Contents
General notes about the labs
Often the lab instructions are intentionally open-ended, and you will have to figure some things out for yourselves. This module is designed to be challenging, as well as fun!
However, we aim to provide a well planned and fluent experience. If you notice any mistakes in the lab instructions or you feel some important information is missing, please let us know and we will try to address any issues.
Preparation
Action: For all of the labs in this module, start by logging into Hacktivity.
Click here for a guide to using Hacktivity. This includes some important information about how to use the lab environment and how to troubleshoot during lab exercises. If you haven’t already, have a read through.
Action: Make sure you are signed up to the module, claim a set of VMs for the web environment, and start your Kali VM.
Feel free to read ahead while the VM is starting.
==VM: Interact with the Kali VM==. ==action: Login with username “kali”, password “kali”==.
Introduction to the approach to lab activities for this module
This module makes use of these great learning resources (amongst others):
- Damn Vulnerable Web App (DVWA): a vulnerable website (written in PHP)
- OWASP WebGoat and WebWolf: an interactive teaching environment for web application security (written in Java)
- OWASP Security Shepherd: a CTF style set of challenges, with some additional training built-in (written in Java)
These lab sheets will guide you through your use of the above and also introduce some important fundamental concepts and techniques.
Understanding cross-site scripting
Cross-site scripting is a type of injection attack where malicious client-side code (typically Javascript) is inserted into a trusted website and executed on the client. There are three types of cross-site scripting:
Reflected
This is the most common type of cross-site scripting attack. It generally occurs when a web-application takes input from the user via a form field and reflects it back to the user without appropriate sanitisation. An attacker will typically send the untrusted code as a parameter embedded in a URL for a trusted website, then get the victim to click on the link by posting it on the Internet or e-mailing it directly to them.
Stored
In this type of cross-site scripting attack, the malicious script is posted to a trusted server and typically stored in a database. It is then sent out to every client that requests the page. Because it does not require the user to click on any links, this is considered the most dangerous type of cross-site scripting. An example of this type of attack is when malicious scripts are posted in online forums or message boards. If not properly escaped or sanitised, the script in the malicious post could run on every client that visits the page.
DOM-Based
This type of cross-site scripting attack is becoming more common with the rise in popularity of Javascript frameworks such as Angular and React. On the one hand, these frameworks offer a more responsive user experience by moving some of the application behaviour to the client side. On the other hand, however, the attack surface on the client side is also increased. In a DOM-based cross-site scripting attack, the malicious script is injected into the client (e.g. via a malicious URL) and runs only on the client, modifying their view of the original website, its data and/or behaviour.
A simple example
We are going to create a very simple page which uses PHP to get a parameter called “name”, passed as a query string, and reflect its value back to the user (with no sanitisation).
==action: Open a terminal and type the command below to create a file called hello.php==.
vi hello.php
==action: Press the “i” key to enter “insert mode”==.
==action: Enter and save this content (Ctrl + Shift + V to paste):==
<?php
    $name = $_REQUEST['name'];
    session_start();
?>
<html>
<body>
Hello, <?php echo $name; ?>!
</body>
</html>
==action: Press the “ESC” key to exit “insert mode”==.
Now to ==action: quit and save the file press the “:” key, followed by “wq” (write quit), and press Enter==.
==action: Self-host this PHP, using the PHP built-in webserver:==
php -S 127.0.0.1:8075
Note: 127.0.0.1 is the IPv4 loopback address for localhost (it connects back to the same computer, locally). We need to tell the PHP built-in-webserver to listen on a specific IP address.
==action: From Firefox visit:==
http://localhost:8075/hello.php?name=bob
You should see a dynamic page load, reflecting the name passed as a parameter.
==action: Replace “bob” with== <script type='text/javascript'>alert('xss vulnerability!');</script>
You should see the alert pop up.
Question: Which type of cross-site scripting did you execute?
Question: How would you fix the code to make it more resilient against this type of attack?
Now let’s see if we can steal the session ID cookie.
==action: Replace the previous script with==
<script type='text/javascript'>alert(document.cookie);</script>
Question: What could a malicious user do with this type of information?
Bypassing naïve filter implementations
Many web developers attempt to implement their own filters to protect their applications against cross-site scripting. We are now going to implement a filter, based on a regular expression, that looks for <script> tags and replaces them with an empty string.
==action: Stop the PHP server by pressing Ctrl + C==.
==action: In the terminal, type the command below to create a new file called helloFiltered.php==.
vi helloFiltered.php
==action: Press the “i” key to enter “insert mode”==.
==action: Enter and save this content (Ctrl + Shift + V to paste):==
<?php
$name = preg_replace('#<script(.*?)>(.*?)</script>#is', '', $_REQUEST['name']);
session_start();
?>
<html>
<body>
Hello, <?php echo $name; ?>!
</body>
</html>
==action: Press the “ESC” key to exit “insert mode”==.
Now to ==action: quit and save the file press the “:” key, followed by “wq” (write quit), and press Enter==.
==action: Self-host this PHP, using the PHP built-in webserver:==
php -S 127.0.0.1:8075
==action: To check that things are working as expected, switch to Firefox and visit:==
http://localhost:8075/helloFiltered.php?name=bob
You should see the same dynamic page as you saw in the previous exercise, reflecting the name passed as a parameter back to the user.
Let’s do the same cross-site scripting vulnerability test we did before. ==action: Replace “bob” with==
<script type='text/javascript'>alert('xss vulnerability!');</script>
Question: Did the alert window pop up?
==action: Right-click on the page and select “View Page Source”==.
Question: What happened to your script tags?
==action: Try using the following alternatives:==
<img src=x onerror="alert('xss vulnerability!')"><b onmouseover="alert('xss vulnerability!')">click me</b>
Question: Did it work this time?
In this example, the developer used his own regular expression implementation to filter out script tags. ==hint: Can you see any problems with this approach?==
Question: What would be a better alternative to sanitise the string passed in as a parameter?
Using existing libraries for string sanitisation
Let’s try using a filter provided by PHP for string sanitisation.
==action: Stop the PHP server by pressing Ctrl + C==.
==action: In the terminal, type the command below to create a new file called helloSanitised.php==.
vi helloSanitised.php
==action: Press the “i” key to enter “insert mode”==.
==action: Enter and save this content (Ctrl + Shift + V to paste):==
<?php
$name = filter_var($_REQUEST['name'], FILTER_SANITIZE_STRING);
session_start();
?>
<html>
<body>
Hello, <?php echo $name; ?>!
</body>
</html>
==action: Press the “ESC” key to exit “insert mode”==.
Now to ==action: quit and save the file press the “:” key, followed by “wq” (write quit), and press Enter==.
==action: Self-host this PHP, using the PHP built-in webserver:==
php -S 127.0.0.1:8075
==action: To check that things are working as expected, switch to Firefox and visit:==
http://localhost:8075/helloSanitised.php?name=bob
You should see the same dynamic page as you saw in the previous exercises, reflecting the name passed as a parameter back to the user.
==action: Try the same tests you did before. Replace “bob” with:==
-
<script type='text/javascript'>alert('xss vulnerability!');</script> -
<img src=x onerror="alert('xss vulnerability!')"> -
<b onmouseover="alert('xss vulnerability!')">click me</b>
Question: Did any of them work this time?
Question: Would you say this approach is 100% secure?
Tips for all challenges
Try the suggestions below as a starting point. If you are trying to get through filters on the server side, experiment with tweaking the input (e.g. mixing upper and lower case, inserting a copy of the word that is getting filtered out inside itself). Pay close attention to what is reflected back to the client and use it as a guide to craft your next attempt.
| Suggestions for cross-site scripting testing |
|---|
| <script>alert(‘XSS’)</script> |
| <img src=”#” onerror=”alert(‘XSS’)”/> |
| <input type=”button” onclick=”alert(‘XSS’)”/> |
| <iframe src=”javascript:alert(‘XSS’);”></iframe> |
| <b onmouseover=”alert(‘XSS’)”>click me!</b> |
(remember to click on the button generated and hover over the <b\> tag)
DVWA challenges
==action: In Firefox, navigate to== http://localhost/ and ==action: log in using the default credentials: admin/password==.
Low Security Level
DVWA has four different security levels: low, medium, high and impossible. ==action: Select “DVWA Security” from the left-hand side menu and read the information about what the different security levels mean==. ==action: Ensure “low” is selected==.
Reflected
==action: Select “XSS (Reflected)” from the left-hand side menu==.
==action: Enter any string==.
Note how the string is reflected on the page.
==action: Test if the application is vulnerable to cross-site scripting== by entering one of the strings provided earlier.
Question: Does the user input appear to be validated or sanitised in any way?
==action: Click on the “View Source” button to check if your assumption was correct==.
Tip: As a learning tool, DVWA makes the PHP source code available for you to view. Under normal circumstances, unless you were performing white-box testing, you would have no access to the server-side code.
DOM-based
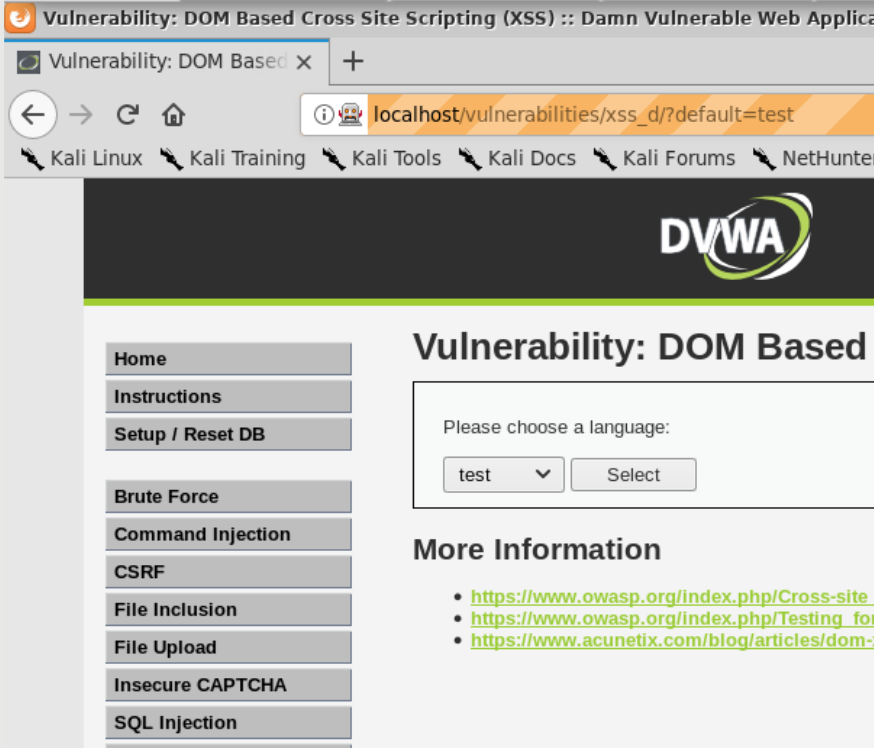
==action: Select “XSS (DOM)” from the left-hand side menu==. ==action: Choose a language from the dropdown list and click “Select”==. Observe what happens to the query parameters in the address bar of the browser every time a new language is selected.
==action: Test if the application is vulnerable to cross-site scripting by replacing the parameter value with one of the strings provided earlier==.
 DOM-based XSS testing
Question: Does the parameter sent to the server appear to be validated or sanitised in any way?
==action: Click on the “View Source” button to check if your assumption was correct==.
Stored
==action: Select “XSS (Stored)” from the left-hand side menu==.
==action: Test if the application is vulnerable to cross-site scripting== by posting a message with one of the strings provided earlier as its content.
==action: Press F5 to refresh the page==.
Question: Why is this type of cross-site scripting attack more dangerous than the two previous ones?
Medium Security Level
==action: Select “DVWA Security” from the left-hand side menu and change the security level to “medium”==.
Reflected
==action: Select “XSS (Reflected)” from the left-hand side menu and try entering the same string you entered for the lower security level==.
Question: Does the user input appear to be validated or sanitised in any way?
Question: What else could you try?
==action: Test other values from the list== of strings provided earlier.
Question: Did any of them work? Which ones?
==action: Click on “View Source” to have a look at the server-side code and use this information to get a XSS attack working==.
DOM-Based
==action: Select “XSS (DOM)” from the left-hand side menu==.
Choose a language from the drop-down list and click “Select”. Now look at the parameter value in the browser’s address bar and try replacing it with the strings you used before.
Question: Can you figure out why none of them works this time?
Tip: The parameter passed in is rendered within a “
 |
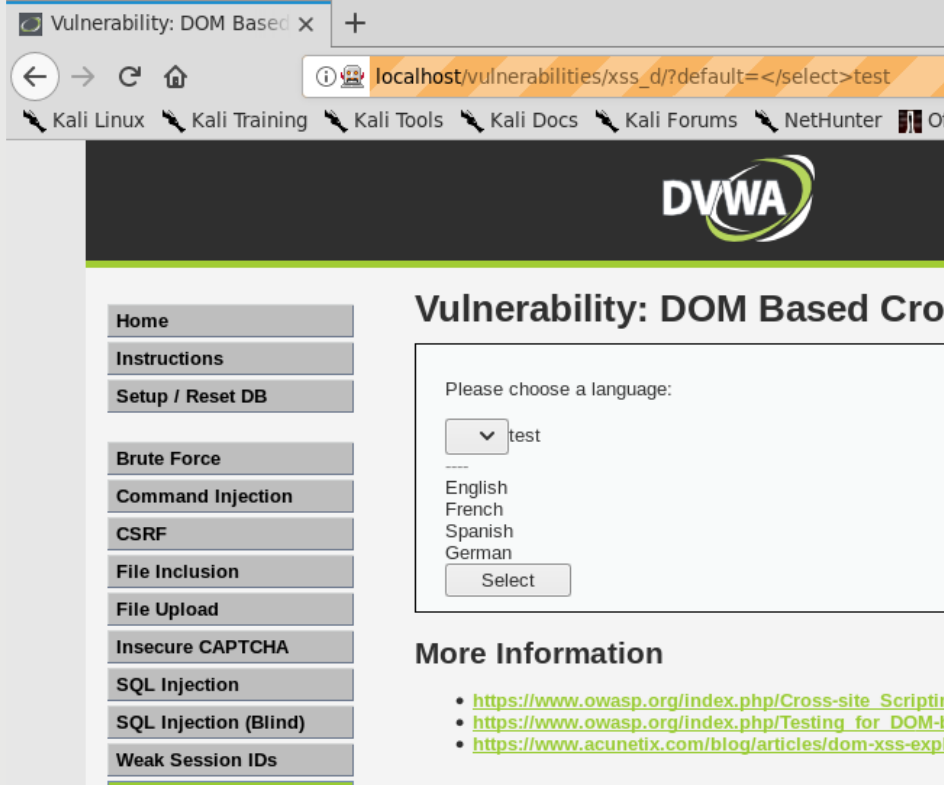 |
|---|---|
Rendered inside the <select> tag. |
Rendered outside the <select> tag. |
==action: Now replace “test”== with the strings you have been working with and see if you can find one that works.
Question: Did any of them work?
==action: Click on the “View Source” button at the bottom of the page==.
Question: Does the server-side code look like what you expected?
Stored
==action: Select “XSS (Stored)” from the left-hand side menu==. ==action: Click on “Clear Guestbook” to stop getting alerts from the exercise you completed before==.
==action: Let’s start by using the suggested== strings you’ve been working with in the “Message” box.
Question: Did any of them work?
Tip: It looks like the box is pretty secure. We may need to attack the “Name” field instead.
Tip: The input field has a limit of 10 characters, which is not really long enough for any of our test strings. Can you think of a way of bypassing this limitation using the browser’s developer tools (F12)?
Once you have worked out how to change the maximum length allowed for the “Name” field, ==action: try entering== the strings you have been working with in this field.
Question: Did any of them work?
==action: Click on the “View Source” button at the bottom of the page==.
Question: Does the server-side code look like what you expected?
High Security Level
==action: Select “DVWA Security” from the left-hand side menu and change the security level to “high”==.
Reflected
==action: Select “XSS (Reflected)” from the left-hand side menu and try the values== from the list of strings provided earlier.
Question: Did any of them work?
==action: Click on the “View Source” button at the bottom of the page==.
Question: Why does this implementation provide weak protection against cross-site scripting attacks?
DOM-Based
==action: Select “XSS (DOM)” from the left-hand side menu==. ==action: Choose a language from the drop-down list and click “Select”==. Now look at the parameter value in the browser’s address bar and ==action: try replacing it== with the strings you used before.
This is a more difficult challenge, as the server is whitelisting the strings it accepts. ==action: You can see this by clicking on the “View Source” button at the bottom of the page==.
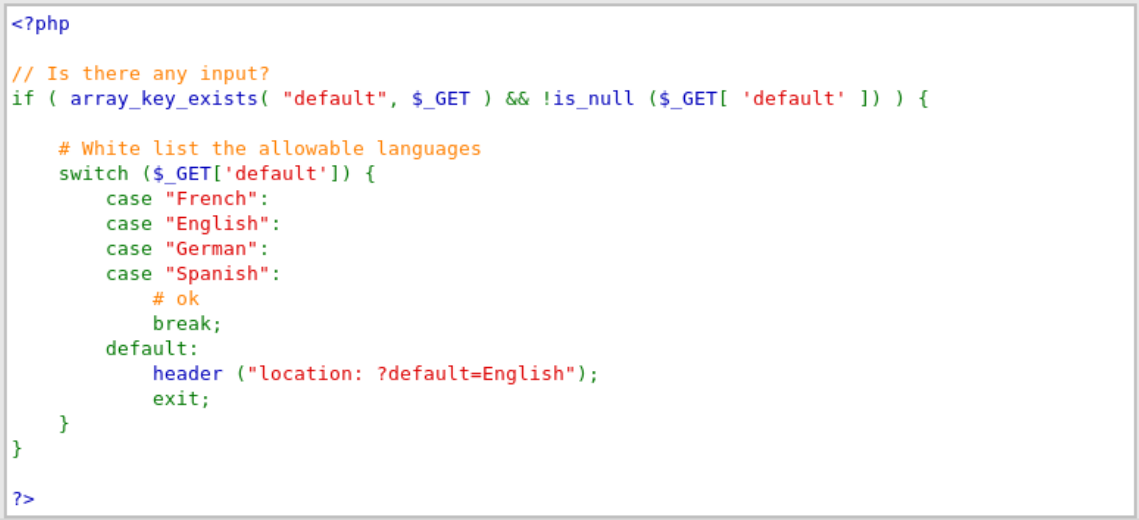 Server-side whitelist code
Tip: As you tried the strings provided, you may have noticed, incidentally, that some text was reflected back to the user with the string below:
 Reflected text example
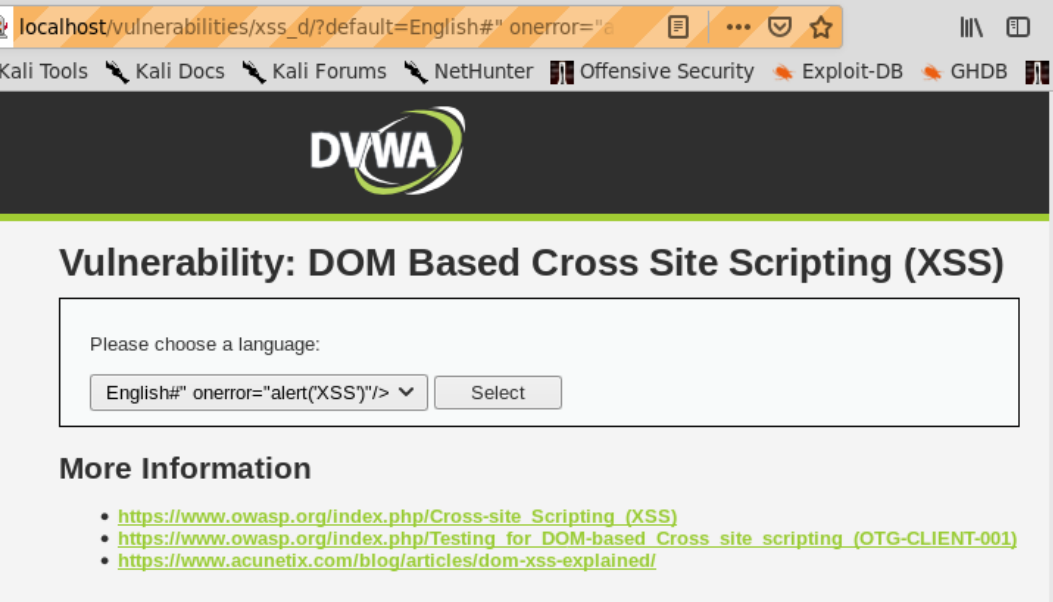 URL fragment example
Tip: Note how everything after the “#” was rendered inside the dropdown list. This is a good starting point. You can try sending your script as a HTML fragment (appended to the URL following a “#”):
 HTML fragment attack example
Question: Was the attack successful?
Tip: If your script is not being picked up, try changing the value for the language and re-submitting.
Stored
==action: Select “XSS (Stored)” from the left-hand side menu==. ==action: Click on “Clear Guestbook” to stop getting alerts from the exercise you completed before==.
This level is not much different from the previous level (medium), follow the same steps and try the different strings provided.
Log in to WebGoat and work through learning tasks
==action: Access WebGoat by visiting:==
http://localhost:8085/WebGoat
==action: Log in (create a new user if you are on a new VM)==.
Action: This week, work through (and refer to the tips below):
Action: * Cross-Site Scripting (1-12)
General Tips
Sometimes WebGoat will mark tasks you have just completed as red. If you refresh the page and wait, they may turn back to green. This is a bug in the application which can be quite annoying, but it doesn’t stop you from completing future tasks. Our advice is to just ignore it for now. Let us know if it becomes a problem.
You may want to set up the filters again in Zap to exclude internal requests from the WebGoat framework. In the History tab, at the bottom,
==action: Click on the filter icon==.
==action: Enter the following information:==
| URL Inc Regex | URL Exc Regex |
|---|---|
http://localhost:8085/WebGoat/.* |
.*/WebGoat/service/.*mvc |
==action: Click “Apply”==.
Don’t forget to delete these filter settings when you switch to a different learning platform, e.g. Security Shepherd.
Exercise 2 Tips
The Javascript alert code does not work from the Firefox address bar. To complete this exercise, ==action: try running it on Chrome, outside the Kali VM==. Remember that, if you cut and paste, you will need to add the “javascript:” back in.
Exercise 10 Tips
The base route is: start.mvc#lesson/
The test route is something similar. Use the developer tools in Firefox to look at the source scripts and search for “route”. Open the Javascript file and see if you can find the test route.
Exercise 11 Tips
You may need to escape the forward slash “/”. Use “%2F” instead.
You will most likely need a proxy to analyse the response and find the secret number to submit.
Log into Security Shepherd and work through assessed tasks
Flag: For this week, complete the challenges for:
- Cross-Site Scripting (XSS)
Challenge 2 Tips
Hint: Some event attributes are being filtered, but maybe not all of them. Have a look at the list below for other possibilities:
https://www.w3schools.com/tags/ref_eventattributes.asp
Challenge 3 Tips
Hint: It looks like the filters that remove the unwanted words are being applied in a loop. Try inserting a copy of the word that is getting filtered out inside itself. Several times!
Challenge 4 Tips
Hint: The string you enter representing an URL is being rendered inside an anchor tag (
<a>). Experiment with using double quotation marks to end the string, and inserting your script as an attribute of the anchor tag. If your event attribute is getting filtered or sanitised, try mixing cases.
Challenges 5 and 6 Tips
Hint: These are not very difficult and are similar to Challenge 4. It is all about ending the URL string inside the anchor tag, then inserting your script as an event attribute.
Conclusion
At this point you have:
-
Learned about cross-site scripting attacks and understood what makes a web application vulnerable to them
-
Simulated the interactions between a client and a Web server using Firefox and the built-in PHP webserver to understand how malicious code sent by a client is reflected by the server and executed on the client
-
Understood the implications of using naïve filter implementations and compared this approach to using a trusted library for sanitising user input on the server side
-
Learned about the three different types of cross-site scripting attacks: reflected, DOM-based and stored, and used DVWA to gain a practical understanding of these types of attacks
-
Completed lessons and challenges independently using both the WebGoat and Security Shepherd learning platforms to verify your knowledge of cross-site scripting in a practical context
Congratulations! This week’s lab was longer than usual, with more tasks to complete in all three learning platforms. Cross-site scripting is the most prevalent type of web application attack, so it is important that you build a solid foundation by practicing in a variety of different scenarios.