Contents
Introduction
This week, we start with understanding how branching and conditionals are represented in assembly. We then move onto learning how to identify the common C code constructs we saw in previous weeks in disassembled code, namely loops, function calls, switch statements, arrays and structs.
Branching and Conditionals
Branching in assembly takes place when execution is transferred to a different memory address. Instead of the code being executed linearly, you see it jump to a named memory address, usually as a result of evaluating a condition.
There are two types of jumps: unconditional and conditional. Unconditional jumps, as the name implies, force the code to jump to a given memory address every time the execution hits that point. It is represented in assembly as:
jmp address
Conditional jumps are taken as a result of some condition. Typically, when two values are compared, the EFLAGS register is updated with the result of the operation. Conditional jumps check the value of different flags in the EFLAGS register to decide whether to jump to a different memory address or continue executing the next instruction in line. There are many different types of conditional jumps. The main ones we are going to be using are summarised in the table below, which you can use (and update) as you work on your challenges:
| Jump | Description | Flags |
|---|---|---|
jz |
Jump if zero | ZF = 1 |
jnz |
Jump if not zero | ZF=0 |
je |
Jump if equals (same as jz) | ZF = 1 |
jne |
Jump if not equals (same as jnz) | ZF=0 |
jg |
Jump if destination greater than source | ZF=0 and SF=0 |
ja |
Same as jg, but unsigned | ZF=0 and SF=0 |
jge |
Jump if destination greater than or equal to source | SF=0 |
jae |
Same as jge, but unsigned | SF=0 |
jl |
Jump if destination less than source | SF=1 |
jb |
Same as jl, but unsigned | SF=1 |
jle |
Jump if destination less than or equals source | ZF=1 or SF=1 |
jbe |
Same as jle, but unsigned | ZF=1 or SF=1 |
jc |
Jump if carry | CF=1 |
Tip: The sign flag (SF) means the operation produced a negative result.
Conditional jumps usually follow a comparison or test. For example:
0x4041..         mov eax, 0x1
0x4041..         mov edx, 0x2
0x4041..         cmp eax, edx
0x4041..         jne 0x5583d4
0x4041..         xor eax, eax
The first line populates EAX with the value 0x1. The second populates EDX with the value 0x2. The third line compares the value stored in EDX with the value stored in EAX. Since they are not the same, this operation sets the zero flag (ZF) to zero. Finally, the fourth line jumps to address 0x5583d4 if the values are not equal, i.e. if ZF is set to zero. Since we know that this is the case, we also know that the jump will be taken and the fifth line will not be executed.
You can use an online asm compiler such as Rextester to test your code. Let’s modify the code above so we can test it:
mov eax, 0x1	; move the literal value 0x1 to the EAX register
mov edx, 0x2	; move the literal value 0x2 to the EDX register
cmp eax, edx	; compare EAX to EDX (or subtract EDX from EAX)
je end		; if the values are equal or ZF=1, jump to end
In the screenshot below, we reused the default “Hello, world!” example that appears when you load Rextester and inserted a label called “end” just before the _start function’s epilogue. We then added our code to the top of the _start function. This way, if the jump is taken, the code that prints “Hello, world!” is skipped and the message is not printed to the screen. Otherwise, it is. Try it for yourself!
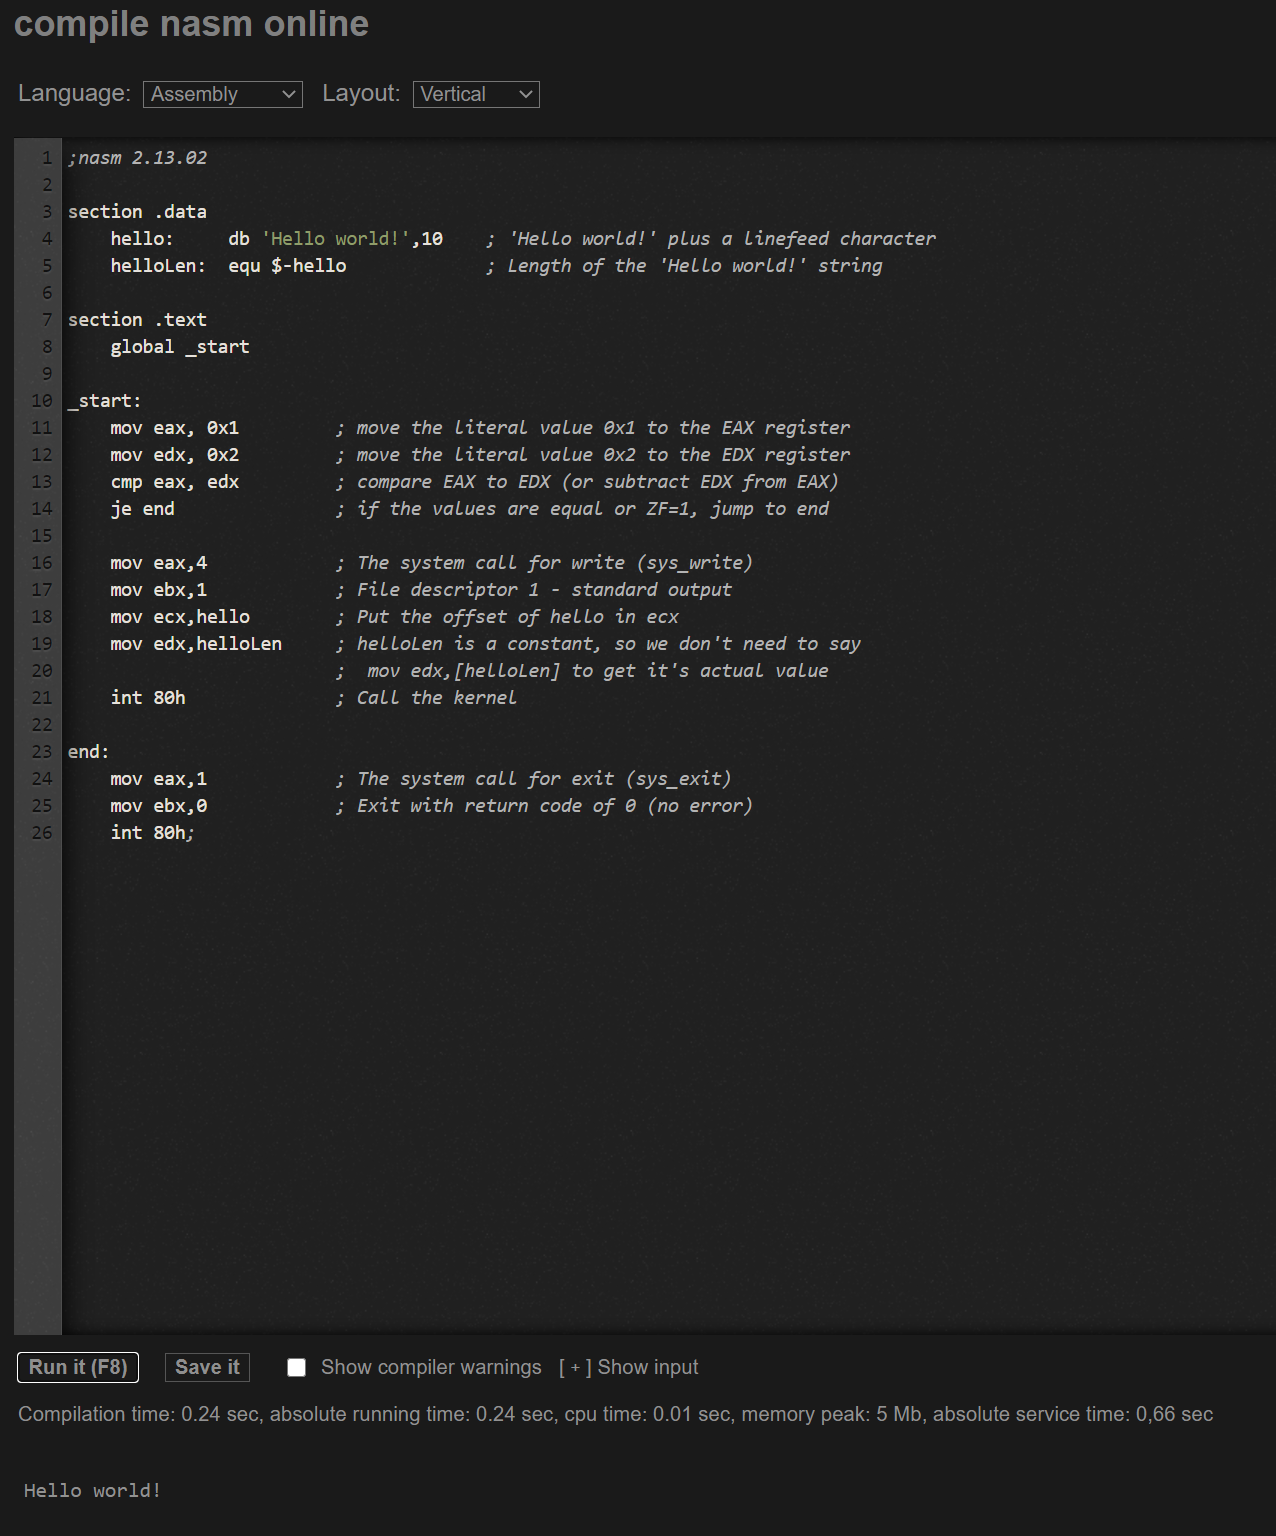
==action: Modify the code above. Use a different jump to ensure the jump is taken and “Hello, world!” is not printed.==
The cmp instruction is very similar to the sub instruction we saw last week, but with a difference: cmp does not modify the value of the operands, it is used only to set flags.
Question: If you change the je jump to jg, will the jump be taken? How about if you change it to jl?
If Statements
We have learned that if statements are used to execute a block of code depending on whether a certain condition is met. In assembly, if statements will inevitably involve a jump.
Let’s look at a simple example.
==action: Create a file called simple-if-else.c and enter the following code:==
int main (void) {
   int i = 5;
   int j = 0;
   if (i > 3) {
       j = i;
   } else {
       return 1;
   }
   return 0;
}
The code does not do much. It declares two local variables, i and j, and assigns them the values 5 and 0 respectively.
An if statement is then used to check whether i is greater than 3. If it is, it assigns the value of i to j. If it isn’t, it does nothing and returns 1.
==action: Compile your code using gcc:==
gcc -m32 simple-if-else.c -o simple-if-else
==action: Now disassemble the executable using objdump:==
objdump -M intel -d ./simple-if-else
==action: Scroll to find the main() function.==
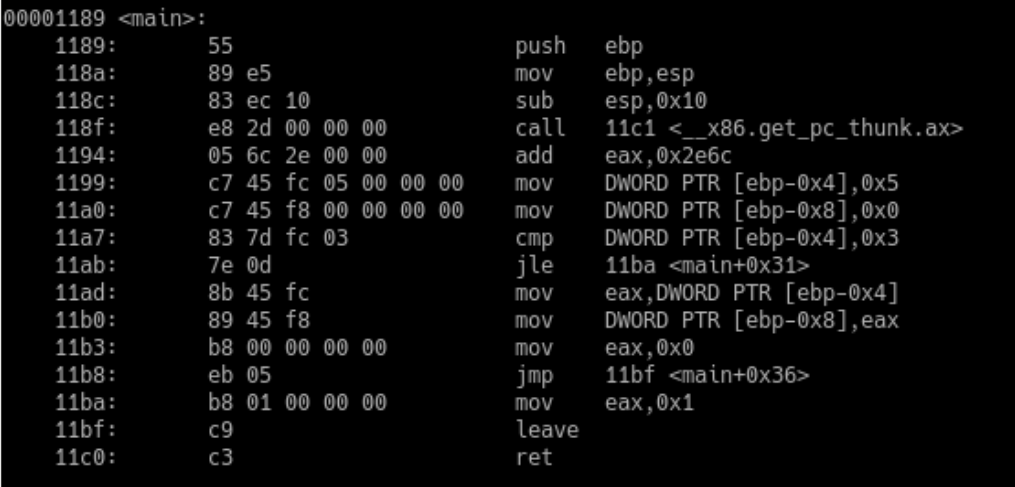 Disassembled main() function for the simple-if-else program
Let’s take a closer look at the disassembled main() function to understand what it does. The first couple of lines are known as the function prologue and are responsible for creating a new stack frame for the function. The instructions push ebp and mov ebp, esp appear in most functions, as does the function epilogue in line 11bf. The function epilogue restores the stack to its previous state by setting ESP to EBP and popping EBP from the stack.
Tip: The leave instruction is equivalent to
mov esp, ebp, followed bypop ebp.
Lines 1199 and 11a0 allocate the literal values 0x5 and 0x0 to the stack variables ebp-0x4 (i in our C code) and ebp-0x8 (j in our C code). Remember stack variables appear in assembly code as offsets of EBP, so ebp-0x4 is enough space for 4 bytes, and ebp-0x8 is also 4 bytes. This makes sense, since we are dealing with ints, which occupy 4 bytes.
In line 11a7, the literal value 0x3 is compared to ebp-0x4 (i). In the following line, we have a conditional jump. If the result of the cmp operation is less than or equal to 0x3, we jump all the way to line 11ba, where the literal value 0x1 is moved to EAX before we return from the function.
==action: Consider what happens if the jump on line 11ab is not taken (line 11ad onwards).==
Loops
Loops are similar to conditional statements in that, in order to identify them, we typically look for a jump. The one important difference to keep in mind is that, in loops, the jump happens backwards.
Let’s work through a simple example.
==action: Create a file called simple-loop.c and enter the following code:==
int main (void) {
   int x;

   int counter;
   for (counter = 0; counter < 3; counter++) {
       x = counter;
   }
   return 0;
}
The code is once again very simple. It declares a local variable of type int called x. Next, it declared the variable counter to use in the for loop. The for loop iterates three times, each time assigning the value of the counter to x. Finally, the function returns 0;
==action: Compile your code using gcc:==
gcc -m32 simple-loop.c -o simple-loop
==action: Disassemble the executable using objdump:==
objdump -M intel -d ./simple-loop
==action: Scroll to find the main() function.==
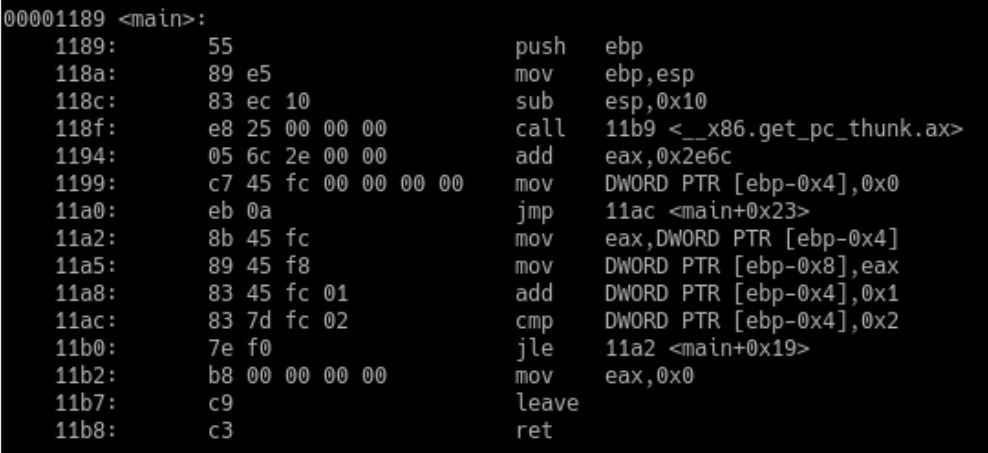 Disassembled main() function for the simple-loop program
We learned in a previous lab that a for loop is split into initialisation, test and increment. Let’s see if we can identify these elements in our disassembled code.
Note how the counter variable is referred to as DWORD PTR [ebp-0x4], whilst x is referred to as DWORD PTR [ebp-0x8]. This is because they are both local variables. They live on the stack and are defined as an offset from EBP, the base pointer for the stack. The size is expressed as a double word (DWORD), which is 32 bits (remember this is also the size of an int). To make the code more legible, we could rename DWORD PTR [ebp-0x4] as counter and DWORD PTR [ebp-0x8] as x:
00001189 <main>:
    1189:       55                      push   ebp
    118a:       89 e5                   mov    ebp,esp
    118c:       83 ec 10                sub    esp,0x10
    118f:       e8 25 00 00 00          call   11b9 <__x86.get_pc_thunk.ax>
    1194:       05 6c 2e 00 00          add    eax,0x2e6c
    1199:       c7 45 fc 00 00 00 00    mov    counter,0x0
    11a0:       eb 0a                   jmp    11ac <main+0x23>
    11a2:       8b 45 fc                mov    eax,counter
    11a5:       89 45 f8                mov    x,eax
    11a8:       83 45 fc 01             add    counter,0x1
    11ac:       83 7d fc 02             cmp    counter,0x2
    11b0:       7e f0                   jle    11a2 <main+0x19>
    11b2:       b8 00 00 00 00          mov    eax,0x0
    11b7:       c9                      leave
    11b8:       c3                      ret
Now we can focus on the code from 1199:. First of all, the value 0x0 is stored in the counter variable. This is the loop initialisation. Next, there is an unconditional jump to line 11ac. If we follow the code, we see that line 11ac contains the loop’s test: the counter variable is compared with the literal 0x2. The next line, 11b0, is a conditional jump. If the operation below resulted in less than or equal, we jump backwards to line 11a2. Otherwise, we continue to move 0x0 to EAX (return zero) and leave the function.
For the first iteration of the loop, the value of counter is 0x0. This means the jump is taken, and we go backwards to line 11a2. The value of counter is moved to EAX, then the value of EAX is moved to x. This is the same as saying x = counter. Finally, we increment the counter by adding 0x1 to it. Once again, we hit the test in line 11ac. Since the value of counter is 0x1, it is still less than 0x2, so we jump backwards to line 11a2. The code keeps jumping backwards until counter is greater than 0x2. When this happens, the backwards jump is not taken and the function returns zero.
Now it’s your turn. ==action: Change the simple for loop above into a do while loop. Compile your code using gcc, then disassemble it using objdump.==
==action: Identify the loop’s initialisation, test and increment in the disassembled code. Observe the point at which the code jumps backwards.==
Switch Statements
The best way to learn how to identify a switch statement in disassembled code is by looking at one.
==action: Let’s start by creating a file called simple-switch.c and entering the following code:==
int main (void) {
   int x = 3;
   char result;

   switch (x) {
       case 0:
           result = 'a'; //0x61 in ASCII
           break;
       case 1:
           result = 'b'; //0x62 in ASCII
           break;
       case 2:
           result = 'c'; //0x63 in ASCII
           break;
       case 3:
           result = 'd'; //0x64 in ASCII
           break;
       default:
           result = 'e'; //0x65 in ASCII
           break;
   }
   return 0;
}
The code above declares a local variable of type int called x and assigns it the value 3. It also declares a local variable of type char called result. The switch statement checks the value of x against the value of each case, in order. If a match is found, it executes the code within the case(s) until it encounters a break. Finally, the function returns 0;
This is just standard behaviour for a switch statement in C, as we saw in Week 2. Since in assembly language characters are encoded in ASCII, the ASCII translation for each character used is added as a comment for your convenience.
==action: Compile your code using gcc:==
gcc -m32 simple-switch.c -o simple-switch
==action: Disassemble the executable using objdump:==
objdump -M intel -d ./simple-switch
==action: Scroll to find the main() function.==
 Disassembled main() function for the simple-switch program
Following the previous example, let’s do some renaming to make it easier for us to read the disassembled code. First, we replace DWORD PTR [ebp-0x4] with x. Looking at the disassembled code, we can also see that the local variable we called result appears as BYTE PTR [ebp-0x5]. Since it is of type char, it only occupies one byte, so you only need to increase the offset from ebp by one. Let’s rename BYTE PTR [ebp-0x5] as result. Note how the literal 0x3 is assigned to x in line 1199, followed by a series of cmp statements that check the value of x against 0x0, 0x1, 0x2 and 0x3. This is shown inside the separated middle section in the code below.
00001189 <main>:
    1189:       55                      push   ebp
    118a:       89 e5                   mov    ebp,esp
    118c:       83 ec 10                sub    esp,0x10
    118f:       e8 52 00 00 00          call   11e6 <__x86.get_pc_thunk.ax>
    1194:       05 6c 2e 00 00          add    eax,0x2e6c
    1199:       c7 45 fc 03 00 00 00    mov    x,0x3

    11a0:       83 7d fc 01             cmp    x,0x1
    11a4:       74 22                   je     11c8 <main+0x3f>
    11a6:       83 7d fc 01             cmp    x,0x1
    11aa:       7f 08                   jg     11b4 <main+0x2b>
    11ac:       83 7d fc 00             cmp    x,0x0
    11b0:       74 10                   je     11c2 <main+0x39>
    11b2:       eb 26                   jmp    11da <main+0x51>
    11b4:       83 7d fc 02             cmp    x,0x2
    11b8:       74 14                   je     11ce <main+0x45>
    11ba:       83 7d fc 03             cmp    x,0x3
    11be:       74 14                   je     11d4 <main+0x4b>
    11c0:       eb 18                   jmp    11da <main+0x51>

    11c2:       c6 45 fb 61             mov    result,0x61
    11c6:       eb 17                   jmp    11df <main+0x56>
    11c8:       c6 45 fb 62             mov    result,0x62
    11cc:       eb 11                   jmp    11df <main+0x56>
    11ce:       c6 45 fb 63             mov    result,0x63
    11d2:       eb 0b                   jmp    11df <main+0x56>
    11d4:       c6 45 fb 64             mov    result,0x64
    11d8:       eb 05                   jmp    11df <main+0x56>
    11da:       c6 45 fb 65             mov    result,0x65
    11de:       90                      nop
    11df:       b8 00 00 00 00          mov    eax,0x0
    11e4:       c9                      leave
    11e5:       c3                      ret
The code inside each switch case is shown below the second break (from 11c2).
==action: Highlight the breaks inside each switch case in the code above. Do they jump to the same instruction, or to different places? Why?==
Question: Can you tell for sure that the code above is a switch statement and not a bunch of if statements?
Arrays and Strings
In C, we define arrays as data structures used to store a predetermined number of elements of the same type. We have learned that the elements of an array are stored next to each other in memory.
Well, in assembly, there is no such thing as an array, so we learn to identify arrays by the way chunks of memory of identical size are stored contiguously in memory. Let’s look at a very simple example using an array of ints.
==action: Create a file called simple-array.c and enter the following code:==
int main (void) {
   int myArray[4];
   myArray[0] = 10;
   myArray[1] = 11;
   myArray[2] = 12;
   myArray[3] = 13;
   return 0;
}
The code above simply initialises an int array of 4 elements and assigns it the values 10, 11, 12 and 13. The function then returns 0.
==action: Compile your code using gcc:==
gcc -m32 simple-array.c -o simple-array
==action: Disassemble the executable using objdump:==
objdump -M intel -d ./simple-array
==action: Scroll to find the main() function.==
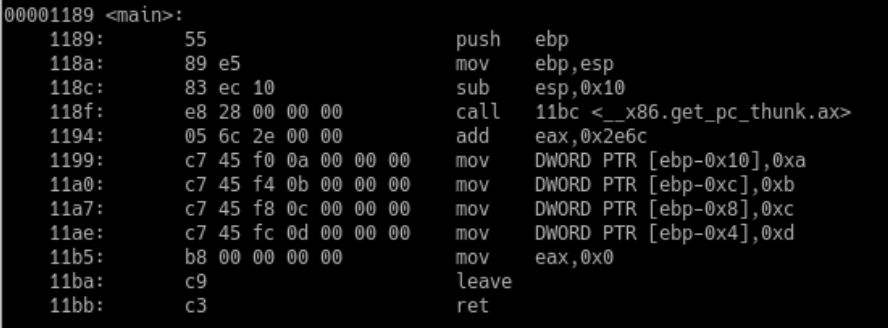 Disassembled main() function for the simple-array program
Note how the array elements are accessed and assigned different values in lines 1199 to 11ae. You can see by the fixed-size offsets from EBP that each array element is 4 bytes in size and stored contiguously.
Question: Why is the first element of the array stored at the largest offset from EBP (line 1199)?
==action: Modify the code above so your array is declared as a global variable instead of local variable. Compile the code, then disassemble it and scroll to the main function.==
Question: Did anything change in the way the array elements are stored/accessed?
Let’s now work through a string example that uses pointers to see how these are represented in assembly. Remember a string is nothing but an array of characters so, essentially, this example is not much different from the previous one.
==action: Create a file called simple-string.c and enter the following code:==
int main (void) {
   char *myPointer = "hello";
   char firstCharacter = myPointer[0];
   char lastCharacter = myPointer[5];
   return 0;
}
The code above declares a pointer called myPointer and assigns it the string “hello”. We then use square brackets (array notation) to access the first and last elements of our string and assign them to char variables called firstCharacter and lastCharacter. Finally, the function then returns 0. There is nothing new here, we have worked through plenty of similar examples in previous weeks.
==action: Compile your code using gcc:==
gcc -m32 simple-string.c -o simple-string
==action: Disassemble the executable using objdump:==
objdump -M intel -d ./simple-string
==action: Scroll to find the main() function.==
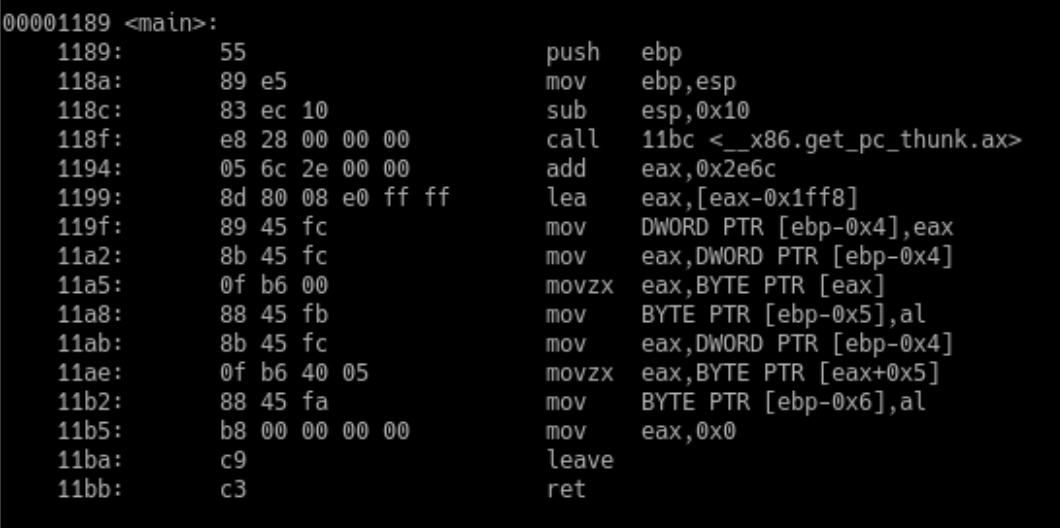 Disassembled main() function for the simple-string program
The first thing to note here is the lea instruction on line 1199. It loads the data at the address [eax-0x1ff8] into EAX.
Question: Can you guess what this data is?
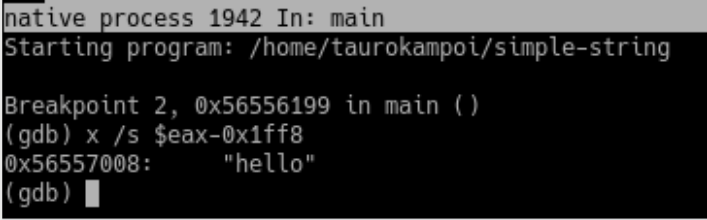 Checking the value of
 [eax-0x1ff8] using dynamic analysis with gdb
We will learn how to perform dynamic analysis in a future lab. For now, you can guess that the value loaded by the lea instruction on line 1199 into the EAX register is the string “hello”.
The next instruction on line 119f proceeds to load the value of EAX into a local variable. We know this is a local variable because it is referred to as an offset of EBP: DWORD PTR [ebp-0x4].
Question: Why is this local variable 4 bytes (32 bits)? Doesn’t the string “hello” occupy six bits?
The next instruction of interest to us is in line 11a5. The BYTE PTR [eax] notation means we are following the address stored in EAX and moving one byte from the data back into EAX. We then retrieve the AL part of EAX (last 8 bits) and put it in another local variable: BYTE PTR [ebp-0x5] or firstCharacter in our C code.
Question: Following the example above, explain how the last character of the string is assigned to another local variable (lines 11ab to 11b2).
Structs
It may not come as a surprise that, in assembly, there is no such thing as a struct either. As with arrays, we learn to identify structs by the way the memory is allocated and elements are accessed as an offset from the start of the struct. Let’s look at a simple example.
==action: Create a file called simple-struct.c and enter the following code:==
#include <malloc.h>

struct Coffee {
   int volume;
   short int roast;
   char size;
};

int main (void) {
   struct Coffee *espresso = malloc(sizeof(struct Coffee));
   espresso->volume = 40;
   espresso->roast = 5;
   espresso->size = 'S';

   return 0;
}
The code above starts by declaring a simple struct called Coffee. In the main function, a pointer named espresso is declared, and the malloc() function is used to allocate enough memory for it on the heap. Next, we assign values to our coffee’s volume, roast and size. Finally, the function returns 0.
==action: Compile your code using gcc:==
gcc -m32 simple-struct.c -o simple-struct
==action: Disassemble the executable using objdump:==
objdump -M intel -d ./simple-struct
==action: Scroll to find the main() function.==
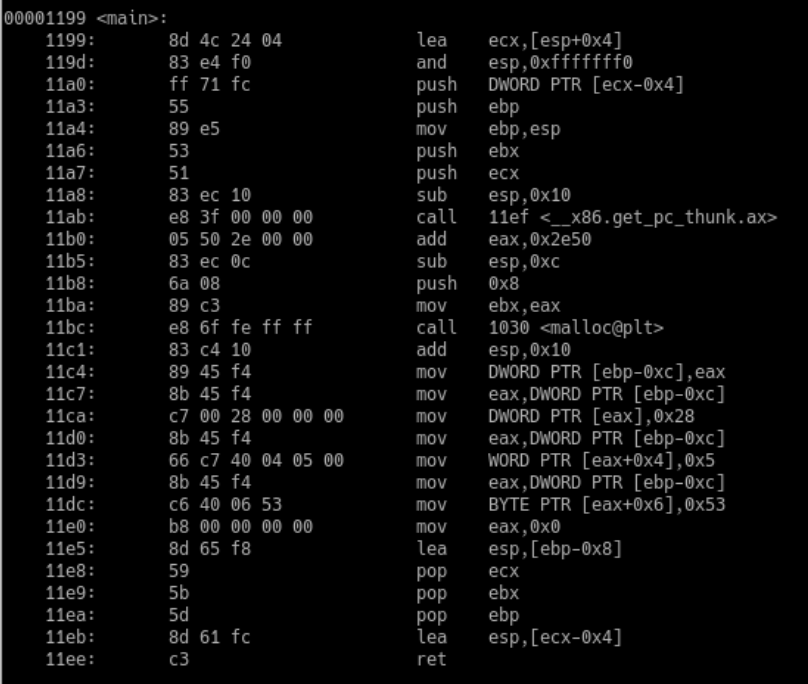 Disassembled main() function for the simple-struct program
We are mainly interested in the code which follows the call to malloc() in line 11bc. We know that the function’s return value is stored in the EAX register. We also know, from working with C, that malloc() returns a pointer. Note how, in line 11c4, the value of EAX (our struct pointer) is put in a local variable referred to as DWORD PTR [ebp-0xc]. This is our espresso variable. Let’s substitute DWORD PTR [ebp-0xc] with espresso for ease of understanding.
    11c4:       89 45 f4                mov    espresso,eax
    11c7:       8b 45 f4                mov    eax,espresso
    11ca:       c7 00 28 00 00 00       mov    DWORD PTR [eax],0x28
    11d0:       8b 45 f4                mov    eax,espresso
    11d3:       66 c7 40 04 05 00       mov    WORD PTR [eax+0x4],0x5
    11d9:       8b 45 f4                mov    eax,espresso
    11dc:       c6 40 06 53             mov    BYTE PTR [eax+0x6],0x53
Continuing onto line 11c7, we first move our espresso pointer to EAX. Next, we follow the pointer stored in EAX and put the literal value 0x28 (number 40 in decimal) in that location (line 11ca).
Once again, we move the espresso pointer to EAX. This time, we follow the address at [eax + 0x4] and put the literal value 0x5 (number 5 in decimal) in that location. Remember that the espresso pointer points to the start of the struct. We want to move 4 bytes along to skip the volume, defined as an int, and arrive at the roast. Line 11d3 moves the literal value 0x5 into that location. Note how the destination is specified as a WORD, i.e. 2 bytes in size.
Question: Following the example above, explain what happens in lines 11d9 and 11dc.
CTF Challenges
Flag: This week, you have two challenges to complete in your VM and two flags to find.
Hints
Hint: Here are some hints to help you find this week’s flags - if you prefer to try first on your own, skip this section.
LoopMulti
Hint: Disassemble the executable using objdump and scroll to find the loop_multi() function.
Hint: Find the places where the execution jumps backwards. Note the cmp instructions that precede these jumps.
Hint: Translate the literal hex values to decimal. Finally, don’t forget that the count starts at 0, so adjust the results accordingly.
SwitchTable
Hint: Disassemble the executable using objdump and scroll to the main() function.
Hint: Find the call to scanf(). This is the function responsible for reading input from the terminal at runtime. Note how, just after the function call, the user input is loaded into EAX and a hexadecimal literal is subtracted from it. Make a note of it. Whatever is left after the subtraction is compared to 0x4, and the execution jumps to the end of main() if the value is greater than 0x4.
Hint: We don’t want it to jump, so we know that we must enter a value greater than the hexadecimal literal we wrote down, but lower than that value + 0x4. This leaves us with four possibilities: value + 0, value + 1, value + 2 or value + 3.
Hint: You can get the flag by elimination from this point, but try to examine the code for the switch table towards the end of the main() function to work out which options holds the call to printflag().
Conclusion
At this point you have:
- Developed a more in-depth understanding of 32-bit x86 assembly language,
- Learned to recognise branching, conditionals, loops, switch statements, arrays, strings and structs in assembly language,
- Practiced mapping the constructs above from assembly back to C and vice-versa,
- Solved practical CTF challenges and found 2 more flags!
Well done!
This concludes our fundamentals in C and assembly. Remember: practice makes perfect, so keep working hard on the exercises and keep referring back to these introductory materials as and when you need them. Now that you know how to create simple C programs, compile and disassemble them, you can use this technique to help you with your future investigations.