Contents
Introduction
This week, we will finish our crash course in C programming by looking at structs, a data type used to represent composite data, memory management (one of the biggest strengths of the C language), and bitwise operators, which you will find particularly helpful when looking at disassembled code. We will then change our focus to assembly language for 32-bit x86 processors. Starting with some basics, we will familiarise ourselves with registers, flags and operands before moving to simple instructions and finally stack instructions.
Structs
Structs are a data type in C used for composite data.
If you come from an object-oriented background, you may think of structs as something similar to a class (without methods). Remember, however, that C is not an object-oriented language, so there are no such things as classes or objects.
Let’s look at a code example:
struct Person {
   char *name;
   int age;
   float height;
   float weight;
};
The code above declares a struct called Person. Here is how to actually create a Person:
struct Person person;
And to access the struct’s attributes, you can simply use the “.” operator.
person.name = "John";
person.age = 30;
person.height = 180.5f;
person.weight = 85.0f;
Let’s put it all together and run some code.
==action: Create a file called person.c and enter the following code:==
#include <stdio.h>

struct Person {
   char *name;
   int age;
   float height;
   float weight;
};

int main (int argc, char *argv[]){
   struct Person person;
   person.name = "John";
   person.age = 30;
   person.height = 180.5f;
   person.weight = 85.0f;

   printf("The person's name is: %s.\n", person.name);
   printf("%s is %d years old.\n", person.name, person.age);
   printf("%s is %g cm tall and weighs %g kg.\n", person.name,
          person.height, person.weight);
}
==action: Compile and run your code.==
Action: Create a struct for a car. A car should have a make, model, colour and year of manufacture. Initialise a car and print its attributes following the example above.
Memory Management
Last week, we saw how local variables, declared and initialised inside functions, had local scope (they were only available from within the function). Global variables, on the other hand, were declared outside any functions and had global scope, meaning they were available from within any function. We are going to take a closer look at different ways to declare and initialise variables in C, with a focus on what exactly happens in memory in each scenario.
The figure below shows the memory layout of a C program. When a program is executed, the sections containing text (the compiled code) and data (static and global variables) are loaded at the lowest memory addresses. The amount of memory needed to hold this data is calculated at compile time, and remains allocated until the program finishes executing.
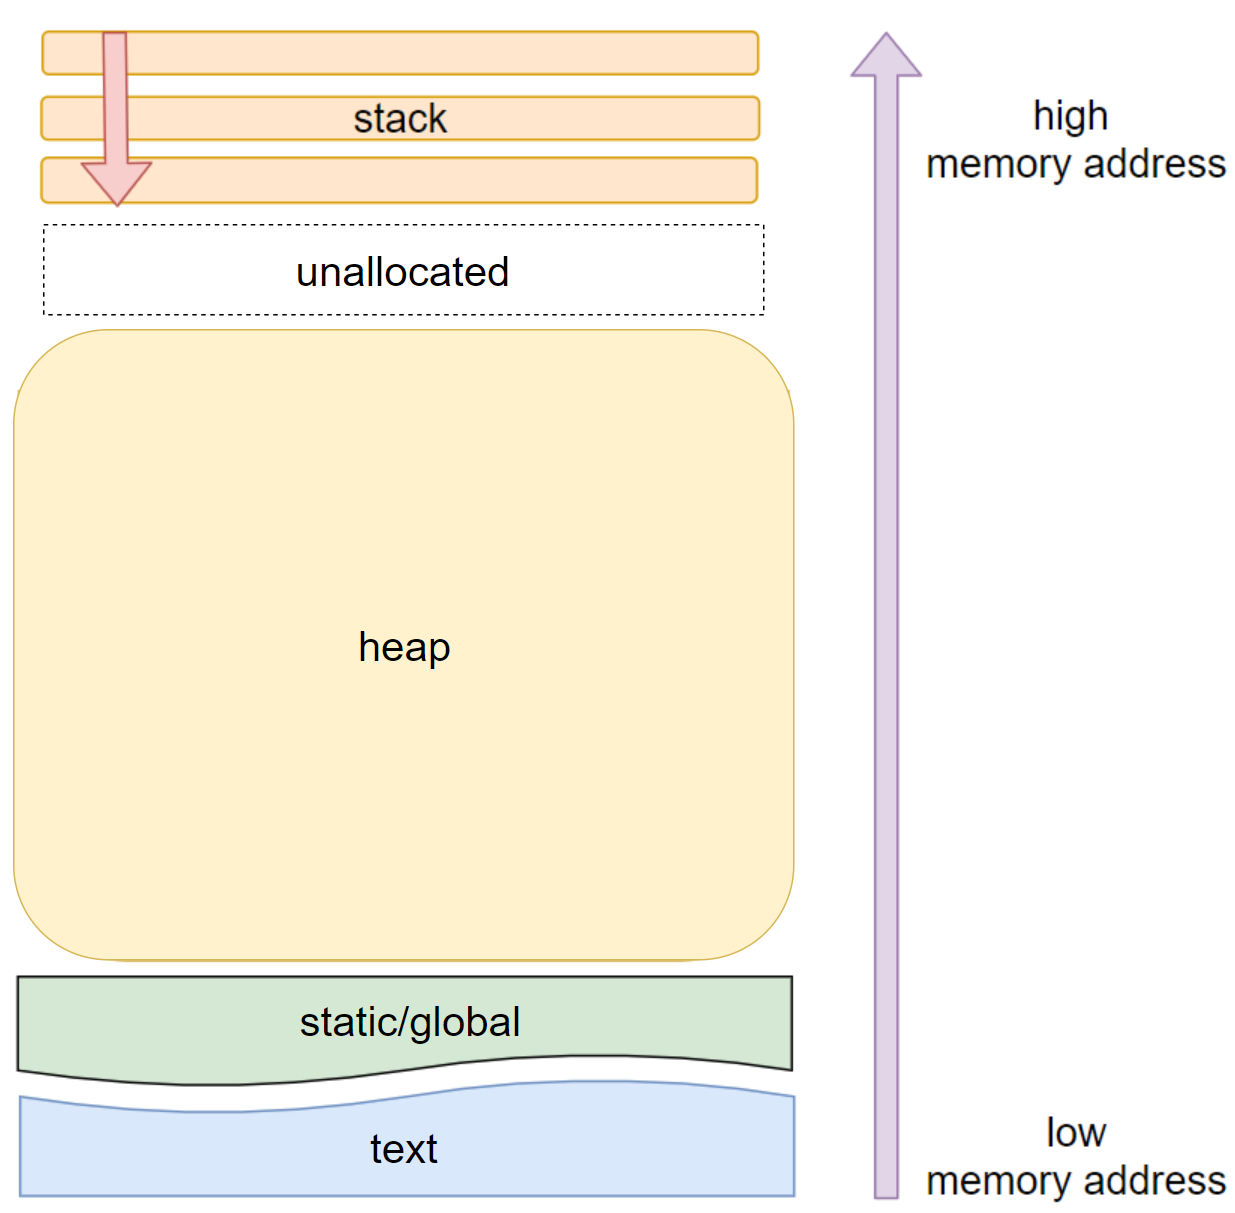 Memory layout of a C program in an x86 architecture
In x86 architectures, the stack starts at the highest memory address and grows downwards. As more elements are pushed to the stack, the stack pointer moves downwards and the stack grows. Conversely, as elements are popped from the stack, the stack pointer moves upwards and the stack shrinks. The stack is the part of memory used to store a program’s local variables. It operates on a LIFO (last in, first out) basis. Think of it like a pile of egg boxes in the supermarket: new egg boxes are placed on top of the pile, and if you need to take one, you take the top one. When talking about stacks, you use the terms “push” for adding elements and “pop” for removing elements.
Finally, the heap is the place in memory where dynamic allocations occur. We know that local variables have local scope, which means they only exist for as long as the function where they were declared is executing. After that, a new function is either added to the stack with new variables, or the function is removed from the stack returning to the calling function; the previous variables can no longer be accessed. We also know that global variables have global scope and exist for the duration of a program’s execution. What if we wanted to have greater control over how long our data is stored for in memory? Is there a way to achieve something in between (and declare variables that hold a lot more data)? Meet the heap.
The C language allows developers to control precisely how much memory is allocated to store data and how long the allocation lasts for.
Making a parallel with Java, every time you create an object in Java, it is placed on the heap automatically. Once the object is no longer in use, i.e. when no reference exists through which you can access it, the memory space is freed through automatic garbage collection. In C, if a developer wants to store data on the heap, the memory allocation must be done manually. Likewise, the developer must remember to free the memory after use to prevent memory leaks.
Let’s work through some examples in code to consolidate what we have learned so far.
==action: Read the code below. Do you understand what it is doing?==
#include <malloc.h>
#include <stdio.h>

int main (void) {
   int bucket1 = 0;
   int *bucket2 = malloc(sizeof(int));

   *bucket2 = 1;

   printf("local bucket: %d\n", bucket1);
   printf("heap bucket: %d\n", *bucket2);

   free(bucket2);
   return 0;
}
There is no new syntax there, but there are some things we have not seen before: 1) an additional include directive for a different library, malloc.h; 2) a call to the malloc() function; 3) a call to the free() function.
The call to malloc() allocates memory space on the heap and returns a pointer. It takes, as an argument, the number of bytes to allocate. Note how we use sizeof() to ensure we allocate enough memory for the exact size of an int.
Question: What does the line
*bucket2 = 1;do?
Just before the return statement, there is a call to another function we haven’t seen before: free(). As you would expect, this function frees the memory space we allocated earlier with malloc(). It is important to remember to do this (exactly once), as dynamically-allocated memory space is not automatically cleared up in C.
Valgrind
You can use the Valgrind tool to check your program for memory leaks.
==action: Let’s comment out the call to free() from our previous code:==
#include <malloc.h>
#include <stdio.h>

int main (void) {
   int bucket1 = 0;
   int *bucket2 = malloc(sizeof(int));

   *bucket2 = 1;

   printf("local bucket: %d\n", bucket1);
   printf("heap bucket: %d\n", *bucket2);

   //free(bucket2);
   return 0;
}
==action: Compile as usual, then run the following command:==
valgrind --leak-check=yes ./bucket
You should get an output similar to the one below:
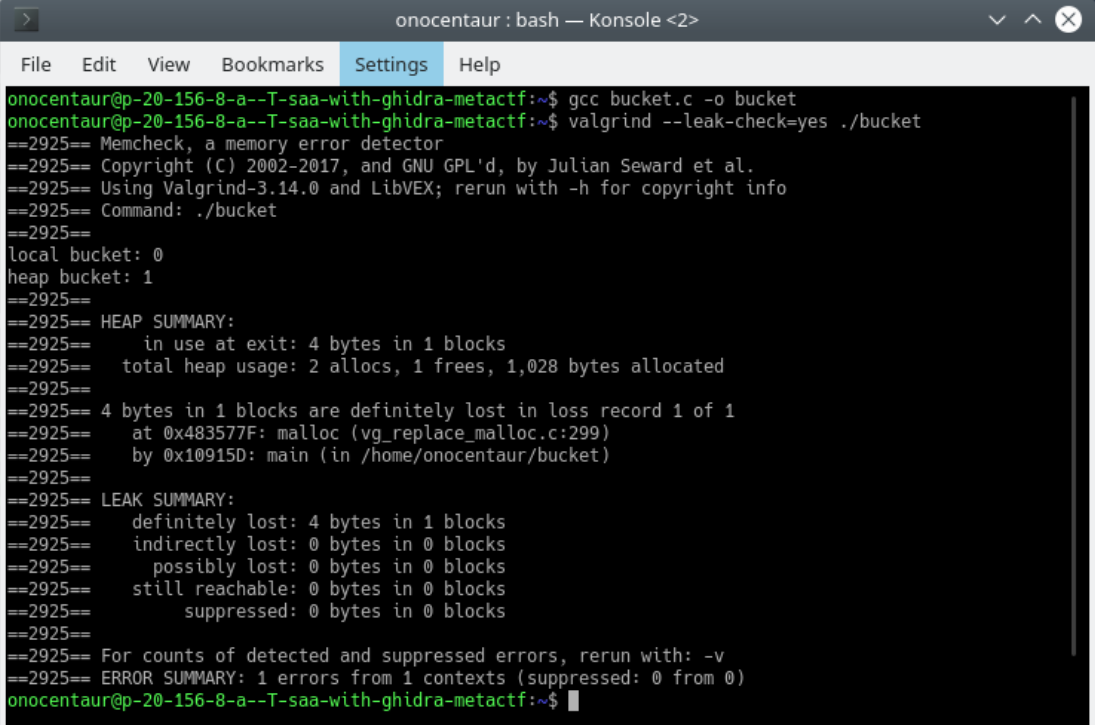 Valgrind output showing memory leak
Note: Note the leak summary toward the bottom and the 4 bytes lost.
==action: Now add the call to free(), re-compile and run valgrind again.==
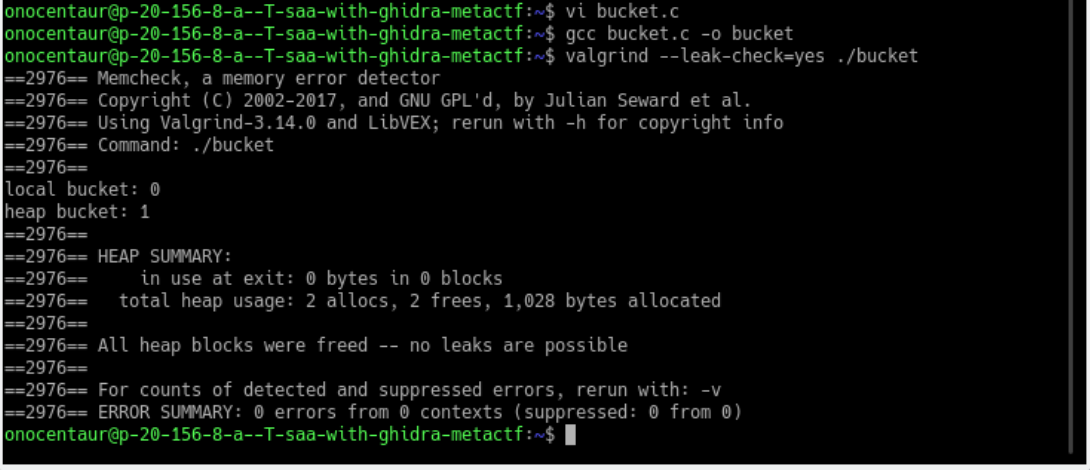 Valgrind output after fixing memory leak
Note: Examine the output. The memory leak is gone.
Let’s work through another example, this time using a struct. ==action: Consider the code below:==
#include <stdio.h>
struct Rectangle {
   int length;
   int height;
};

struct Rectangle makeRectangle(int length, int height) {
   struct Rectangle newRectangle;
   newRectangle.length = length;
   newRectangle.height = height;

   return newRectangle;
}

int main(int argc, char *argv[]) {
   struct Rectangle myRectangle = makeRectangle(4, 2);
   printf("The rectangle's length is: %d\n", myRectangle.length);
   printf("The rectangle's height is: %d\n", myRectangle.height);
   return 0;
}
We start by creating a simple struct for a rectangle, which has a length and a height, defined in integers. Then we create a function called makeRectangle() which takes two integers as arguments and returns a struct representing a rectangle. Finally, the main function creates a rectangle using the function we defined above and prints its length and height.
Note that, in the x86 architecture, when the makeRectangle() function returns a rectangle, all the data contained in the struct is copied into the EAX register by convention. This could be an expensive (and unnecessary) operation if the struct happens to be very large. As we have seen, the function cannot return a local variable because local variables are out of scope outside the function, so it must return the entire rectangle structure and all the data it contains.
Question: Based on what we have seen up to this point, can you think of a different approach to solving this problem other than returning the entire struct?
We could, of course, use pointers. We saw last week that pointers are only four bytes, so we could store the struct on the heap to ensure it does not disappear after the function goes out of scope, then return a simple pointer instead of the whole structure. Any other code wanting to access our struct could do it through the pointer to the address where the data is stored in memory. Let’s put this into practice by writing some code.
==action: Create a file called rectangle.c and enter the following code:==
#include <stdio.h>
#include <malloc.h>

struct Rectangle {
   int length;
   int height;
};

struct Rectangle *makeRectangle(int length, int height) {
   struct Rectangle *newRectangle = malloc(sizeof(struct Rectangle));
   newRectangle->length = length;
   newRectangle->height = height;

   return newRectangle;
}

int main(int argc, char *argv[]) {
   struct Rectangle *myRectangle = makeRectangle(4, 2);
   printf("The rectangle's length is: %d\n", myRectangle->length);
   printf("The rectangle's height is: %d\n", myRectangle->height);
   return 0;
}
Note: Have you noticed the new
->operator? It is called the structure dereference operator and is similar to*. It means “follow the address of this struct pointer and give me the value of this property”.
==action: Compile and run your code.==
Warning: There is a bug in the code 🐛!
Action: Investigate the bug and try to fix it.
Hint: Consider what the makeRectangle() function is doing, line by line.
Optional: watch this video Dynamic Memory Allocation
Bitwise Operators
Bitwise operators are very useful when trying to understand disassembled code. They are used to perform operations on the bits that make up an integer value. Since a bit can have only two values, 1 or 0, it is common to convert an integer value to binary if you are going to perform the binary operation by hand. There are six binary operators in C, summarised in the table below:
| Operator | Name |
|---|---|
& |
Bitwise AND |
| |
Bitwise OR |
^ |
Bitwise XOR |
~ |
One’s complement |
<< |
Left shift |
>> |
Right shift |
Let’s use the short ints 137 and 458 as examples.
The first step before performing a binary operation by hand is to convert the number to binary. So 137 becomes 100101 and 458 becomes 111001010.
Bitwise AND (&)
Check each bit of the numbers against each other. If one number has a 1 AND the other number also has a 1, then the result is a 1. Otherwise, it is a 0.
| 0 | 0 | 0 | 0 | 0 | 0 | 0 | 0 | 1 | 0 | 0 | 0 | 1 | 0 | 0 | 1 |
AND (&)
| 0 | 0 | 0 | 0 | 0 | 0 | 0 | 1 | 1 | 1 | 0 | 0 | 1 | 0 | 1 | 0 |
Results in:
| 0 | 0 | 0 | 0 | 0 | 0 | 0 | 0 | 1 | 0 | 0 | 0 | 1 | 0 | 0 | 0 |
The result of 137 & 458 is 10001000, or 136 in decimal.
Bitwise OR (|)
Check each bit of the numbers against each other. If one number has a 0 AND the other number also has a 0, then the result is a 0. Otherwise, it is a 1.
| 0 | 0 | 0 | 0 | 0 | 0 | 0 | 0 | 1 | 0 | 0 | 0 | 1 | 0 | 0 | 1 |
| OR ( | ) |
| 0 | 0 | 0 | 0 | 0 | 0 | 0 | 1 | 1 | 1 | 0 | 0 | 1 | 0 | 1 | 0 |
Results in:
| 0 | 0 | 0 | 0 | 0 | 0 | 0 | 1 | 1 | 1 | 0 | 0 | 1 | 0 | 1 | 1 |
| The result of 137 | 458 is 111001011, or 459 in decimal. |
Bitwise XOR (^)
Check each bit of the numbers against each other. If one number has a 0 AND the other number has a 1, then the result is a 1. Otherwise, it is a 0.
| 0 | 0 | 0 | 0 | 0 | 0 | 0 | 0 | 1 | 0 | 0 | 0 | 1 | 0 | 0 | 1 |
XOR (^)
| 0 | 0 | 0 | 0 | 0 | 0 | 0 | 1 | 1 | 1 | 0 | 0 | 1 | 0 | 1 | 0 |
Results in:
| 0 | 0 | 0 | 0 | 0 | 0 | 0 | 1 | 0 | 1 | 0 | 0 | 0 | 0 | 1 | 1 |
The result of 137 ^ 458 is 101000011, or 323 in decimal.
One’s complement (~)
The one’s complement operator is a unary operator that simply flips all the bits in a given number. Let’s apply it to the number 137:
| 0 | 0 | 0 | 0 | 0 | 0 | 0 | 0 | 1 | 0 | 0 | 0 | 1 | 0 | 0 | 1 |
One’s complement (~), results in:
| 1 | 1 | 1 | 1 | 1 | 1 | 1 | 1 | 0 | 1 | 1 | 1 | 0 | 1 | 1 | 0 |
The result of ~137 is 1111111101110110, or 65398 in decimal.
Left Shift (<<)
The left shift operator shifts the bits of a given number to the left by a specified number of spaces. For example, 137 <<1 becomes 100010010 or 274.
| 0 | 0 | 0 | 0 | 0 | 0 | 0 | 0 | 1 | 0 | 0 | 0 | 1 | 0 | 0 | 1 |
Left Shift (<<), results in:
| 0 | 0 | 0 | 0 | 0 | 0 | 0 | 1 | 0 | 0 | 0 | 1 | 0 | 0 | 1 | 0 |
Question: When might you want to use the left shift operator?
Right Shift (>>)
The left shift operator shifts the bits of a given number to the right by a specified number of spaces. For example, 137 >> 2 becomes 100010 or 34.
| 0 | 0 | 0 | 0 | 0 | 0 | 0 | 0 | 1 | 0 | 0 | 0 | 1 | 0 | 0 | 1 |
Right Shift (>>), results in:
| 0 | 0 | 0 | 0 | 0 | 0 | 0 | 0 | 0 | 0 | 1 | 0 | 0 | 0 | 1 | 0 |
Action: Write a simple C program that illustrates the bitwise operators we just learned. Did you get the same results?
Hint: You might need to declare the number 137 as a short unsigned int for the one’s complement operator in order to get the same result. Don’t forget to print it as a short unsigned decimal number (use the formatting placeholder “%hu”).
Introduction to Assembly Language
Computers read, understand and execute machine code instructions. As we learned last week, machine code instructions are very difficult for us to read and comprehend, but they can be directly translated into assembly instructions, which use mnemonics to facilitate human reading. Since different classes of processors have different architectures, the machine instruction sets that they support are also different. Consequently, there are many different assembly languages. In this module, we are going to focus on 32-bit x86 assembly language, since x86 is the most common architecture for personal computers and most malware is still written for this architecture and compiled as a 32-bit executable.
Registers
Registers are special memory spaces in the CPU used for fast access. Because data stored in registers can be accessed much faster than data stored in RAM, the CPU uses registers to perform operations. There are eight general purpose registers, shown in the table below. You don’t need to memorise them, but keep this table handy and make sure you populate the notes section with information you find helpful.
| Register | Additional References | Notes |
|---|---|---|
| EAX | AX, AH, AL | |
| EBX | BX, BH, BL | |
| ECX | CX, CH, CL | |
| EDX | DX, DH, DL | |
| EBP | BP | base pointer for the stack |
| ESP | SP | stack pointer |
| ESI | SI | |
| EDI | DI |
Each register is 32 bits (4 bytes) in size. There are some shortcuts to access different parts of the 32 bits which make up each register. For example, EAX’s 32 bits are represented as hexadecimal values in the image below.
| 18 | 2F | C3 | 5A |
EAX = 182FC35A
If we wanted to access the last 16 bits stored in the EAX register, we could refer to them as AX.
AX = C35A
The last 16 bits can be broken down further into two sets of 8 bits. The higher set is referred to as AH, and the lower as AL.
AH = C3
AL = 5A
The first four registers in our table work exactly like the EAX example we have just seen.
The last four registers have a shortcut for their lower 16 bits (BP, SP, SI and DI).
EIP
The EIP register or instruction pointer is a special register used to store the address of the next command to be executed by the CPU.
Flags
The EFLAGS register is an additional 32-bit register where each bit is used as a binary flag to control different CPU operations. The illustration below shows what each bit of theEFLAGS register is used for.
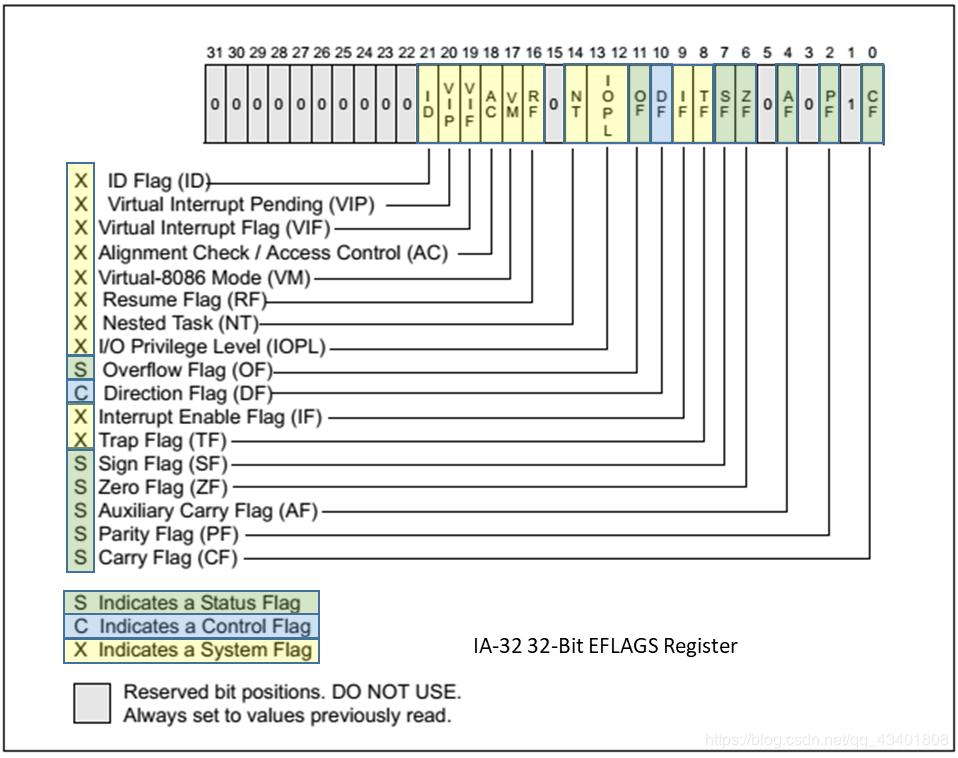 EFLAGS register bit layout https://www.programmersought.com/article/7622514127/
Operands
Operands represent data upon which instructions are executed. They can be literal values such as hexadecimal numbers, registers or memory addresses. When an operand is enclosed by square brackets [ ], you read it as “the data at this memory address”.
Simple Instructions
We are going to use Intel syntax in this module, since it is simpler and easier to read. However, you should be aware of the existence of the AT&T style. For information on the differences between them, check out this document.
The way Intel syntax works is simple: you have an instruction, followed by the destination, then a comma, then finally the source. Let’s take the mov instruction as an example, which moves data from one place to another.
mov eax, 1
Read: move the literal value 1 into the EAX register.
You can use semicolons to add comments.
mov eax, ebx         ; move the data in EBX to the EAX register

mov eax, [ebx]       ; follow the address stored in EBX and move the data to the EAX register
==action: Consider the instructions below:==
mov eax, 0x1a

mov ebx, [0x00a7800f]

mov eax, [ebx + 8]
The lea (load effective address) instruction is similar to mov, but it loads the address instead of the value.
lea eax, [ebx] ; load the address stored in EBX into the EAX register
The add, sub, mul, div, inc and dec instructions are used to perform arithmetic operations.
add eax, 0x1         ; add 1 to the value stored in eax

sub eax, ebx         ; subtract the value in ebx from the value in eax
In both cases, the result is stored in the destination (the EAX register in this example).
Multiplication only involves one operand, since the other is always the EAX register. Therefore, in order to multiply two literal values, one of them must be loaded to the eax register first. The result of a multiplication is stored in two registers: EDX and EAX. The former holds the most significant bits, and the latter the least significant bits.
mov eax, 0x4         ; move the literal value 0x4 to the EAX register

mul 0x2              ; multiply the value in EAX by 0x2
Question: What do you expect the EDX and EAX registers to contain after the instructions above are executed?
Division is almost like the reverse of the multiplication instruction. First, the EDX and EAX registers are populated with the most significant and least significant 32 bits of the dividend (number to divide). The div instruction involves one operand, the divisor or number by which to divide. The result of the operation is stored in the EAX register, and the remainder in the EDX register.
mov edx, 0x0         ; move the literal value 0x0 to the EDX register

mov eax, 0x8         ; move the literal value 0x8 to the EAX register

div 0x3              ; divide the value in EDX and EAX by 0x3
Question: What do you expect the EDX and EAX registers to contain after the instructions above are executed?
Finally, the inc and dec instructions increment or decrement the value in the register or memory address by 1.
inc eax              ; the same as eax = eax + 1

dec eax              ; the same as eax = eax - 1
Stack Instructions
As we have learned this week, the stack is a portion of memory used for short-term storage of data used by a program’s functions. The most important assembly instructions used within the context of the stack are: push, pop, call and ret.
Push is used to push values onto the stack. Typically, if a function takes arguments, these are pushed to the stack before the function is called. Likewise, the pop instruction removes or pops the data from the stack.
The call instruction calls the function specified at the given memory address, and the ret instruction returns from the function.
Let’s create a very simple C program, compile it using gcc, then disassemble the executable using objdump to put what we have learned into practice.
==action: Create a file called simple.c and enter the following code:==
int add(int a, int b) {
   return a + b;
}

int main(void) {
   add(1, 2);
   return 0;
}
==action: Compile and run your code.==
==action: Decompile your executable using objdump:==
objdump -M intel -d simple
Note: Note how the assembly code is a lot more verbose than the C code you wrote. Don’t worry about trying to understand every single instruction, the key here (and with reverse engineering in general) is to focus on the big picture.
Action: Identify the disassembled main function.
Action: Identify the call to the add function.
Action: Identify the disassembled add function.
Action: Identify the add instruction within the add function.
CTF Challenges
Flag: This week, you have six challenges to complete in your VM and six flags to find. In your VM, open a terminal, cd into the challenges directory and cd into the challenge you would like to complete. Type “./” followed by the executable name to run the challenge and get further instructions on how to solve it.
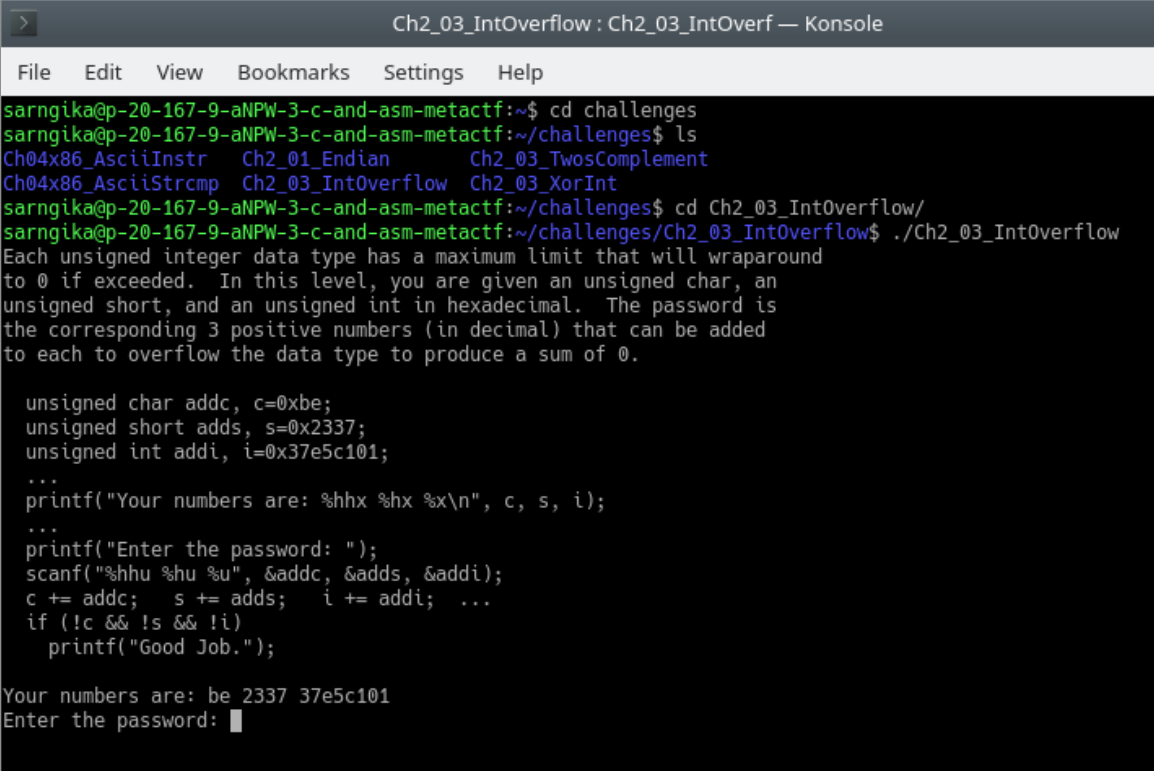 Example of how to run a CTF challenge from this topic
Hints
Here are some hints to help you find this week’s flags - if you prefer to try first on your own, skip this section.
XorInt
This challenge you can work out by hand, like you did on Page 8 when we looked at XOR, or by writing a simple C program.
==action: Run the challenge and enter the example hexadecimal number: 4f91853a.==
Note: Note the result that the challenge gives you on the terminal.
Hint: You know that 4f91853a ^ secret = result.
Hint: To do it manually, convert everything to binary. Then work out what the secret is. When you are finished, convert the binary back to hex for the password.
Question: Can you figure out how to do it programmatically?
IntOverflow
Hint: You can edit the base program given to you by the challenge to calculate the int, char and short values that will cause an overflow.
Tip: You might want to use the limits.h library for handy constants that represent these maximum sizes. Alternatively, you can also work with literals.
TwosComplement
Hint: When the leftmost bit of a number is set to 1, it represents a negative number in two’s complement notation. One of the ways to calculate the two’s complement of a binary number is to flip the bits, then add one. With this in mind, what number does the given binary represent in decimal?
Watch this video for a more in-depth explanation, including different ways to arrive at the same result: Two’s Complement Representation of Negative Numbers
Endianness
Hint: Convert each pair of digits to ASCII. Then reverse the endianness.
AsciiInstr
Hint: Disassemble the executable using objdump (follow the example from page 14).
Hint: Find the main function, then find the code that moves each hardcoded character to memory.
Hint: Translate each character from hex to ASCII.
AsciiStrcmp
Hint: There are two checks that happen here. The first checks that the first character of the string you passed is equal to a character literal. The second checks that the rest of the string you passed is equal to the correct string.
Hint: You can use ltrace, which you used in the first week, to find the second part of the string.
Hint: For the first character, you need to use objdump to disassemble the executable. Find the part in main() where one byte, a character literal, is moved to an offset of EBP. Note how a comparison is made (cmp), followed by a jump (je). We will cover this in detail next week so don’t worry about it for now. Focus on finding what the character literal is.
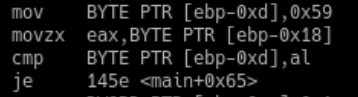 Assembly code analysis example
Conclusion
At this point you have:
- Practiced using structs in C, with and without pointers
- Understood the difference between the stack and the heap and learned to allocate and free memory dynamically in C
- Worked with bitwise operators, both theoretically and programmatically
- Developed a basic understanding of 32-bit x86 assembly language, including registers, flags, operands and instructions
- Solved practical challenges using MetaCTF and found 6 more flags!
Well done!
Tip: This week is quite heavy in terms of new content, so take your time working through the exercises and don’t expect to take everything in in one sitting. Make sure you read the recommended book chapters, they are VERY important and will greatly help your understanding. Remember: assembly is part of every week’s labs from now on, so the more effort you spend getting to grips with the fundamentals, the more comfortable you will be with the rest of the module’s materials. Good luck!