Contents
“Give me six hours to chop down a tree and I will spend the first four sharpening the axe.” -- Abraham Lincoln
General notes about the labs
Often the lab instructions are intentionally open ended, and you will have to figure some things out for yourselves. This module is designed to be challenging, as well as fun!
However, we aim to provide a well planned and fluent experience. If you notice any mistakes in the lab instructions or you feel some important information is missing, please let us know (via GitHub) and we will try to address any issues.
Preparation
==action: For all of the labs in this module, start by logging into Hacktivity.==
Click here for a guide to using Hacktivity. This includes some important information about how to use the lab environment and how to troubleshoot during lab exercises. If you haven’t already, have a read through.
==action: Make sure you are signed up to the module, claim a set of VMs for this lab, and start your VMs.==
Feel free to read ahead while the VMs are starting.
==VM: Interact with the Kali VM==. (Click the launch icon after the VMs have started):
![]() ==action: Login with username “kali”, password “kali”.==
==action: Login with username “kali”, password “kali”.==
==action: Start the Linux victim server.==
Note: You don’t need to login to the target server VM or open it (you don’t need to know the login password), just start the VM.
==action: Note the IP address(es) of the Kali Linux system, using:==
ip a
Introduction to scanning
Scanning is an active phase of an attack or security test, involving identifying IP addresses, ports, and services. Scanning is often conducted by network administrators or security specialists to get an understanding of and to map out a network. Scanning is also a critical stage for an attacker, since it can give them all the information they need in order to launch an attack. Once an attacker knows the IP address of a service, and the version of the software that the server is running, they can look up and use known attacks against the target. A well executed scanning stage is extremely important when looking for potential security problems.
Ping sweeps for finding live hosts
Using ping
The Ping command is used for network troubleshooting. Ping works by sending an Internet Control Message Protocol (ICMP) “echo request”, to which most hosts will reply with an ICMP “echo response” (although Windows PC firewalls typically block incoming ping requests by default).
==action: Read the manual. From a terminal on your kali VM, run:==
man ping
==action: Read the synopsis and description, and press “q” to quit, when you are ready.==
Note: The most basic use is “ping destination” (where destination is the IP address you want to test for a response).
==action: Ping your own Kali VM from Kali itself (with the IP address you noted earlier):==
ping ==edit:Kali-IP-address==
Note: This doesn’t make much sense, since Kali can respond without even sending network traffic beyond itself, but shows you how it responds when something replies to the ping request. Pinging can also be useful to tell if a system is online before attempting to connect via another means.
Note: Since you haven’t specified how many times to send the echo request, ping keeps going until you press Ctrl-C, at which point ping will present some statistics about how long it took for the remote system (or, in this case, the VM) to reply.
==action: Run a command to send 3 echo requests.== ==hint: “man ping”, and read through the available options.==
==VM: On your Kali Linux VM (attacker)==, ==action: note the first three octets of your IP address of the bridged network connection (run “hostname -I”)==. For example, ==edit:10.123.123==.
Suppose you want to identify all the live hosts in a given network range (which is often the first step after an attacker has found an IP range using Whois). One way to achieve this is to send an echo request to each IP address, and see which ones reply.
To check all IPs starting with “10.123.123” (which can usually be written as 10.123.123.1-254 or 10.123.123.0/24, although the ping command does not understand this):
You could manually run ping for each IP address. ==action: Run (replacing the first three octets with that of your IP address, as noted above):==
ping -c 1 -W 1 ==edit:10.123.123==.1
ping -c 1 -W 1 ==edit:10.123.123==.2
ping -c 1 -W 1 ==edit:10.123.123==.3
ping -c 1 -W 1 ==edit:10.123.123==.4
ping -c 1 -W 1 ==edit:10.123.123==.5
You could continue for all 254 IP addresses on this subnet. This is obviously not very efficient… ==tip: It is easy enough to write your own ping sweep tool as a Bash script==.
Creating a ping sweep bash script
Remember, a Bash script is basically a file containing commands that you could otherwise run directly in a Linux Bash shell (terminal) prompt. You may be surprised to learn that you can actually do all kinds of programming tricks at the command prompt, such as writing loops.
==action: Run:==
vi pingsweep.sh
==action: Press “i” to enter insert mode, and enter these lines in the file (you can leave out the descriptive # comments, if you like):==
#!/bin/bash

# if the script is not started with one argument, tell them how it is used
if [ $# -ne 1 ]
then
        # print a message to the screen describing how the script should be used
        echo "Usage: `basename $0` {three octets of IP address, for example 192.168.0}"
        # exit with an error (1)
        exit 1
fi # end of if

# define a variable and set it to the value passed as the first argument ($1)
ip_address_start=$1
# for loop, where "i" starts at 1 and each time increments up to 254
for i in {1..254}
do
        # run ping with one echo request and short timeout for the IP address
        # and pipe to grep to only show if it replies
        ping -c 1 -W 1 $ip_address_start.$i | grep 'from'
done
==action: Press “Esc” to exit insert mode, and type “:wq” to write to the file and quit vi.==
Note: Read the comments to understand this ping sweep script.
==action: Set your script so it can be executed, then run your script:==
chmod +x pingsweep.sh
./pingsweep.sh
Note: If you get an error message, edit the file and find where you have made a mistake. Check that the spaces around the if statements are exactly as above (that is, “if [ $# -ne 1 ]”).
==action: Run your script with the first three octets of your local network’s IP address (as you noted earlier):==
./pingsweep.sh ==edit:10.123.123==
Hint: To see what chmod does, try running “ls -la” beforehand. You should see the names of the files within the folder each with a series of letters to the left. An ‘r’ indicates the file can be read, ‘w’ means it’s writable, and ‘x’ means it’s executable. The above command adds the ‘x’ flag to your file, allowing it to be executed.
This may take awhile, but should discover the IP addresses of the other hosts in the lab. While you wait for the results, you could open a new console tab (Ctrl-Shift-T) and continue.
Question: How long will this take to complete? ==hint: Consider what the “-W 1” command argument to ping means. Why does this take so long?==
Assuming you have the other VM running, you have at least one other system on that network range.
Nmap
The most popular tool for scanning is, without a doubt, Nmap.
==action: Read the man page:==
man nmap
From the man page:
“Nmap (“Network Mapper”) is an open source tool for network exploration and security auditing. It was designed to rapidly scan large networks, although it works fine against single hosts. Nmap uses raw IP packets in novel ways to determine what hosts are available on the network, what services (application name and version) those hosts are offering, what operating systems (and OS versions) they are running, what type of packet filters/firewalls are in use, and dozens of other characteristics. While Nmap is commonly used for security audits, many systems and network administrators find it useful for routine tasks such as network inventory, managing service upgrade schedules, and monitoring host or service uptime.” – (by Insecure.Com LLC, licensed under the Creative Commons Attribution License version 3.0)
==action: When you are ready, press “q” to quit.==
Ping sweeps and host discovery using Nmap
==action: Do a ping sweep of the lab using nmap (as before, replace the first three octets of the IP address with that of the Kali system)==. The -PE option tells nmap to send a ping echo request to the target. The “-sn” specifies that you don’t want Nmap to do a port scan (described later below).
nmap -sn -PE ==edit:10.123.123==.1-254
This will be completed fairly quickly, since Nmap does not wait for each response before sending a request to another computer. You should see the same IP addresses returned as those from your Bash script above. If you don’t, check the IP range you are scanning.
Note: Often firewalls are configured to block ICMP echo requests. In this case, an ICMP “timestamp request” may still be allowed through, and also reveals whether the host is available.
Nmap’s default host discovery does a bit more than just send an echo request. From the man page: “The default host discovery done with -sn consists of an ICMP echo request, TCP SYN to port 443, TCP ACK to port 80, and an ICMP timestamp request by default.”
sudo nmap -sn ==edit:10.123.123==.1-254
Note: Read the output from the above commands, and note that the MAC address is also reported. MAC addresses are related to the network interface card, and can also reveal information, since they include prefixes based on the vendor, such as “Cisco Systems” or “Apple”.
The responses to the commands above also include DNS name resolution against each IP address. This by itself can be very informative. ==action: To only list the hosts along with their hostnames run a “List scan”1:==
nmap -sL ==edit:10.123.123==.1-254
Note: The above List scan does not actually test whether the host is responding.
Tip: This command may not detect any up hosts in the lab environment because there is no DNS server there
==action: Use nmap to discover the IP addresses of the VM(s)==. You should see at least two live hosts, one of which will be your Kali Linux VM (the attacker), the other(s) your target(s).
==action: Note the IP addresses of the other system(s).==
Ports and port scanning
After establishing a list of live hosts that are targets to attack, the next stage for an attacker or security tester is to examine the attack surface; that is, what there is that could be attacked on each of those systems. Any way that a remote computer accepts communication has the potential to be attacked.
All TCP and UDP traffic (which accounts for almost all network traffic over the Internet) involves the use of port numbers to establish which applications are communicating. For example, a server could be running the Apache web server program, which will typically listen to port 80 for connections. Why port 80?: Many different types of servers have standard ports numbers, so for example if I want to access a web page my web browser knows to connect to port 80, while if I want to access email or FTP on the same server, those programs know what port to connect to. The list of all officially registered port numbers can be found here (check port 80 to see the details): http://www.iana.org/assignments/port-numbers
On a Linux system there is also a file containing a list of these, plus other common uses (look at port 80 again - the details should match those above):
less /etc/services
A server binds to a port, and listens for connections from a client.
Any open port on a target system is a service that we could test the security of.
==action: Manually you can check whether a port is open on a system, by connecting using Telnet:==
telnet ==edit:IP-address== 80
Where IP-address is the IP address you noted earlier.
Note: If the connection succeeds you see the message “Connected to […]” (press “.” and press Enter and the server will reply and then close the connection), if it stays on “Trying […]” for a while, then the port is not accessible to you (so you know it is probably closed).
Creating a port scanner using a bash script
Using (new versions of) Bash you can easily connect to ports using TCP IP.
==action: Start a netcat listener:==
nc -lvp 4444
Tip: Depending on the version of netcat, you may need to run “nc -l 4444”
Leave that running, and from another terminal (hint: press Ctl-Shift-T), ==action: send a message using the cat command:==
cat > /dev/tcp/localhost/4444
Type in a message, and check the other tab to see that it was sent through. Ctl-D to end (only press it once or you may close your terminal window).
Note: If the above does not work, then your version of Bash does not support making TCP connections.
You can check whether the command was successful by reading the Bash variable $?, which logs the exit status of the last command executed.
echo $?
==action: If you try to connect to a port that is not open:==
echo > /dev/tcp/localhost/7777
The $? will report failure:
echo $?
Question: What value does $? have when the connection succeeds?
Question: What value does $? have when the connection fails?
Now that we know how to check for open ports using Bash, we can create our own Bash script port scanner:
==action: Run:==
vi portscanner.sh
==action: Press “i” to enter insert mode, and enter these lines in the file (you can leave out the comments, if you like):==
#!/bin/bash

if [ $# -ne 1 ]
then
	echo "Usage: `basename $0` {IP address or hostname}"
	exit 1
fi
# define a variable and set it to the value passed as the first argument ($1)
ip_address=$1
# write the current date to the output file
echo `date` >> $ip_address.open_ports
# for loop, where "i" starts at 1 and each time increments up to 65535
for port in {1..65535}
do
	# use a short timeout, and write to the port on the IP address
	timeout 1 echo > /dev/tcp/$ip_address/$port
	# if that succeeded (checks the return value stored in $?)
	if [ $? -eq 0 ]
	then
		# append results to a file named after the date and host
		echo "port $port is open" >> "$ip_address.open_ports"
	fi
done
==action: Press “Esc” to exit insert mode, and type “:wq” to write to the file and quit vi.==
Note: You may want to save a copy of your script. You can copy and paste a copy from your VMs.
==action: Set your script so it can be executed:==
chmod +x portscanner.sh
==action: Run your script on your own system:==
./portscanner.sh ==edit:IP-address-of-Kali-VM==
This may take a while, and may display a lot of failed attempts to connect, but should discover all the open ports, and create a file in your working directory (where you are) with a list of open ports.
==action: Have a look at the resulting file:==
less ==edit:IP-address==.open_ports
==action: When you are ready, press “q” to quit.==
Tip: Extra challenge: write your own port scanner in another programming language of your choice. Look online, there are lots of examples you can use for help.
TCP three-way handshake
Many port scanners are quite simple, and do more than is strictly necessary to know whether a port is open. In order to establish a TCP connection and start sending and receiving data, a full three way handshake takes place.
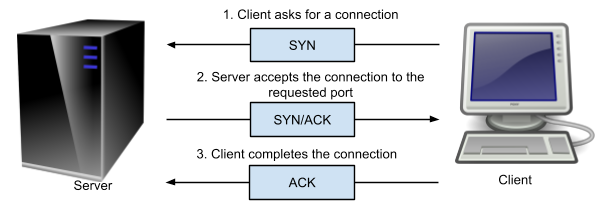 TCP three-way handshake
As illustrated above, 1) the client starts by sending a TCP packet that includes the port that it wants to talk to (say port 80), and the SYN flag set, meaning that it wants to start a new connection. 2) If the server accepts the connection (there is indeed a program listening on that port), then it responds with the SYN and ACK flags set, meaning it accepts the connection. 3) The client can now complete the connection by sending a packet with the ACK flag set.
If the port is closed it will send a RST at stage 2. If there is a firewall that is filtering connections to the port, then the client may not receive any reply.
SYN port scans
Notice that if all we are interested in is whether the port is open, we can skip the third step, since step 2 already tells us whether the port is open. This approach to port scanning is known as a SYN scan. However, this requires the ability to write to the raw network directly rather than using libraries that establish connections for us. On Linux this means the program needs some extra privileges, such as being run by the root user2.
Nmap port scanning
Nmap is primarily a port scanner, and is quite possibly the most advanced port scanner that exists. It has many port scanning features, such as the ability to do SYN scans or full TCP connect scans, but also can do some advanced analysis.
==VM: From Kali Linux==:
Run a simple nmap port scan against your own system:
nmap localhost
Have a look through and make sure you understand the output.
Again from the Nmap man page:
“The state is either open, filtered, closed, or unfiltered. Open means that an application on the target machine is listening for connections/packets on that port. Filtered means that a firewall, filter, or other network obstacle is blocking the port so that Nmap cannot tell whether it is open or closed. Closed ports have no application listening on them, though they could open up at any time. Ports are classified as unfiltered when they are responsive to Nmap’s probes, but Nmap cannot determine whether they are open or closed. Nmap reports the state combinations open|filtered and closed|filtered when it cannot determine which of the two states describe a port.”
Nmap port scanning techniques
“As a novice performing automotive repair, I can struggle for hours trying to fit my rudimentary tools (hammer, duct tape, wrench, etc.) to the task at hand. When I fail miserably and tow my jalopy to a real mechanic, he invariably fishes around in a huge tool chest until pulling out the perfect gizmo which makes the job seem effortless. The art of port scanning is similar. Experts understand the dozens of scan techniques and choose the appropriate one (or combination) for a given task. Inexperienced users and script kiddies, on the other hand, try to solve every problem with the default SYN scan. Since Nmap is free, the only barrier to port scanning mastery is knowledge. That certainly beats the automotive world, where it may take great skill to determine that you need a strut spring compressor, then you still have to pay thousands of dollars for it.” -- Nmap man page.
Open the Nmap man page (“man nmap”) and scroll down to the title “PORT SCANNING TECHNIQUES”. Read the entries for:
-
-sS (TCP SYN scan)
-
-sT (TCP connect scan)
-
-sU (UDP scans)
-
-sN; -sF; -sX (TCP NULL, FIN, and Xmas scans)
Run a SYN scan on your own system:
nmap -sS localhost
Now, based on what you have learned:
==action: Run a SYN scan against the IP address(es) you noted earlier.==
==action: Run a UDP scan against the IP address(es). Any interesting results? Why are UDP scans unreliable? (If this takes a while, double check the man page to find out why)==
==action: Run an Xmas scan against the IP address(es). Did they work? Why?==
Question: What operating systems do you think the system(s) have?
Question: What services appear to be running on each of the VMs?
You may wish to read about the other port scanning techniques that Nmap supports.
Nmap port specification
By default Nmap scans 1000 “interesting ports” (of the possible 65535); however, you can tell Nmap which ports to scan.
Open the Nmap man page (“man nmap”) and scroll down to the title “PORT SPECIFICATION AND SCAN ORDER”. Read the entries for:
-
-p port ranges (Only scan specified ports)
-
-F (Fast (limited port) scan)
-
-r (Don’t randomize ports)
Run:
nmap -p 80-85 ==edit:IP-address==
Where IP-address is one of the VM IP addresses.
Look through the output and note which ports are open and which are closed.
Based on what you have learned:
==action: Run a SYN scan against the VM(s), but only checking port 80.==
==action: Run a TCP connect scan against the VM(s), checking only the most likely ports.==
==action: Run a SYN scan against the VM(s), but don’t randomise the port order during scanning.==
==action: Run a SYN scan against the VMs, checking every possible port (this may take a while - check the man page if you’re not sure how to scan all ports).== ==hint: There is a service you may have missed earlier, and a familiar vulnerability! Find and submit the flag to Hacktivity!==
Nmap timing and performance
Open the Nmap man page (“man nmap”) and scroll down to the title “TIMING AND PERFORMANCE”. Read the entry for:
- -T paranoid|sneaky|polite|normal|aggressive|insane (Set a timing template)
Run:
nmap -T5 ==edit:IP-address==
Where IP-address is one of the VM IP addresses.
Based on what you have learned:
==action: Run a SYN scan of ports 80-85 against one of the VMs, using the “sneaky speed”.==
Question: Why would anyone choose this speed?
==action: Run a scan of all possible ports as fast as possible.==
Question: Why might it not be a good idea to choose “insane” speed for scans across the Internet?
Service identification
In order to know what attacks could be successful against a system, we usually need to know more than which ports are open. For example, knowing that port 80 is open tells us that some software on the other system is listening to that port number, and that we can connect to that port, and can probably send data to it, and may get a reply. Since port 80 is almost always used by web servers hosting websites, it is very likely that the software on the other side is Apache, IIS, or one of the many other web servers available. However, in order to know what types of attacks are likely to succeed, we want to know as much as we can about the software running on the server.
Banner grabbing
The simplest way of determining what software is running on a port, is to connect and check whether the response tells us what software is running. Many services present a banner whenever a new connection is established, which often states what software version the server is running. Collecting this information is known as banner grabbing.
==action: Manually connect to port 21 on the VM IP address(es) you noted earlier:==
nc ==edit:IP-address== 21
Netcat (nc) is similar to Telnet, in that it can be used for manual raw TCP communication.
==action: Press Ctrl-C to kill the process after you receive the response.==
Note: Note the software version this reports (if any).
==action: Manually connect to port 80 on the VM IP address(es) you noted earlier:==
nc ==edit:IP-address== 80
(enter “.” and press the Enter key a few times)
Note: The output from a web server often contains the line “Server:”… Use this to note the software on port 80 for each VM IP, if available.
Based on what you have learned:
Question: What is port 21 used for? If you’re not sure, try connecting to that port on the Kali system and compare the response to the result(s) from the VM(s).
Question: What software and versions of software are running on those systems?
Automated banner grabbing
If there are a number of ports to banner grab from, it is more efficient to use an automated approach.
Netcat can be used to banner grab over a range:
nc ==edit:IP-address== 1-2000 -w 1
The above command will connect to each port from 1 to 2000 (with a timeout of 1 second), and display any responses.
==action: Connect to each of the open ports you detected earlier, and view any banners.==
Flag: Find and submit flags to Hacktivity!
Hint: One of the flags is encoded using a common encoding method, and you will need to decode it.
Tip: Extra challenge: update your port scanner with your own code to do banner grabbing. ==hint: You want to read from each port, rather than write to them.==
Protocol analysis and fingerprinting
Question: Consider this: Why can’t you trust this information?
A: A problem with banner grabbing is that the software could be lying! Just because a web server is telling you that it is Apache or IIS, does not guarantee that it is.
The solution to this problem (from an attacker/security tester’s perspective) is the use of protocol analysis / fingerprinting of the service to determine what software is listening to the port. The way this works is by interacting with the server, sending different kinds of requests (also known as triggers), and comparing the way the server responds with a database of fingerprints.
The software that made this a popular security testing approach was Amap. Amap has two main features: banner grabbing (using the “-B” flag), and protocol analysis (using “-A”).
==VM: On your attacking system (Kali Linux):==
==action: Run Amap protocol analysis on each VM web server (repeat for each IP address):==
amap -A ==edit:IP-address== 80
This will tell you what protocol is in use on the port (HTTP), and an idea of what software is used.
Note: Amap is now somewhat outdated, and has been superseded by Nmap’s service and version detection. Some security testers prefer to use both, to compare results.
==action: Open the Nmap man page (“man nmap”) and scroll down to the title “SERVICE AND VERSION DETECTION”. Read the text after the title, and the entry for:==
- -sV (Version detection)
==action: Run Nmap service and version detection on each of the VMs web servers (repeat for each IP address):==
nmap -sV -p 80 ==edit:IP-address==
==action: Attempt detection for the 1000 ports that are scanned by default (repeat for each IP address):==
nmap -sV ==edit:IP-address==
Based on what you have learned:
Question: What web servers (and versions) are running on the VM(s)?
Question: What other services are running?
Operating system detection
Knowing the versions of software on a remote system is often enough to start looking for vulnerabilities. However, another important piece of information is knowing what operating system it is running. We need to know this before launching an exploit (so we can choose the correct payload), or just to get a better idea of whether that version of the software is actually vulnerable.
Nmap can do some clever analysis of the way the system communicates to detect the operating system running on the remote system. The official RFC (request for comment) specifications that define the way protocols such as TCP works contain some ambiguity (not 100% clear or prescriptive), so each OS works slightly differently in the way it handles network packets. Nmap detects the OS by sending lots of specially crafted packets to open and closed port on the system, and analyses the response3.
==action: Open the Nmap man page (“man nmap”) and scroll down to the title “OS DETECTION”. Read the text after the title, and the entry for:==
- -O (Enable OS detection)
==action: Run Nmap OS detection on each of the VMs web servers (repeat for each IP address):==
sudo nmap -O ==edit:IP-address==
Some other important Nmap features
We will also cover some other advanced Nmap features in other labs.
Nmap and output
Having the output to your screen is obviously helpful, but usually you will want to keep a record of Nmap’s findings to look back over later, to import into another security program for reporting, for vulnerability analysis (looking for vulnerabilities), or even for exploitation (attack). Here are a few of the main ways that Nmap can save output:
-
-oN filespec (normal output)
Essentially saves a copy of the output in a named file -
-oX filespec (XML output)
Saves an XML document containing the results. This is the most useful format for importing the results into another program. -
-oG filespec (grepable output)
Saves to a very simple column format, but is deprecated (that is, not encouraged for use, since it may be removed from later versions). -
-oA basename (Output to all formats)
Saves all of the above.
Tip: You may wish to read the man page for more details about the above features.
==action: Run Nmap on the target VM(s) and save the normal output:==
nmap -oN output ==edit:IP-address==
==action: Have a look at the output file:==
less output
Based on what you have learned:
Question: For each IP, run a scan with OS and version detection and output to all three output formats. Since the .xml file contains a lot of information, how might you reformat it to make it more readable?
Nmap GUIs
There are various graphical user interface (GUI) front-ends for Nmap, including the official Zenmap, which is illustrated in the figure below. Essentially the GUI can help to create the command for starting Nmap, and then runs Nmap and displays the results. The GUI can be helpful for beginners, and for saving scanning profiles, although most experts will generally prefer the command line. ==tip: Consider why the command line may be the preferable option==.
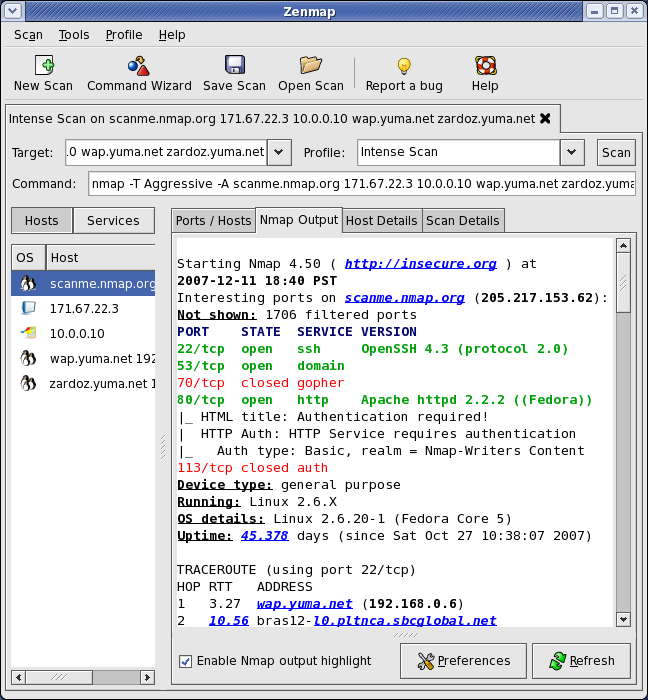
Note: Kali Linux recently removed Zenmap (and all python 2 programs), however, the screenshot above illustrates that these GUI programs provide an alternative interface. If you wish to learn more about it, you can find information at https://nmap.org/zenmap/. You could also spend a few minutes looking into alternative GUIs.
What next?
Now that you know what software is running on the host (even down to the version of the software running), you have everything you need to plan an attack on the system. From this point there may be more advanced methods of extracting information about the system (known as enumeration), or you may have gathered information that suggests the system is likely vulnerable to certain attacks.
Conclusion
At this point you have:
-
learned about ping sweeps, and how they work (and even worked with Bash code for a ping sweep script)
-
learned about port scanning, run a script, and used many important port scanning methods and command line options using Nmap
-
performed banner grabbing manually and automatically using protocol analysis
-
experimented with other features of Nmap (the most used scanner), such as file output, and familiarised yourself with a graphical frontend for Nmap
Congratulations! This was a lengthy lab, but these concepts are very important, and these are essential stages in security testing.
There are flags to be found in the banner grabbing tasks, and an opportunity to exploit a familiar vulnerability.
Tip: When you have some time, it is highly recommended to try the extra challenge of writing your own port scanner from scratch in a programming language of your choice (such as Python, Perl, Java, or C). You could add the ability to grab and auto-decode the banners, then save the output to a file.
Footnotes
-
Note that the list scan below may take a while to run (around 5 ½ minutes). Feel free to leave it running and carry on working on another tab if you prefer. ↩
-
Or have the appropriate Linux capability, although understanding this is outside of the scope of this lab. ↩
-
For a technical description of how Nmap’s OS detection works: http://nmap.org/book/osdetect-methods.html ↩