Contents
General notes about the labs
Many of the tasks you complete within our labs could be considered illegal if targeted at a computer that you do not have explicit permission to interact with, do security tests on, and attack. In short, keep all activity contained to our labs and to computers you have legal permission to attack1. Use common sense, and act within the law, ethically, and according to your own morals. With power comes responsibility, use it wisely.
One of the interesting and inevitable things about working with security attacks, is that because we are often intentionally “breaking” things and making them misbehave for our own intentions, sometimes things do not go exactly according to plan, software may crash or behave erratically. This adds to the challenge, and may require some troubleshooting.
The labs are written to be informative and, in order to aid clarity, instructions that you should actually execute are generally written in this colour. Note that all lab content is assessable for the module, but the ==action: colour coding may help you skip to the “next thing to do”==, but make sure you dedicate time to read and understand everything. Coloured instructions such as ==edit: this== indicates you need to change the instructions based on your environment: for example, using your own IP address.
Often the lab instructions are intentionally open ended, and you will have to figure some things out for yourselves. This module is designed to be challenging, as well as fun!
However, we aim to provide a well planned and fluent experience. If you notice any mistakes in the lab instructions or you feel some important information is missing, please let us know (via GitHub) and we will try to address any issues.
Preparation and logging in
Click here to read through a guide to using Hacktivity.
This includes some important information about how to use the lab environment and how to troubleshoot during lab exercises. Read through this now before continuing.
Action: For all of the labs in this module, start by logging into Hacktivity. Sign up for the module, claim a set of VMs for lab 1, and start your VMs.
==VM: Interact with the Desktop VM==. (Click the launch icon after the VMs have started):
![]()
Note: Note that a command shell will open automatically, and a username has been randomly generated for you.
Tip: To adjust the size of the terminal text, you can press “Ctrl”, “Shift” and “+” to increase it, or “Ctrl” and “-“ to decrease it.
==action: From the command line run:==
whoami
Your password is “tiaspbiqe2r” (this is a secure password but is quite easy 2 remember).
Note: You don’t (yet 😉) have root (superuser / admin) access to this desktop VM.
In any case, never log in to the desktop environment using the root account -- that is bad practice, and should always be avoided2.
Tip: Don’t waste time typing out the full commands and directory / file names - pressing the “Tab” key will autocomplete words, as long as nothing else starts with those letters (if it does, try typing a few more before pressing “Tab”). ==action: Try it now - type “whoa” then press “Tab”==. You should see the previous command complete itself.
Familiarisation with the environment
The desktop VM is a Linux system, which is based on Debian (a distribution of GNU/Linux3), and is configured with the KDE desktop environment4. Note that many of the VMs you will use are based on different Linux distros, with various desktop environments. Although different distributions may appear to be visually very different, the commands used for each are typically almost identical. By the end of your studies you will be familiar with many flavors of Linux. We will also be using other operating systems (OSs), such as Windows.
Side note: Linux distros have various levels of support for different desktop environments (such as KDE and Gnome), which can often be chosen upon install, and these change the user interface quite dramatically. Note that servers are often headless; that is, they have no graphical interface, and are typically configured via the command line.
A major difference between various distros is the way that software is organised and installed, and what is installed by default. Some distros are more suited to specific use cases, since they are designed to do certain things well. Beyond these differences, there are many great distributions, and comparisons often come down to a matter of preference.
Why study Linux in this module? Familiarity with Linux and Unix tools are valuable skills. Often Linux is the right tool for the job. Linux servers are common in large organisations, or any serious ICT setup. For example, Google and Facebook run most of their servers on Linux, and even Apple and Microsoft have been known to use Linux servers (as much as Microsoft may rather you not know that). Many security testing tools are only available on Linux, and there are many Linux distros that specialise in security testing, and are industry-standard.
Here is a brief summary of some of the most popular desktop flavours of Linux:
- Ubuntu:
- One of the most popular and user-friendly Linux distributions. It’s widely used for desktop and server applications. Canonical, the company behind Ubuntu, releases a new version every six months.
- Debian:
- Known for its stability and adherence to free software principles. Debian is the foundation for many other Linux distributions, including Ubuntu. It has a large community and a reputation for being a reliable choice for servers.
- Fedora:
- Sponsored by Red Hat, Fedora is known for its cutting-edge features and being a testing ground for technologies that may later be incorporated into Red Hat Enterprise Linux (RHEL). It’s popular among developers and enthusiasts.
- Arch:
- Known for its simplicity and flexibility. Arch is a rolling release system, providing the latest software updates continuously. It has a steep learning curve but is favored by users who want to customize their system extensively.
- Raspberry Pi OS:
- Specifically designed for the Raspberry Pi single-board computers. It’s the default operating system for Raspberry Pi devices and is optimized for low-resource usage, making it suitable for various projects and educational purposes.
- Steam OS:
- Developed by Valve Corporation, Steam OS is designed for gaming and intended for use with the Steam gaming platform. While it hasn’t gained widespread adoption as a general-purpose operating system, it remains relevant in the gaming community and is used in the Steam Deck console.
Each of these Linux distributions has its strengths and caters to different user preferences and needs, whether it’s ease of use, stability, bleeding-edge software, or specialized applications. The popularity of each distribution can vary depending on the target audience and use case.
Basic Linux command skills
We will start with a crash course in building your way to Linux command-line wizardry (you have to start somewhere), then quickly jump into network sniffing, password grabbing, remote administration of machines via ssh (secure shell), and other exciting things.
Here’s a brief cheat sheet of some common Linux/Unix commands:
| Command | Simplified description | Example usage |
|---|---|---|
pwd |
Check your current location in the file system | pwd |
ls |
Lists all the files in your current working directory, similar to “dir” on windows (-la shows details) | ls -la |
cp |
Copies files (-r to recursively copy directory contents) | cp file1 copy_of_file1 |
mv |
Moves (or renames) a file or directory | mv file1 file2 |
cat |
Prints the contents of a file to the console | cat file1 |
echo |
Prints a message to the screen | echo "hello, world!" |
mkdir |
Makes a directory | mkdir newdirectory |
cd |
Change working directory, to “move us into a different directory” | cd newdirectory |
Tip: If you ever get lost within the file structure, you can type “cd” on its own (no directory name afterwards) and you’ll return to your home folder. To go up just one level within the file system, type “cd ..” (“cd”, followed by a space then two full-stops.)
If you haven’t already, ==action: open a terminal console==.
Note: One way to do this is to start Konsole from KDEMenu → Applications → System → Terminal → Konsole.
Start by ==action: checking your current location in the file system==:
pwd
Continue by ==action: making a new directory, moving into it, and creating another directory there== (check you location using pwd if needed):
mkdir mydir
cd mydir
mkdir mydir2
==action: Display the contents of your working directory==:
ls
Note: Note that this is lowercase “LS”.
Ok, that lists the directory name, but doesn’t tell you much else…
Getting unstuck
If you don’t know what a command does, or what flags (command arguments) to use, then look it up in the manual, using the man command.
==action: Try it now==:
man ls
(and press enter when prompted which ls you are interested in learning about)
The cheat sheet above mentions how how to use ls to display more details. Scroll through the manual page you have just opened, and read about what “-a” does, and what “-l” does. You may wish to read about some of the other options and/or take some notes.
When you are done reading, press “q” to quit.
Now ==action: try it==. Run:
ls -la
Note: This is lowercase “LS -LA”.
This gives a much more satisfying output. The output includes permissions, the user who owns the file, filesize (in bytes), last time each file/directory was modified, and more. We will come back to the meaning of all this information in more detail another time.
You can also read the info page, which like the man page, also provides a summary of usage:
info ls
(press “q” to quit)
VI
Next, lets ==action: edit a file, using vi==, the “paragon of editing perfection”5, and most importantly the editor available on nearly every Unix and Linux system. Run:
vi mynewfile
Vi is ‘modal’: it has an insert mode, where you can type text into the file, and normal mode, where what you type is interpreted as commands. ==action: Press the “i” key to enter “insert mode”==. ==action: Type a message (such as “hello there”)==, then ==action: exit back to “normal mode” by pressing the Esc key==. Now to ==action: exit and save the file press the “:” key, followed by “wq” (write quit), and press Enter==.
Now you know everything you need to edit files using vi!
Tip: Side note: if you want to become a serious guru, take 10-20 mins to run through an online tutorial on vi. You will soon be impressing people with your wizard-like editing skills. What’s that you say? Want to delete 30 lines? In normal mode, just type “30dd”.
==action: Open the file using vi again, and add another line of text to the file. Save and quit==.
Next, ==action: list the files in your working directory again==. Then, ==action: refer to the cheat sheet to copy your new file to a file named “mynewfile2”==.
==action: Print the contents of the file to the console==.
Tip: If your terminal is getting a little crowded with text, press “Ctrl” and “l” (lower-case L) together to clear it.
Piping between programs
Another important command line skill is piping between programs. You can send the output (known as stdout) of one program to the input (known as stdin) of another. For example, imagine you had a large text file, and wanted to find all the lines that matched a certain pattern, and then sort those alphabetically. Doing this manually could take an impossibly long time, depending on the size of the file. Using some simple Unix commands we can do this easily.
Let’s start by ==action: printing the contents of a file on our system==. Run:
cat /etc/passwd
Note: The passwd file contains information about each of the user accounts on the local system.
Now if we wanted to see only the lines that contained the text “/home/”, we can use the grep command, to filter the output to only those lines. Run:
cat /etc/passwd | grep /home/
Note: There are user accounts that are not for normal users (with home directories), so this command will filter those out. Also, depending on your computer’s keyboard layout or language settings, you may find that the “|” and “~” keys are reversed, so try the other if you get an unexpected output.
And to put these in reverse alphabetical order, run:
cat /etc/passwd | grep /home/ | sort -r
Tip: Pressing the ↑ key (up arrow) or ↓ key (down arrow) allows you to cycle through previous commands. For example, after typing each command above, press ↑ to bring it back, then you can just add the new parts.
Redirecting to/from files
The final command line skill we will cover in this quick crash course is redirection to and from files. You can send the output (known as stdout) of a program to a file, or send the contents of a file to the input (known as stdin) of a program.
So for example, it is easy to ==action: save the output from a command to a file==. Run:
ps aux > processes
Note: The ps command lists the processes (running programs) on the system, and the “aux” flags tell it to show all of the processes in some detail. The command above writes a list of all the processes on the machine to a file named ‘processes’.
To ==action: display that file we can send the contents of the file to the cat program==:
cat < processes
Alternatively you can ==action: tell cat to read the file itself==:
cat processes
The difference is that the first version sends the contents of the file to the cat process, which just receives the lines of text and displays them, whereas the second command tells cat that you want it to open the file and read out its contents.
Another handy program is less, which gives you the ability to scroll through the file (as well as lots of other handy features). Run:
less processes
==action: Scroll through, and press “q” to quit when you are ready==.
==action: Write a one line command that only prints the processes that contain the text ‘bash’ to a file named ‘bashes’==.
Hint: Pipe the output from ps to grep, then redirect the output to a file.
Basic Linux networking
==action: Find your system’s IP address(es)==. Run:
/sbin/ifconfig
Note: This is similar in purpose to the ipconfig command on Windows.
Also ==action: try the newer command==:
ip a s
(Short for “ip address show”, which also works in full)
Finally, you can ==action: use the “hostname” command with the flag “-I” to display just your IP address(es)==:
hostname -I
Hint: In the Hacktivity environment, your IPv4 address will typically start either with “172.22” (where you are on a shared network with other students) or “10” (where you are on a more isolated network).
On many Linux systems you can leave off the /sbin/ part, depending on the $PATH environment variable, which lists where to look for programs to run. To ==action: see what your $PATH is currently set to==, run:
echo $PATH
Note: The echo command simply outputs something to the screen (so for example, “echo hello, world!” would print “hello, world!” to the console), and variables start with “$” in Bash, the Linux shell6.
You will see a list of folders, separated by the “:” symbol. Any executables contained within these folders will be accessible from any directory, without typing the path first.
Note that the commands to list IP addresses will display each of the network interfaces, including physical interfaces, and virtual ones. Ethernet ports will be represented as “eth0”, “eth1”, “ens3” and so on.
If you ever find that your ethernet port has not been allocated an appropriate IP address (for example, there was a problem with the DHCP server), you can usually ==action: remedy the problem (and get allocated an IP address) by running==:
dhclient eth0
or (depending on distro)
dhcpcd eth0
Note: You can also try restarting the entire network service, or bring up/down interfaces (ask Google or your tutor).
Virtualisation and our use of virtual machines (VMs)
Virtualisation is a very powerful tool, which can provide important security features, such as isolation, and is an important component of many modern cloud infrastructures. Virtualisation can create virtual environments, and can even run entire operating systems as though they were on separate hardware. This type of virtualisation is known as platform virtualisation, or hardware virtualisation. As illustrated in the figure below, virtualisation allows one set of hardware (a computer), to host a number of guest virtual machines (VMs), each with their own operating systems, applications, and virtual hardware.
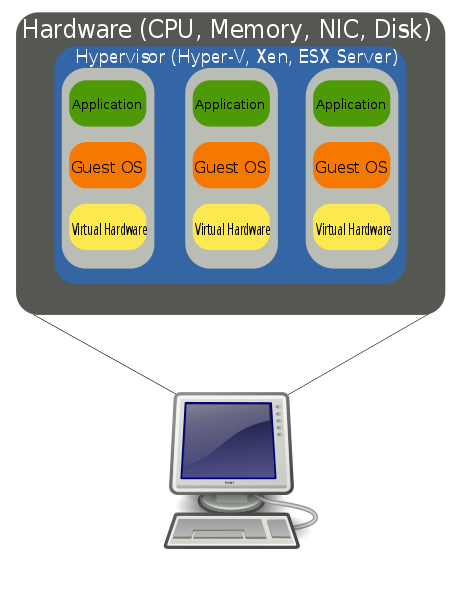 Hardware Virtualization (Image: public domain by John Aplessed)
.svg)
During the module we will make use of various VMs to recreate realistic security scenarios, typically generated by our software and running on our oVirt and Proxmox cloud infrastructure.
A note about working from home
You can access Hacktivity remotely to work on labs from home, and you might also be interested in setting up your own home lab environment with VMs installed locally. However, choosing to do work outside of our lab environment is at your own risk and responsibility.
Warning: The most important thing to consider is to ensure you are not acting illegally. As mentioned, many of the tasks we do in our isolated labs could be considered illegal if targeted at someone else’s servers. Any tasks done in your own environment should be contained to your own personal computer(s), and to be sure you should disconnect your personal lab from all external network connections. If in any doubt, only complete the exercises within our secure labs.
Ideally you would have a PC with VMware Player and Virtualbox installed. Keep in mind that your mileage will vary, and we cannot provide support for your own home setups. Getting some practice with Linux outside of the labs (either installed on your computer or through a VM) will also help with upcoming lessons.
Introduction to Kali Linux
In 2013, Offensive Security released Kali Linux, the successor to the very popular BackTrack Linux distribution.
Kali Linux is a Linux distribution especially designed for penetration testing, and forensics. These distros have become the industry standard for ethical hacking.
If you have not already done so (it should already be running), start and interact with the Kali VM. The username is “kali”, with password “kali”.
==action: Start by browsing through the tools that are available==.
==action: Click the “Applications” menu → hover over any of the numbered subdirectories==
There are an amazing amount of security/hacking tools included with Kali. ==action: Take a few minutes to familiarise yourself with the layout of this menu==.
Most of these programs are command line tools. ==action: Open a terminal, by clicking the console icon==
![]()
This is where the magic happens!
To further emphasise the sheer amount of awesomeness tools, run:
ls /usr/bin
Have a quick scroll through the vast “arsenal” of tools. Do you already recognise any of these programs?
Remote shell access and SSH
Secure shell (SSH) is a network protocol that enables secure communication between two computers on an insecure network. The primarily purpose of SSH is to provide an encrypted remote shell (command line) session, for executing commands on a remote server. This is safer than the old insecure method of remote logins using Telnet or rlogin, which have no encryption and can be easily attacked (by simply listening to network traffic, which includes user logins with passwords).
In addition to remote shell access, SSH can also be used for encryption of other kinds of connections, and can be used for SSH tunneling, SCP file transfers, VPNs, and so on. In short, it is very useful.
SSH involves a server listening to a port (typically on TCP port 22, it can be a good idea to change this), and a client connects and sends commands. The protocol uses a form of public-key cryptography for authentication and encryption7.
Now lets see ssh in action.
On your Desktop system
==action: Confirm that a local SSH server (sshd) is running on your system==:
/usr/sbin/service sshd status
Note: On Kali “/usr/sbin/” is not necessary, since you are logged in as root (again, running everything as root is normally a bad idea, but for security testing purposes is ok).
When the sshd service is running, other users can SSH into your machine (if they have valid credentials), and issue commands.
On your Kali system
To illustrate this, ==action: ssh into your Desktop VM==. Run this command to ssh into the server:
ssh ==edit:username==@==edit:IP-address-of-Desktop==
Where username is the desktop user’s username, as shown previously by the whoami command, and the IP address is the address of the Desktop.
If you leave out the username (and @ symbol),the username you are logged in as is used to connect to the remote system (which won’t work here, as we are running as root on Kali). This is also an instance where keyboard layout and language can cause the incorrect symbol to be typed - you may find that the “@” symbol and “ symbol (quote mark) are reversed.
==action: Enter the password given to you at the start of the lab, “tiaspbiqe2r”==.
You should ==action: check the fingerprint displayed, to confirm you are connecting to the machine you think you are connecting to==. This protects against man-in-the-middle attacks, where you think you are connecting to a trusted server, but are actually being fooled into talking to a malicious host, who may be intercepting or modifying the communications.
To ==action: check the fingerprint, on the desktop run==:
ssh-keygen -lf /etc/ssh/ssh_host_rsa_key.pub
Hint: you may also need to check other .pub files in that directory
If the fingerprint presented to you while connecting matches, type “yes”, and from then on if you connect to the same machine you won’t be prompted.
Tip: If you wish to copy / paste commands within the terminal, press the “Shift” key along with the usual shortcut - “Shift”, “Ctrl” and “c” will copy, “Shift”, “Ctrl” and “v” will paste.
If all has gone well you are now sharing the computer. ==action: Use these commands and interpret the output==:
hostname
/sbin/ifconfig
whoami
top
who
write ==edit:username==
ps aux
Hint: remember, if you are not sure what a command does, check its man page, using “man command”.
==action: Try running “kate” on the remote system, why doesn’t that work?==
==action: Log out of the ssh session (run “exit” or press Ctrl-D)==
Warning: Be careful, if you exit one too many times your current terminal console will close (the username within the terminal should indicate which account you are currently using).
Now ==action: try adding the command line argument “-X” which forwards X11 traffic, so that graphical programs have their interfaces forwarded to your local X server==:
ssh ==edit:username==@==edit:desktop-ip== -X
==action: Retry running “kate”==.
Now the program is running on the remote server, but displayed locally! You should be able to graphically edit files on the remote system. ==action: Try adding some text and saving it==. You should then be able to view the new document back on the Desktop machine.
When you are finished, simply ==action: run “exit” or press Ctrl+D to exit back to your own local terminal==.
Hacking SSH via online bruteforce attacks
Now, for those of you hanging out to hack something!
One approach to attacking SSH servers is to attempt remote logins.
Hydra is an online login tool, which can test login credentials (and bruteforce them) against a long list of different protocols/services, including SSH.
Services Hydra can check credentials include: Asterisk, AFP, Cisco AAA, Cisco auth, Cisco enable, CVS, Firebird, FTP, HTTP-FORM-GET, HTTP-FORM-POST, HTTP-GET, HTTP-HEAD, HTTP-POST, HTTP-PROXY, HTTPS-FORM-GET, HTTPS-FORM-POST, HTTPS-GET, HTTPS-HEAD, HTTPS-POST, HTTP-Proxy, ICQ, IMAP, IRC, LDAP, MEMCACHED, MONGODB, MS-SQL, MYSQL, NCP, NNTP, Oracle Listener, Oracle SID, Oracle, PC-Anywhere, PCNFS, POP3, POSTGRES, Radmin, RDP, Rexec, Rlogin, Rsh, RTSP, SAP/R3, SIP, SMB, SMTP, SMTP Enum, SNMP v1+v2+v3, SOCKS5, SSH (v1 and v2), SSHKEY, Subversion, Teamspeak (TS2), Telnet, VMware-Auth, VNC and XMPP.
==action: Use Hydra to test a known username and password combination==:
hydra -l ==edit:username== -p tiaspbiqe2r ==edit:IPADDRESS== -t 4 ssh
On your Desktop system
==action: Confirm the user home directories present==:
ls /home/
There is a victim account… ==action: Can you read the victim’s files in other users’ home folders?==
ls /home/victim
No. (Not yet!)
On your Kali system
Hydra can receive a list of passwords to attempt. But which passwords should you try? ==action: List some of the wordlists available on Kali==:
ls /usr/share/wordlists/seclists/Passwords/Common-Credentials
==action: Which of these are most likely to work against SSH credentials?==
==action: Use some password lists to use Hydra to crack the victim account on Desktop==:
hydra -l victim -P /usr/share/wordlists/seclists/Passwords/Common-Credentials/==edit:File_name== ==edit:DESKTOP-IP-ADDRESS== -t 4 ssh
Where filename is a password list.
Warning: Using the wrong list will take a REALLY long time to try to crack credentials using online methods (and can quickly result in your IP address being blocked from some online services). To stop the scan press Ctrl-C, and try a different password list file.
Once you have identified login credentials for the victim account, ==action: SSH to the desktop using the victim credentials==.
Once you have access to the victim user, ==action: look in the victim user’s home directory for a flag==. ==action: Read the flag file in the victim’s home directory with the command==:
cat /home/victim/flag
There is another account to be hacked, the “bystander” user. There is a flag. ==action: Try to access it using==:
cat /home/bystander/flag
The victim can’t access it directly (neither can your user).
Note that the victim user has the extra ability to act as a superuser (root). As the victim, ==action: use the “sudo” command to act as root and access the “bystander” user’s files==.
sudo cat /home/bystander/flag
Flag: Submit all flags to Hacktivity to show you have completed these tasks.
Conclusion
At this point you have:
-
learned about our lab environment for the module, including some of the virtual machines we will be using;
-
developed some very important Unix/Linux command line skills, including common commands and piping between processes;
-
learned some basic Linux networking commands and skills;
-
learned about remote administration using SSH;
-
conducted bruteforce online attacks using Hydra.
Well done! Not bad for the first week!
Footnotes
-
See the section about working from home for some more details about setting up your own isolated lab ↩
-
For more information, see: http://en.opensuse.org/SDB:Login_as_root ↩
-
Overview of what a Linux distribution is: http://en.wikipedia.org/wiki/Linux_distribution ↩
-
KDE happens to be my (Cliffe’s) favourite desktop environment for everyday use, but you should play around with others and make up your own mind. Note that Kali Linux is not really designed for everyday desktop use. ↩
-
Vi vs Emacs: http://en.wikipedia.org/wiki/Editor_war ↩
-
A shell is the processor that interprets commands, and on Linux that is commonly Bash: https://en.wikipedia.org/wiki/Bash_%28Unix_shell%29 ↩
-
Public-key crypto will be covered at a later stage in your studies, but if you are curious now here is an overview: http://en.wikipedia.org/wiki/Public_key ↩